Wiring rock lights on a Jeep can transform your off-road adventures. These small but powerful LED lights help you see obstacles at night and add a stylish glow under your vehicle. Many Jeep owners want to install rock lights but worry about wiring mistakes or safety.
This guide makes the process clear, step-by-step, and shows you how to avoid common errors. Whether you’re new to vehicle mods or have some experience, you’ll learn how to wire rock lights safely and efficiently.
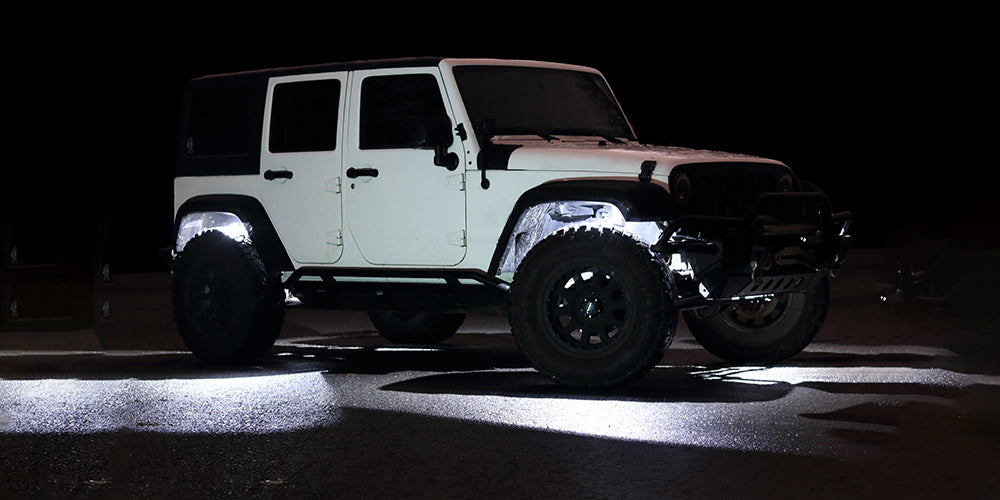
What Are Rock Lights And Why Install Them?
Rock lights are compact LED lights mounted under your Jeep. They shine on the ground to help you spot rocks, mud, or uneven terrain when driving off-road at night. Besides safety, rock lights boost your Jeep’s appearance, making it stand out during night rides or car meets.

According to a 2023 survey from Off-Road.com, over 60% of Jeep owners who drive on trails after sunset use extra underbody lighting. The main reasons are better visibility and personal style.
Tools And Materials Needed
Before starting, gather the right tools and parts. Missing items can cause delays and mistakes.
- Rock light kit (usually comes with 4-8 LED lights)
- Wiring harness (often included in kits)
- Relay and fuse (protects your Jeep’s electrical system)
- Switch (to turn lights on/off)
- Drill and bits (for mounting)
- Wire strippers and cutters
- Electrical tape
- Zip ties
- Screwdriver
- Multimeter (for checking connections)
Most kits range from $50 to $150 depending on quality and number of lights. Choose waterproof, high-lumen lights for best results.
Planning The Installation
Think about where to mount each rock light. Common spots are wheel wells, underbody frame, and front/rear bumpers. Make sure every area you plan to light is easy to reach and away from moving parts. This planning avoids future repairs and improves lighting coverage.
Here’s a quick comparison of typical mounting locations:
| Location | Visibility | Installation Difficulty |
|---|---|---|
| Wheel Wells | Excellent | Moderate |
| Underbody Frame | Good | Easy |
| Bumpers | Moderate | Hard |
Step-by-step Wiring Guide
Follow these steps for a safe and neat installation.
1. Mount The Rock Lights
Use the drill to create holes in chosen locations. Secure lights with screws, making sure the wires face upward and away from moving parts. Use zip ties to keep wires tidy.
2. Route The Wires
Run the wires toward the engine bay, avoiding hot spots like the exhaust. Use zip ties to attach wires to the frame. This prevents wire damage and keeps your setup neat.
3. Connect To Relay And Fuse
A relay lets you draw power safely from the battery. Connect the positive wire from the lights to the relay, and install a fuse (usually 15A to 30A, depending on your kit). This protects the system from short circuits.
| Fuse Size | Max Lights Supported | Safety Level |
|---|---|---|
| 15A | 4 | High |
| 20A | 6 | Medium |
| 30A | 8 | Low |
Tip: Use a fuse slightly above your total amp draw. For example, if your lights use 12A, a 15A fuse is safe.
4. Wire The Switch
Mount the switch inside the Jeep, near the dashboard or driver’s seat. Run the wire from the relay to the switch. This lets you control the lights easily.
5. Connect To Battery
Attach the relay’s main power wire to the positive battery terminal. Connect the ground wire to a clean metal part of the Jeep’s frame. Use a multimeter to check for good continuity.
6. Test The System
Turn on the switch and check each light. If any don’t work, use the multimeter to check the connections. Fix loose wires or replace damaged parts as needed.
Practical Tips For Beginners
- Label wires as you work. This helps with troubleshooting later.
- Seal connections with electrical tape or heat shrink tubing. This prevents water damage.
- Double-check fuse size before powering on. Using too small a fuse can cause it to blow; too large can risk fire.
- Avoid wire splicing unless necessary. Kits often include plug-and-play connectors.
- Plan for future upgrades. Leave extra slack in wires if you might add more lights later.
A common mistake is mounting lights where mud or debris can easily cover them. Place lights where they stay visible and protected.
Safety And Legal Considerations
Some states limit underbody lighting on roads. Check local regulations before installing. For more details, see SEMA’s vehicle lighting guide.
Always disconnect the battery before working on wiring. Wear gloves and eye protection when drilling or handling wires.

Maintenance And Troubleshooting
Rock lights need little maintenance, but you should:
- Inspect for loose wires monthly.
- Clean lens covers for maximum brightness.
- Replace burnt-out LEDs promptly.
If lights flicker or fail, check connections, fuse, and relay first. Most issues come from loose wires or water getting into connectors.
Frequently Asked Questions
How Many Rock Lights Should I Install On My Jeep?
Most kits offer 4 to 8 lights. Four is enough for basic lighting. Eight covers all wheels and adds extra style. Choose based on your needs and budget.
Can I Connect Rock Lights To My Existing Jeep Wiring?
It’s safer to use a separate wiring harness and relay. Connecting to factory wiring can cause overload and electrical problems.
Do Rock Lights Drain The Battery Quickly?
LED rock lights use very little power. For example, eight lights typically draw less than 3A total. Running them for hours won’t drain a healthy battery, but avoid leaving them on overnight.
Are All Rock Lights Waterproof?
Most quality kits offer IP67 or IP68 ratings. Check your kit’s specs before buying. Waterproof lights last longer and resist mud and rain.
What’s The Best Way To Prevent Wiring Problems?
Seal all connections, use zip ties, and avoid routing wires near heat sources. Regular checks help catch issues early.
Wiring rock lights on a Jeep is a rewarding project. With good planning and care, you can enjoy safer night rides and a cool new look. The steps above give you a clear path from start to finish. Take your time, follow safety advice, and your Jeep will shine on every trail.