Installing an LED light bar on your Jeep is one of the best upgrades for off-road driving or night adventures. A well-wired LED bar gives you brighter, more reliable lighting than factory headlights. But wiring it the right way is key for safety and performance. Many first-timers worry about damaging their Jeep’s electrical system or making mistakes that could cause a short circuit. With a clear step-by-step approach, you can do this upgrade confidently and avoid common pitfalls.
Tools And Materials You Need
Before you start, collect all the essential tools and parts. Missing one item can delay your project or force you to use unsafe shortcuts.
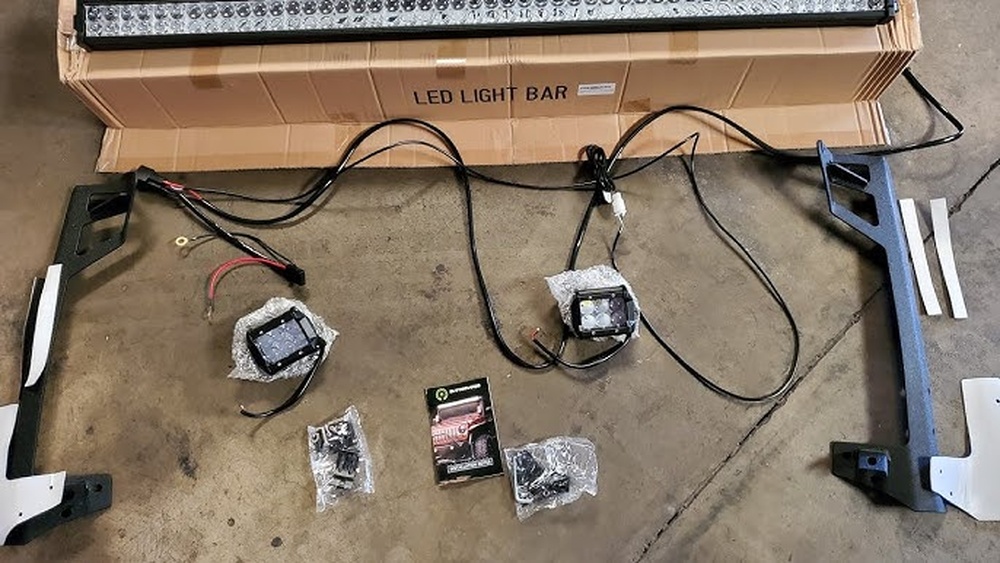
- LED light bar kit (includes bar, brackets, wiring harness)
- Wire strippers and crimpers
- Electrical tape and zip ties
- Fuse tap or add-a-circuit kit
- Inline fuse (usually 15-30 amps)
- Relay (most kits include one)
- Switch (toggle or rocker)
- Screwdrivers and wrenches
A complete kit often provides most wiring parts, but check before you buy. Some cheaper kits lack a relay or quality wiring, so double-check what’s included.
Planning The Install
Choosing the right mounting location is crucial. Most Jeep owners install the LED bar on the roof, bumper, or grille. Each spot has benefits:
| Location | Pros | Cons |
|---|---|---|
| Roof | Maximum coverage, high visibility | More wind noise, visible wires |
| Bumper | Easy wiring, less wind noise | Lower light spread |
| Grille | Sleek look, hidden wires | Limited bar size |
Think about wire routing before you start. Avoid moving parts, hot areas like the engine block, and sharp edges. Planning your wire path reduces the chance of future problems.
Step-by-step Wiring Process
Let’s break down the safest way to wire your LED light bar.
1. Mount The Light Bar
Install the brackets securely using the hardware provided. Tighten bolts evenly so the bar doesn’t shift when you hit bumps. Double-check that the bar is level and won’t block your view.
2. Position And Route The Wires
Lay out the wiring harness from the light bar to your battery and switch. Use zip ties to keep wires neat and away from any moving parts. Run the switch wire through the Jeep’s firewall—there’s usually a rubber grommet you can use.
3. Connect The Relay And Fuse
Most kits use a relay for safety. Mount it close to the battery but away from heat and water. Insert an inline fuse on the power wire—never skip this step. A fuse protects your Jeep if there’s a short circuit.
4. Wire To Power And Ground
Connect the positive (red) wire to the battery’s positive terminal. The negative (black) wire goes to a solid ground point on the Jeep’s frame, not just any metal bolt. Clean the ground spot for the best contact.
5. Install The Switch
Mount the switch in a convenient spot inside your Jeep. Many owners use a blank panel near the dashboard. Connect the switch wire to the relay, following your kit’s wiring diagram. Test that the switch works before securing everything.
6. Test Your Setup
Before finalizing, turn on the Jeep and test the light bar. If it flickers or doesn’t turn on, check your connections and the fuse. Once it’s working, secure all loose wires with electrical tape or zip ties.
Common Mistakes To Avoid
Even with good instructions, some errors happen often—especially for beginners.
| Mistake | What Happens | How to Prevent |
|---|---|---|
| No relay or fuse | Electrical fire risk | Always use both for safety |
| Poor ground connection | Light flickers or fails | Clean the ground spot well |
| Wires near hot areas | Melted insulation, shorts | Route wires away from engine heat |
| Loose mounting | Light bar shakes or falls | Tighten bolts and use lock washers |
Many people overlook the importance of a properly rated fuse. If you use a fuse that’s too high, it won’t protect your system. Always match the fuse size to your bar’s amp rating.
Another detail: factory wiring is not designed for high current. That’s why you should never tap your light bar directly into headlight wires. Use the battery with a relay for best results.

Extra Tips For A Clean Install
- Use wire loom or split tubing to protect wires from dirt and rubbing.
- Leave a bit of extra wire length for future adjustments.
- Label your wires if you plan more accessories later.
- After heavy off-roading, check all connections and mounts.
A clean install isn’t just about looks—well-secured wires last longer and are safer.
When To Seek Professional Help
If you feel unsure about any step, it’s smart to ask for help. Modern Jeeps have sensitive electronics (like CAN bus systems) that can be tricky. If your Jeep uses advanced controls, a professional installer can ensure you don’t void your warranty or cause electrical issues.

Final Thoughts
Wiring an LED light bar on your Jeep is a rewarding DIY project. It brings better visibility and a unique look to your ride. Careful planning, using the right parts, and avoiding shortcuts keep your Jeep safe. Always test your setup before heading out on the trail. For extra guidance or wiring diagrams, the Jeep official site is a helpful resource.
Frequently Asked Questions
What Size Fuse Should I Use For My Led Light Bar?
Check your light bar’s amp rating. Usually, a 15-30 amp fuse works for most bars. Never use a larger fuse than needed, as this can increase fire risk.
Can I Wire The Led Light Bar To My Jeep’s Headlight Switch?
It’s possible, but not recommended for most people. The factory switch and wires aren’t designed for extra current. Use a separate relay and switch for safety.
How Do I Run Wires Through The Jeep’s Firewall?
Look for a rubber grommet already in use for other wires. Carefully poke a hole, add your wire, and seal it with silicone to prevent leaks.
Is A Relay Necessary For A Small Led Light Bar?
Even for small bars, a relay prevents damage to your switch and wiring. It’s always a good idea to use one.
Will Adding A Light Bar Drain My Battery?
If wired correctly and used with the engine running, your alternator keeps up with the extra load. Avoid using the light bar for long periods with the engine off.
Wiring your Jeep’s LED light bar can be straightforward if you follow these steps. Take your time, double-check each connection, and you’ll enjoy safer adventures at night.