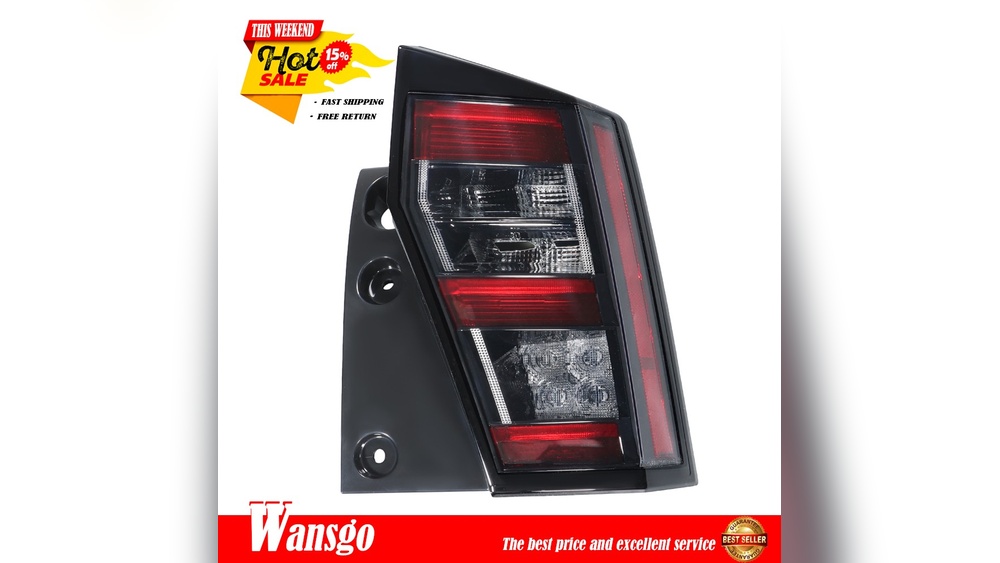
Removing the tail light on your 2018 Jeep Latitude might sound challenging, but with the right steps, it’s a manageable job. Whether your tail light is broken, the bulb has burned out, or you want to upgrade to LED, knowing how to remove it safely can save you time and money. This guide explains each step, the tools you need, and a few expert tips that beginners often miss.
Why You Might Need To Remove The Tail Light
There are several reasons drivers need to take out the tail light:
- Replace a burnt-out bulb
- Fix a cracked or damaged lens
- Upgrade to a brighter or custom light
- Check for wiring issues
Driving with a faulty tail light is not just unsafe; it can also result in a traffic ticket. Fixing the problem quickly keeps you and your Jeep safe on the road.

What You Will Need
Gather these tools before you start:
- Phillips screwdriver
- Flathead screwdriver
- Socket wrench set (8mm or 10mm sockets work for most tail light bolts)
- Work gloves (optional, for better grip)
- Clean cloth (to protect the paint)
Most beginners forget to check their socket size before starting. Always test your tools on the bolts first to avoid damaging the hardware.

Preparing Your Jeep Latitude
Before you touch the tail light, take a few minutes for setup:
- Park on a level surface and turn off the engine.
- Remove the keys and set the parking brake.
- Open the rear liftgate to access the tail light area.
- Clean the tail light with a cloth so you don’t scratch the paint while working.
Never try to remove the tail light while the car is running or in gear. This prevents accidents and protects your electrical system.
Step-by-step: Removing The Tail Light
Follow these steps for a safe and smooth removal:
1. Locate The Mounting Bolts
Open the rear liftgate. You’ll see two bolts holding the tail light assembly to the Jeep body, usually on the inside edge of the light.
2. Remove The Bolts
Use the correct socket wrench to loosen and remove the bolts. Put the bolts in a safe place—you’ll need them to reinstall the light.
3. Pry Out The Tail Light
Gently wiggle the tail light assembly. If it feels stuck, use a flathead screwdriver wrapped in a cloth to prevent scratches. Insert it between the light and the body and gently pry. Never force the light—Jeep tail lights often use plastic clips that can break if handled roughly.
4. Disconnect The Wiring Harness
The tail light is connected by a wiring harness. Squeeze the tab on the connector and pull it out. If it’s tight, wiggle it gently. Do not pull by the wires, as this can cause damage.
5. Remove The Tail Light
Now, the tail light assembly should come free. Set it on a clean towel to avoid scratches.
Here’s a quick comparison of the main steps and common mistakes:
| Step | Correct Action | Common Mistake |
|---|---|---|
| Remove Bolts | Use proper socket size | Stripping bolts with wrong tools |
| Pry Tail Light | Wrap screwdriver in cloth | Scratching paint or breaking clips |
| Disconnect Wiring | Pull connector, not wires | Damaging harness by pulling wires |

Tips For A Smooth Removal
- Label the wiring harness if you’re removing more than one tail light, so you don’t mix them up during reinstallation.
- Check the seals around the tail light. If they’re worn or cracked, replace them to prevent water leaks.
- Take photos before and during removal. This helps you remember how everything fits back together.
Many beginners forget to check the rubber seal, leading to leaks after reinstallation. Always inspect it before putting the light back.
Reinstalling The Tail Light
To reinstall, reverse the removal steps:
- Plug the wiring harness back into the tail light.
- Align the assembly with the Jeep body.
- Press it gently into place, making sure the clips snap in.
- Reinstall the bolts and tighten them securely, but don’t overtighten.
- Test the light before closing the liftgate.
Here’s a quick table to compare reinstalling vs. removing:
| Action | Key Difference |
|---|---|
| Reinstallation | Ensure tight seal, test light before finish |
| Removal | Protect paint, avoid breaking clips |
How Long Does It Take?
Most people can remove and reinstall a Jeep Latitude tail light in about 20–30 minutes. If it’s your first time, give yourself extra time to avoid rushing.
If you run into trouble—like a stuck clip or a damaged connector—don’t force anything. Consider watching a video from a trusted source like 1A Auto for more visual guidance.
Safety Reminders
- Work in a well-lit area.
- Wear gloves if possible, as edges can be sharp.
- Dispose of broken bulbs carefully—they can contain harmful materials.

Frequently Asked Questions
How Do I Know If My Tail Light Needs Replacing Or Just The Bulb?
If the lens is cracked or water is inside, replace the whole tail light. If only the bulb is out, you can often just replace the bulb.
Can I Drive With A Missing Tail Light?
No, it’s unsafe and illegal in most states. Always fix or replace the tail light before driving.
Are Aftermarket Tail Lights As Good As Original Jeep Parts?
Quality varies. Some aftermarket lights are excellent, while others may not fit perfectly or last as long. Always check reviews or buy from trusted sellers.
What If The Wiring Harness Won’t Disconnect?
Try pressing the release tab more firmly. If it’s stuck, spray a little electrical contact cleaner and wait a few minutes before trying again.
Where Can I Find The Right Replacement Tail Light?
You can find original parts at a Jeep dealership or high-quality aftermarket options from auto parts stores. The National Highway Traffic Safety Administration has information on lighting standards.
Taking out the tail light on your 2018 Jeep Latitude is a straightforward task if you follow these steps and tips. With the right tools and a careful approach, you’ll have your Jeep back in top shape—and safe for the road—in no time.