Replacing the antenna cable on a Jeep Wrangler is a task many owners eventually face. Over time, cables can become damaged by weather, off-road debris, or simple wear and tear. A faulty antenna cable leads to poor radio reception, crackling sounds, or even total radio silence. While it might seem tricky, swapping out the cable is manageable with basic tools, a little patience, and careful steps. This guide walks you through the process so you can restore clear radio signals and keep your Wrangler adventure-ready.
Why Replace The Antenna Cable?
A bad antenna cable is more than an annoyance. Weak reception can ruin long drives, and in remote areas, having a working radio is a matter of safety for emergency updates. The Jeep Wrangler, known for off-road adventures, often faces tough conditions that wear out its antenna system faster than most vehicles.
Common signs you need a new cable include:
- Static or no sound on all radio stations
- Visible damage to the antenna base
- Cable feels loose or frayed
Ignoring these signs can result in total radio loss, so replacing the cable early is wise.
Tools And Materials Needed
Before you start, gather these tools and materials:
- Replacement antenna cable (compatible with your Wrangler’s model/year)
- Phillips and flathead screwdrivers
- Ratchet and socket set
- Trim removal tool or plastic pry tool
- Electrical tape
- Flashlight (helpful for dark spaces)
- Gloves (optional, for comfort)
Not all Jeep Wrangler models are built the same. Double-check your user manual or look up your specific year for any unique steps. The process for a JK (2007-2018) is the most common, but other models are similar.
Step-by-step: Replacing The Antenna Cable
1. Disconnect The Battery
Safety first. Disconnect your Jeep’s negative battery terminal to avoid electrical shorts while working.
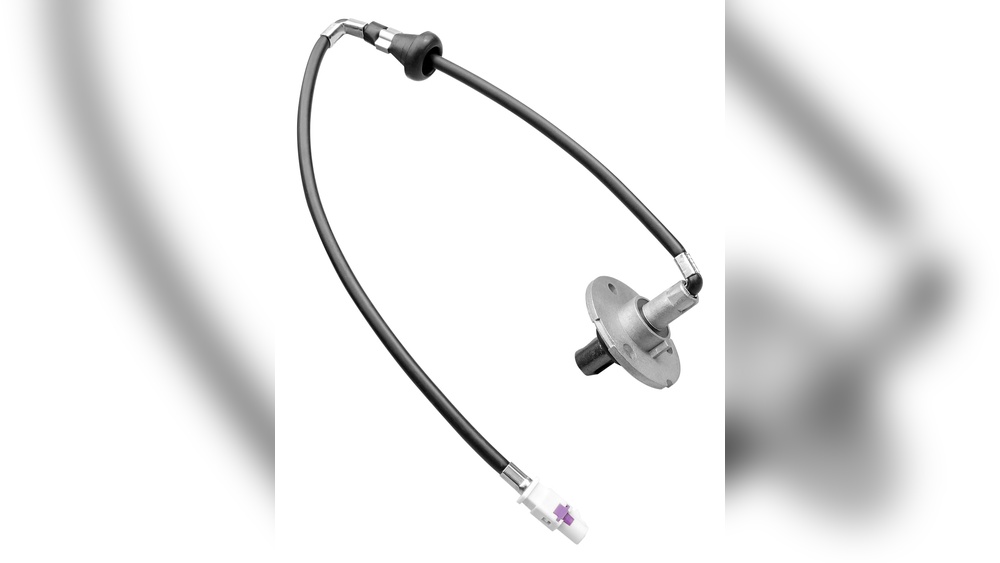
2. Remove The Antenna Mast And Base
Unscrew the antenna mast by hand. If it’s stuck, use pliers with a soft cloth to avoid scratching. Next, remove the screws holding the antenna base to the fender. Save these screws—they’re easy to lose.
3. Access The Cable Inside
The cable runs from the base, through the fender, and into the dashboard. You’ll need to remove the interior side panel near the glove box. Use a trim removal tool to avoid damaging clips or panels.
Tip: If this is your first time removing Jeep panels, go slowly. Force can break plastic clips, which are costly to replace.
4. Trace And Remove The Old Cable
Follow the cable from the antenna base into the dash. It usually connects to the back of your radio. Remove the radio using the correct size socket. Carefully unplug the antenna cable from the radio port.
Gently pull the cable out through the fender area, being careful not to snag or force it. If it’s stuck, check for hidden clips or tape along the path.
5. Install The New Cable
Feed the new antenna cable through the same path as the old one. This can be tricky—using the old cable to “fish” the new one through is a smart move. Tape the new cable end to the old one and pull gently from the other side.
Reconnect the cable to the radio and the antenna base. Secure any loose cable with electrical tape or zip ties to prevent rattling.
6. Reassemble And Test
Replace all panels, screws, and the antenna mast. Reconnect the battery, then turn on your radio. Test multiple stations to check for strong, clear reception.
If you hear static or have poor signal, double-check both cable connections.
Jeep Wrangler Antenna Cable: Common Mistakes
Even experienced DIYers make mistakes. Here are some problems to avoid:
- Forcing panels: Use gentle pressure and the right trim tools.
- Skipping battery disconnection: This can cause electrical shorts.
- Not securing the new cable: Loose cables can rattle or get pinched.
- Buying the wrong cable: Always match the cable to your Wrangler’s year and radio type.
- Overtightening screws: This can crack plastic parts or strip threads.

Comparing Antenna Cable Types
Choosing the right cable is important. Here’s a quick look at your main options:
| Type | Pros | Cons |
|---|---|---|
| OEM (Original Equipment) | Perfect fit, reliable quality | Higher cost |
| Aftermarket | Lower price, sometimes better length | May need adapter, fit not always exact |
| Heavy-duty/Off-road | Extra protection, water-resistant | Usually more expensive |
Cost And Time Expectations
Many drivers wonder if it’s worth doing this job themselves. Here’s what to expect:
| Factor | DIY | Professional |
|---|---|---|
| Average Cost | $20–$60 (parts only) | $100–$200 (parts + labor) |
| Time Needed | 1–2 hours | 30–60 minutes |
| Skill Level | Beginner to Intermediate | Not needed |

Pro Tips For A Smooth Replacement
- Take photos of each step so you can reverse the process if needed.
- Label screws and small parts in a cup or bag.
- Test the radio before fully reassembling the dash to avoid repeat work.
- If you notice corrosion on the cable ends or the antenna base, clean them with a small wire brush or replace corroded parts.
Most beginners overlook the importance of proper cable routing. If your cable crosses sharp edges or is pinched by a panel, it can fail again quickly. Take your time to route it smoothly, following the original path.
Another tip: Aftermarket antennas sometimes need adapters for the cable to fit the radio. Check before you buy to avoid surprises.
When To Call A Professional
If you’re not comfortable removing dashboard panels or dealing with tight spaces, it’s okay to get help. A car audio shop can finish the job quickly and safely. If your radio still doesn’t work after replacing the cable, the problem may be with the radio unit or antenna itself.
For detailed Jeep Wrangler specs, you can check the official Jeep website.

Frequently Asked Questions
How Do I Know If My Antenna Cable Is The Problem?
If your radio loses signal on all stations, or you see visible damage near the antenna base, the cable is likely the issue. Testing with a known good antenna can also help confirm.
Can I Use A Universal Antenna Cable?
Some universal cables fit, but not all. Wrangler dashboards are tight, and the radio connector is a special shape in some years. It’s best to check compatibility before buying.
Will Replacing The Cable Fix All Radio Issues?
Not always. If the radio itself is faulty, or the antenna mast is bent, you may need more repairs. But a new cable will solve most reception problems.
Do I Need To Remove The Whole Dashboard?
No. Usually, only the glove box area and radio need to come out. Most cables can be replaced without removing the full dash.
Is This Repair The Same For All Wrangler Models?
The basic steps are similar, but some years and trims have different panel layouts. Always check your model’s manual for any special instructions.
Replacing the antenna cable in your Jeep Wrangler can restore crisp, reliable radio for both daily drives and off-road adventures. With the right tools, a careful approach, and attention to detail, most owners can handle this project confidently and get back to enjoying their favorite stations.


