Replacing the fuel tank on a 1976 Jeep can seem difficult, but with the right steps, tools, and a careful approach, it’s manageable for most DIY mechanics. Over decades, rust, leaks, or clogging can make tank replacement necessary. The process involves safety, patience, and knowing how classic Jeep fuel systems work. If you prepare well, you’ll get your Jeep back on the road quickly.
Tools And Materials Needed
Before starting, collect these items:
- Jack and sturdy jack stands
- Wrenches (mainly 1/2″ and 9/16″)
- Screwdrivers (flat and Phillips)
- Fuel line disconnect tool
- Drain pan
- Replacement fuel tank (for 1976 Jeep, 15 or 20-gallon options)
- New fuel sending unit (recommended)
- Replacement hoses and clamps
- Penetrating oil
- Rags and eye protection
Having everything ready saves time and avoids last-minute trips.
Preparation And Safety
Classic Jeeps often have old fuel lines or brittle bolts. Start by parking on a flat surface, engaging the parking brake, and disconnecting the negative battery cable. Work in a well-ventilated area. Fuel vapors are dangerous, so never smoke or use open flames.
Spray all bolts and connections with penetrating oil. This helps loosen rusted fasteners, a common issue on older vehicles.

Draining The Old Tank
Removing fuel before dropping the tank makes it lighter and safer:
- Place a large drain pan under the tank.
- Disconnect the fuel line at the tank’s lowest point.
- Allow all fuel to drain completely.
- Dispose of old fuel according to local rules.
Some tanks have a drain plug. If not, use a siphon or disconnect the hose at the sender.
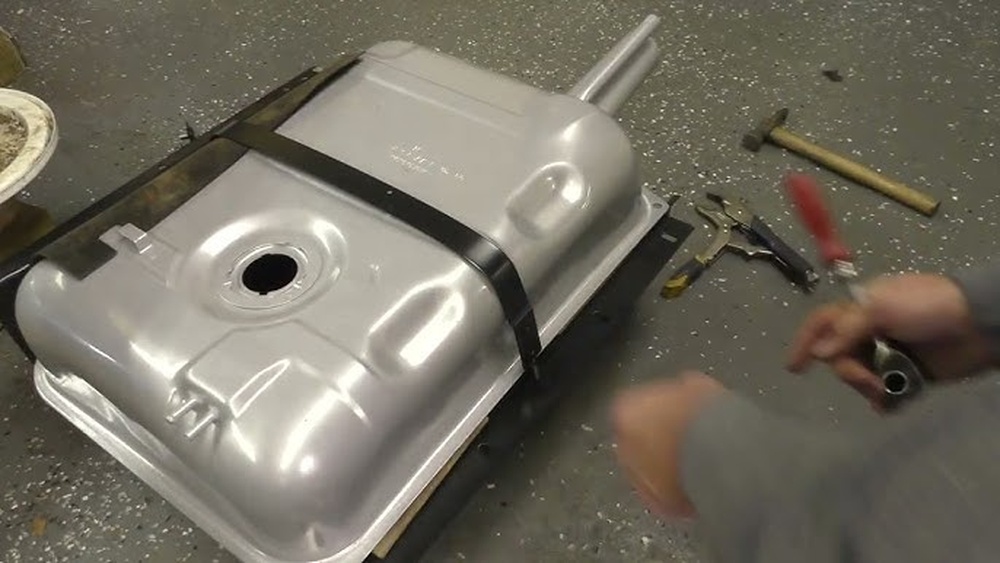
Removing The Old Tank
Once empty, follow these steps:
- Support the tank with a jack and wide board. Never trust the tank to stay in place once bolts are removed.
- Remove the fuel filler neck at the rear quarter panel. Loosen clamps and slide hoses off.
- Unplug the fuel sending unit wire and ground strap.
- Loosen then remove the tank’s mounting straps. Keep hardware if it’s reusable.
- Carefully lower the tank. Watch for any lines or wires still attached.
Older Jeep tanks can be heavy, even empty. Rust may cause them to stick; gentle rocking helps.
Comparing Old And New Tanks
Before installing, compare the replacement to the original. Here’s a quick comparison:
| Feature | Old Tank | New Tank |
|---|---|---|
| Material | Steel (often rusted) | Coated steel/plastic |
| Capacity | 15 or 20 gallons | 15 or 20 gallons |
| Rust Protection | Minimal | Improved coatings |
Check that the filler neck, mounting points, and sender hole match.
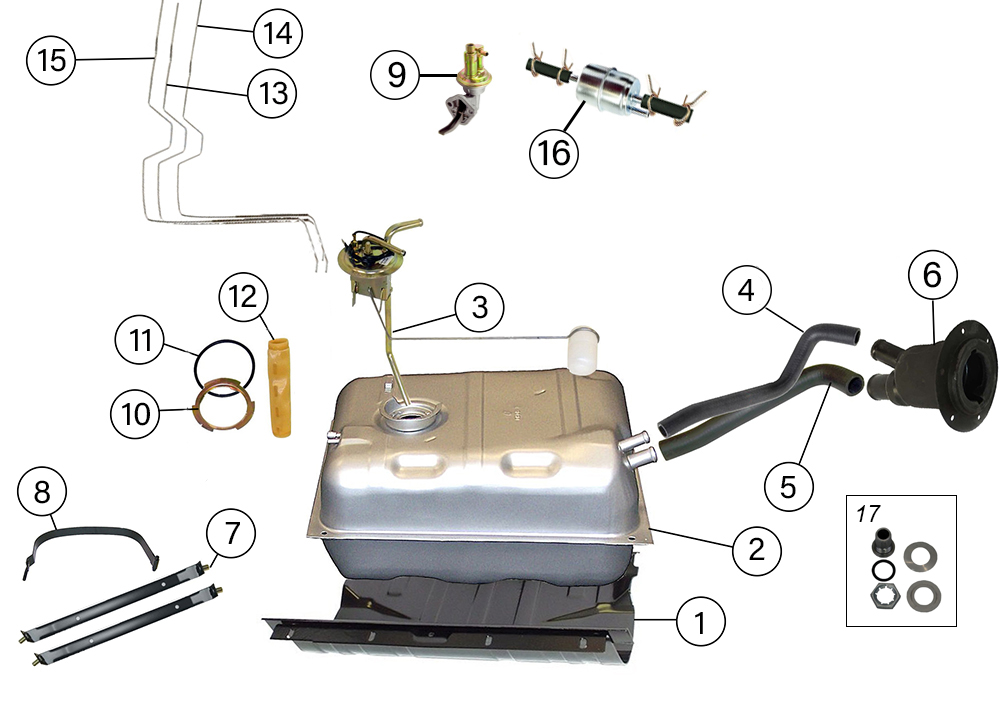
Installing The New Tank
- Install the new sending unit (if replacing). Use a new gasket to prevent leaks.
- Attach any hoses and clamps to the tank while it’s out, if possible.
- Lift the tank into place. A helper makes this easier.
- Reinstall the mounting straps and tighten securely. Don’t overtighten—straps can crush some tanks.
- Connect the fuel lines, filler neck, vent hoses, and sender wiring.
- Double-check all connections for tightness and alignment.
Here’s a reference for torque specs (approximate):
| Fastener | Torque (ft-lbs) |
|---|---|
| Mounting straps | 15–20 |
| Sender unit screws | 5–7 |
| Hose clamps | Hand-tight |
Testing For Leaks
Add a few gallons of fresh fuel. With the Jeep still raised, turn the key to the “on” position (don’t start the engine) and watch for leaks at all connections. Tighten fittings if needed.
Start the engine and let it idle. Check again. If everything is dry, lower the vehicle and test drive gently.
Common Problems And Solutions
Many first-time installers face these issues:
- Fuel gauge not working: Check the sender wiring and ground.
- Persistent leaks: Always use new gaskets, and inspect the filler neck hose for cracks.
- Hard starting: Bleed air from the line by cycling the key on/off several times.
Older hoses often split when moved. Replace any line that looks cracked or soft.
Tips For A Smooth Replacement
- Photograph connections before removal for easy reference.
- Label each hose and wire with tape.
- If mounting hardware is very rusty, replace it. Old bolts can snap easily.
- Upgrade to ethanol-safe hoses if possible, as modern fuels can damage older rubber.
- Save the old tank for recycling—most scrap yards will accept it.
Cost And Time Estimate
Expect 3–5 hours for a full replacement. Most replacement tanks cost between $120–$250. Additional hoses, clamps, and a new sending unit may add another $50–$100.
When To Call A Professional
If mounting straps are rusted to the frame or you see severe frame rust, consult a mechanic. Safety is critical, and sometimes professional help is the best choice.
For more technical details, check official Jeep resources such as the Jeep CJ-5 History page.
Frequently Asked Questions
How Do I Know If My 1976 Jeep Needs A New Fuel Tank?
Common signs are fuel smells, visible leaks, rust flakes in the fuel filter, or the tank failing a pressure test. Sometimes, the Jeep may stall or hesitate due to clogged pickup lines.
Can I Reuse My Old Fuel Sending Unit?
You can, but it’s not recommended. New tanks work best with a new sending unit to ensure accurate fuel readings and avoid leaks.
Are Plastic Tanks Better Than Steel For 1976 Jeeps?
Plastic tanks resist rust and are lighter. However, some owners prefer steel for originality. Both types fit, but check compatibility with your Jeep’s mounting straps.
Is It Safe To Weld A Leaking Fuel Tank?
No. Welding can ignite fuel vapors, even in “empty” tanks. Replace the tank instead—repairing is risky and rarely permanent.
What Fuel Capacity Options Were Available For 1976 Jeeps?
Most 1976 Jeeps had 15-gallon tanks. Some models came with 20-gallon tanks, especially CJ-7s. Always check your owner’s manual or existing tank for size before buying.
Replacing a 1976 Jeep fuel tank is a rewarding project. Take your time, follow safety steps, and enjoy the satisfaction of restoring a classic. With care, your Jeep will be ready for many more adventures.