Removing the shifter knob from a Jeep Wrangler can feel tricky if you’ve never done it before. Whether you want to swap in a custom knob, clean the area, or need access for repair, knowing the right steps makes a big difference.
Many Jeep owners worry about breaking something or damaging the threads. With the right guidance, you can handle this task confidently in your garage or driveway, even if you’re not a mechanic.
Understanding Your Jeep Wrangler’s Shifter Knob
Jeep Wranglers have different shifter knob designs depending on the model year and transmission type. Older models often use a threaded knob, while newer Wranglers (like the JK, JL, and Gladiator) use a press-fit or snap-on system. Before starting, check your owner’s manual or look up your Jeep’s specific year and transmission for details.
A common mistake is using excessive force. If you pull or twist the wrong way, you could damage the shift lever or the knob itself. Take your time to identify your knob’s attachment method.
Here’s a quick comparison of shifter knob types:
| Model Year | Attachment Type | Tools Needed |
|---|---|---|
| 1987–2006 (YJ, TJ) | Threaded | None/Gloves |
| 2007–2018 (JK) | Press-fit/Snap-on | Plastic Pry Tool |
| 2018–Present (JL, Gladiator) | Snap-on/Retainer Clip | Flathead Screwdriver |
Tools And Preparation
For most Jeep Wrangler shifter knob removals, you’ll need only a few basic tools:
- Work gloves (protect your hands)
- Plastic trim or pry tool
- Flathead screwdriver
- Clean rag
Make sure your Jeep is parked, the engine is off, and the parking brake is set. It’s best to work in good light so you can see any clips or fasteners clearly.
Step-by-step: Removing The Shifter Knob
1. Identify The Attachment Method
Gently move the shifter boot (the rubber or leather cover at the base) up to expose the bottom of the knob. Look for:
- Threads (older models)
- Clips or pins (newer models)
- Set screws (rare, but possible on aftermarket knobs)
2. Remove A Threaded Knob (yj, Tj)
For 1987–2006 Wranglers:
- Grip the knob firmly with one hand.
- Turn the knob counterclockwise (left) to unscrew it.
- If tight, use gloves for better grip.
- Continue until the knob comes off.
Tip: If stuck, spray a little penetrating oil at the base and wait a few minutes. Don’t use pliers—they can damage the knob.
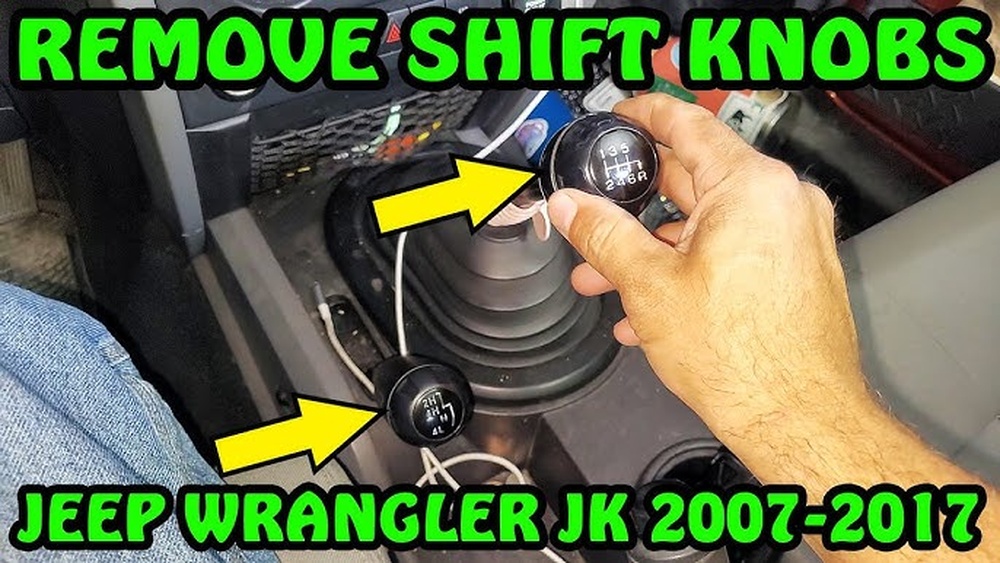
3. Remove A Press-fit Or Snap-on Knob (jk, Jl, Gladiator)
For 2007 and newer models:
- Insert a plastic pry tool or flathead screwdriver under the knob base.
- Gently pry upward to release the clips. Don’t rush—clips can break if forced.
- Some JL and Gladiator models have a retainer clip. Slide a small flathead screwdriver in, press the clip, and pull the knob straight up.
Be careful not to twist aggressively. If it won’t budge, double-check for hidden clips or set screws.
Here’s a comparison of removal techniques:
| Knob Type | Action | Difficulty |
|---|---|---|
| Threaded | Twist counterclockwise | Easy |
| Press-fit | Pull or pry up | Medium |
| Snap-on w/Clip | Release clip, pull up | Medium/Hard |
4. After Removal: Cleaning And Inspection
Once the knob is off, take a moment to:
- Clean the shift lever with a rag.
- Check for dirt or debris.
- Inspect the threads or clips for damage.
If installing a new knob, make sure it fits your lever type. Don’t force a threaded knob onto a snap-on shaft or vice versa.
Common Problems And Solutions
Many beginners make these mistakes:
- Using metal tools that scratch plastic or leather.
- Forgetting hidden screws under trim pieces.
- Not supporting the shifter while pulling (can bend the lever).
If the knob feels stuck, try gently rocking it back and forth while pulling upward. Patience and the right tool are key.
Installing A New Shifter Knob
Reverse the steps to install a new knob:
- For threaded knobs, twist clockwise until snug.
- For snap-on knobs, line up the clip and press down until it clicks.
- For knobs with a set screw, tighten the screw after positioning.
Always check that the knob is secure before driving. A loose shifter knob can be a safety risk.
Here’s a quick data table for shifter knob compatibility:
| Model | OEM Knob Fit | Aftermarket Knob Fit |
|---|---|---|
| YJ/TJ | Threaded (M10x1.5) | Most universal knobs |
| JK/JL | Snap-on | Model-specific only |
| Gladiator | Snap-on w/clip | Model-specific only |
Practical Tips
- If your Jeep has heated seats or shift boot lighting, unplug the connector before removing the knob.
- Take a photo of the assembly before starting, so you remember how it goes back together.
- Keep all clips and screws in a small container.
- If you’re unsure, consult your Jeep’s service manual or watch a model-specific video on YouTube for guidance.
Safety And Final Checks
After replacing the knob, shift through all gears to make sure the knob doesn’t interfere with shifting. Listen for any unusual sounds or resistance. If you notice anything odd, recheck the installation.
Frequently Asked Questions
Can I Reuse My Old Shifter Knob After Removal?
Yes, as long as you don’t damage the threads or clips. Inspect the knob for cracks before reinstalling.
Do I Need Special Tools To Remove The Shifter Knob?
Usually, only basic hand tools like a plastic pry tool or screwdriver are needed. Avoid metal tools if possible.
Will Removing The Shifter Knob Void My Warranty?
No, simply removing the knob will not void your Jeep’s warranty. However, damage caused by improper removal might not be covered.
How Do I Know If My Shifter Knob Is Threaded Or Snap-on?
Check your owner’s manual or gently lift the shift boot to see the attachment. Older Wranglers use threads; newer ones use clips or press-fit.
Where Can I Find More Information About Jeep Wrangler Maintenance?
A trusted resource is the Jeep Wrangler Wikipedia page for model histories and technical info.
Removing a Jeep Wrangler shifter knob isn’t difficult if you know the method for your model. Take your time, use the right tools, and double-check your work. This simple upgrade can make your Jeep feel more personal and help you get comfortable with DIY maintenance.