If you own a Jeep Grand Cherokee, knowing how to remove the front bumper can save you time and money. Whether you need to replace it after an accident, upgrade to a new style, or fix a fog light, this task is easier than most think.
With the right tools and a careful approach, anyone can do it at home. This guide gives simple, clear steps to help you remove your Jeep Grand Cherokee front bumper safely and efficiently.
Tools And Preparation
Before starting, gather all the necessary tools. Having everything ready will make the process smoother.

Essential tools:
- Socket set (metric and standard sizes)
- Flathead and Phillips screwdrivers
- Trim removal tool (plastic preferred)
- Ratchet and extensions
- Safety gloves
Check if your Jeep Grand Cherokee is a 2011–2020 model, as steps may vary slightly for other years. Always consult your owner’s manual for specific guidance.
Preparation tips:
- Park on a flat surface and turn off the engine.
- Disconnect the battery to avoid electrical issues.
- Take photos before starting. This helps with reassembly.
Step-by-step Bumper Removal
Removing the front bumper involves several steps. Be patient and careful, especially with hidden clips and wires.
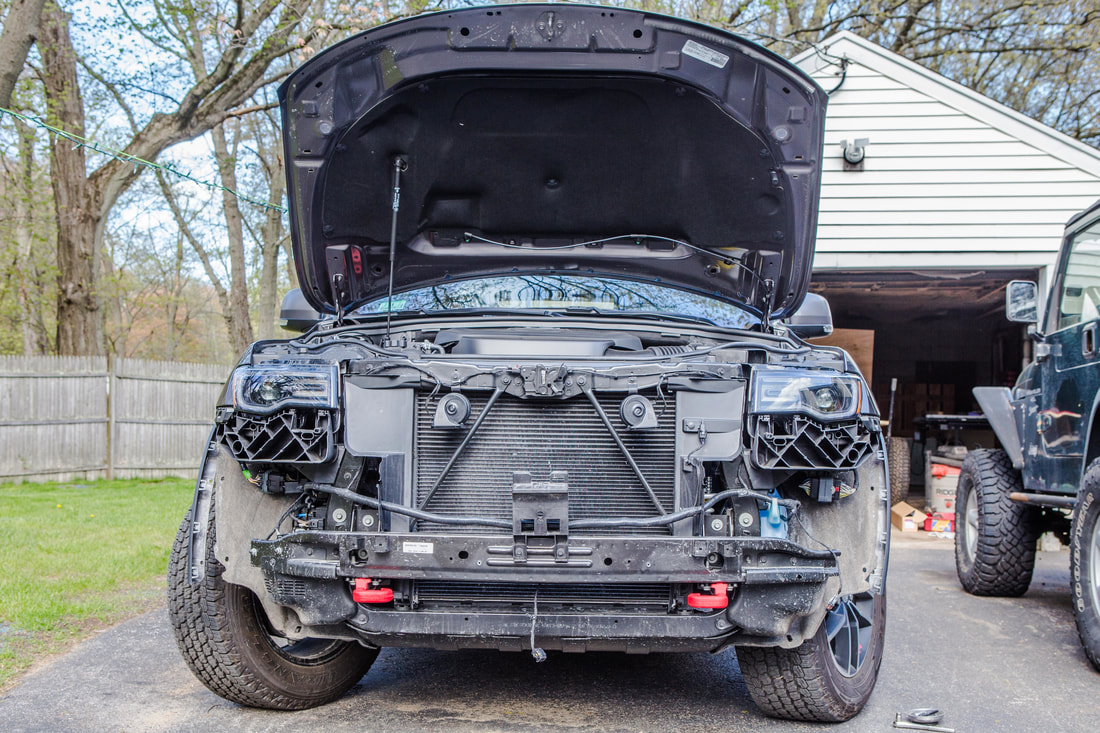
Remove The Grille And Top Screws
Open the hood and locate the screws above the grille. Use your socket set to remove 6–8 screws along the top edge. Gently lift the grille out if necessary.
Take Off Wheel Well Screws
Turn the steering wheel to expose the wheel wells. Inside each wheel well, you’ll find 4–6 screws or clips attaching the bumper to the fender. Remove these using a screwdriver or trim tool.
Detach Underbody Fasteners
Underneath the bumper, there are 5–7 bolts and clips holding it in place. Use a ratchet and socket to remove bolts, and the trim tool for plastic clips.
Unplug Fog Light And Sensor Wires
Carefully reach behind the bumper and locate any fog light or sensor wires. Press the release tabs and unplug these connectors. Take note of wire positions for reassembly.
Release Side Clips And Pull Off Bumper
The bumper has side clips connecting it to the fenders. Use your trim tool to gently pry the clips loose. Once all fasteners are removed, grip both sides and pull the bumper forward. If you feel resistance, check for missed bolts or wires.
Pro tip: Always lift the bumper straight out to avoid scratching paint or damaging mounting points.
Common Challenges And Solutions
Removing the bumper is not always straightforward. Here are some issues you might face:
| Challenge | Solution |
|---|---|
| Stuck clips | Use a plastic trim tool to avoid breaking them. |
| Rusty bolts | Spray with WD-40 and let sit for 10 minutes. |
| Hidden screws | Check under the wheel well liner and near fog lights. |
| Unplugging wires | Press the release tab firmly and wiggle connectors gently. |
Non-obvious tip: Some models have a hidden screw behind the license plate area. Always check this spot before pulling the bumper off.
Comparison: Diy Vs Professional Removal
If you’re unsure about doing the job yourself, compare the benefits and drawbacks:
| Method | Cost | Time | Skill Needed |
|---|---|---|---|
| DIY | $0–$50 (tools only) | 1–2 hours | Basic mechanical knowledge |
| Professional | $150–$400 | 30–60 minutes | None |
DIY removal is cheaper and can build your confidence. However, professionals work faster and handle tough problems easily.

Important Safety Reminders
Always follow these safety tips:
- Disconnect the battery to prevent shocks or short circuits.
- Wear gloves to protect your hands from sharp edges.
- Keep all screws, clips, and bolts in a labeled container.
- Never force parts—if something feels stuck, double-check for missed fasteners.
Extra insight: When reinstalling, check the alignment of the bumper. Misaligned bumpers can affect headlights and sensors.
Reinstallation Tips
Putting the bumper back on is almost the reverse of removal. Line up the bumper carefully, attach side clips first, then secure bolts and screws. Plug in all wires before tightening everything.
Quick checklist for reinstallation:
- Check all wire connections
- Align bumper with headlights
- Secure side clips and top screws
- Test fog lights and sensors before finishing
Jeep Grand Cherokee Model Differences
Bumper removal steps may differ depending on the model year or trim. Here is a quick reference:
| Year Range | Fastener Types | Extra Steps |
|---|---|---|
| 2011–2013 | Screws, clips | Check hidden screw near grille |
| 2014–2020 | Bolts, push pins | Unplug parking sensors |
| 2021 and newer | Mixed fasteners | More sensors and cameras to unplug |
Always check your owner’s manual or a trusted resource like Jeep official site for your exact model.
Frequently Asked Questions
How Long Does Bumper Removal Take?
Most people need 1–2 hours for removal. If you have experience or good tools, it can be faster. Rusty bolts or extra wires may slow you down.
Do I Need To Lift The Jeep?
No, you usually don’t need to lift the vehicle. Turning the steering wheel gives enough access to wheel wells. If you want more space, use ramps or a jack for safety.
Will Removing The Bumper Affect My Headlights?
If you follow proper steps and align the bumper during reinstallation, your headlights should remain unaffected. Always check alignment after finishing.
Can I Reuse The Old Clips And Bolts?
You can reuse most clips and bolts, but some may break or wear out. It’s smart to buy a few extra clips before starting. New clips help ensure a tight fit.
Is Bumper Removal The Same For All Jeep Grand Cherokees?
No, there are differences by year and trim. Some have more sensors, cameras, or hidden screws. Always check your manual or search for your specific model before starting.
Removing your Jeep Grand Cherokee front bumper is a manageable job with the right tools and patience. Take your time, follow the steps, and you’ll finish with confidence. If you ever feel unsure, don’t hesitate to ask a friend or professional for help.


