Many Jeep Renegade owners notice their air conditioning isn’t as cold as before, especially in summer. A common cause is low refrigerant (often called Freon, though most cars use R-134a or R-1234yf now). While adding Freon might sound technical, it’s a straightforward job if you follow the right steps. Doing it yourself can save money and restore comfort to your drive.
This guide will show you how to safely put Freon in a Jeep Renegade. You’ll learn what tools you need, how to avoid mistakes, and how to keep your A/C running efficiently.
Understanding Your Jeep Renegade’s A/c System
The air conditioning in your Renegade uses a closed-loop system. The refrigerant absorbs heat from the cabin and releases it outside. If there’s not enough refrigerant, the A/C won’t cool properly.
Most Jeep Renegades from 2015 and newer use R-1234yf refrigerant, while some older models may use R-134a. Always check the sticker under the hood or your owner’s manual for the correct type.
Typical Symptoms Of Low Freon
- Weak cooling even when the fan is on high
- Compressor turns on and off quickly (short cycles)
- Hissing noises from the vents
If your A/C blows warm air, but the fan works, you likely need more refrigerant.
Tools And Materials Needed
Before starting, gather these items:
- Refrigerant can (R-1234yf or R-134a, as specified for your Renegade)
- A/C recharge hose with a pressure gauge
- Safety glasses and gloves
- Owner’s manual (for reference)
- Thermometer (optional, for checking vent temperature)
You can find these at auto parts stores or online. Choose a recharge kit with a gauge—this helps prevent overfilling.
| Model Year | Refrigerant Type | Approx. Capacity (oz) |
|---|---|---|
| 2015-2018 | R-1234yf | 14-16 |
| 2019-present | R-1234yf | 14-16 |
| Some early models | R-134a | 16-18 |
Tip: Adding too much refrigerant can damage the system. Always use the pressure gauge.

Step-by-step: How To Put Freon In A Jeep Renegade
1. Confirm The Refrigerant Type
Open the hood and look for a label with A/C information (often near the radiator or under the hood). Only use the correct type—mixing them causes damage.
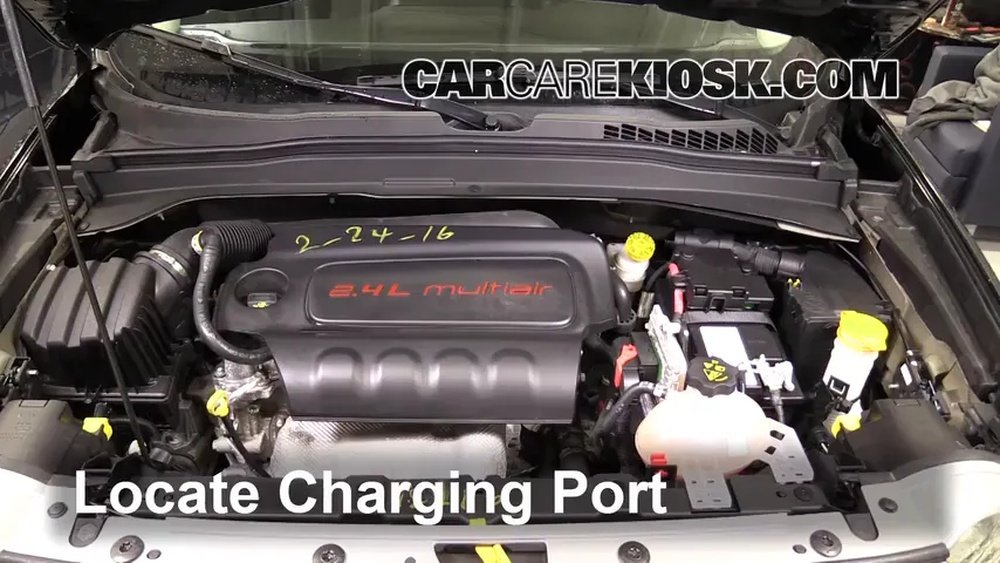
2. Locate The Low-pressure Port
The low-pressure port is where you connect the recharge hose. It usually has a black or blue cap labeled “L”. Never use the high-pressure side (the cap is often red).
3. Start The Engine And Turn On A/c
- Set the air conditioning to maximum cold and fan speed to high.
- Let the engine run. This helps the system accept the refrigerant.
4. Attach The Recharge Hose
- Wear safety glasses and gloves.
- Connect the hose to the low-pressure port. It should click in place.
- Check the gauge—if it’s in the “Low” zone, you need to add Freon.
5. Add Refrigerant
- Shake the can well.
- Squeeze the trigger in short bursts.
- Watch the gauge closely. Stop when the needle enters the “Optimal” or “Green” zone.
- Do not overfill. If the needle enters the “High” zone, stop immediately.
Non-obvious insight: The system only takes refrigerant when the compressor is running. If the gauge doesn’t move, wait for the compressor to cycle on.
6. Check Cooling Performance
- Insert a thermometer into the center vent.
- A properly charged system should blow air at 38–45°F (3–7°C).
- If it’s not cold enough, repeat small bursts, waiting 1–2 minutes between each.
7. Disconnect And Replace Cap
- Remove the hose carefully.
- Replace the low-pressure cap tightly.
- Turn off the engine.
| Gauge Reading | Interpretation | Action |
|---|---|---|
| Low (Blue) | Low refrigerant | Add Freon |
| Optimal (Green) | Correct charge | Stop filling |
| High (Red) | Overfilled/Danger | Stop, seek service |
Safety Tips And Common Mistakes
- Don’t mix refrigerants. This can ruin the A/C and void warranties.
- Never add Freon to a leaking system. If you hear loud hissing or see oily residue, get leaks repaired first.
- Always use a gauge. Adding refrigerant blindly can cause expensive damage.
- If your A/C doesn’t improve after adding refrigerant, the problem may be electrical or mechanical.
Extra insight: Sometimes, a system is empty due to a major leak. A Renegade’s A/C is designed to hold pressure for years. If you need frequent recharging, consult a professional.

When To See A Mechanic
DIY recharging works for minor losses, but not for every problem. Visit a mechanic if:
- The A/C clutch doesn’t engage (you hear no click when A/C is on)
- You have to recharge more than once a season
- There’s a visible leak under the car
A certified shop can check for leaks, vacuum out old refrigerant, and recharge to factory specs. This ensures long-term performance.
Cost Comparison: Diy Vs. Professional Service
Here’s how costs typically compare for Jeep Renegade A/C recharging:
| Method | Estimated Cost (USD) | Includes |
|---|---|---|
| DIY Kit | $35 – $60 | Refrigerant & gauge hose |
| Professional Shop | $120 – $180 | Leak test, recharge, warranty |
While DIY saves money, a shop visit covers leaks and full diagnostics.

Frequently Asked Questions
How Do I Know If My Jeep Renegade Needs Freon?
If the air is no longer cold, but the fan works and the compressor cycles on and off, you likely need refrigerant. Use a gauge to confirm low pressure before adding any.
Can I Use R-134a Instead Of R-1234yf?
No. Never substitute refrigerants. Jeep Renegade systems are designed for a specific type. Using the wrong one can cause damage and legal issues.
How Often Should I Recharge The A/c?
A healthy A/C system should not need regular recharging. If you’re adding Freon yearly or more, there’s probably a leak or another problem.
Is It Safe To Add Freon Myself?
Yes, if you follow instructions and safety steps. Wear gloves and glasses, use only the low-pressure port, and always check the gauge. If unsure, consult a mechanic.
Where Can I Learn More About Refrigerants?
For deeper details on automotive refrigerants, visit the Automobile Air Conditioning Wikipedia page.
Keeping your Jeep Renegade’s A/C charged is simple with the right tools and care. By following these steps, you can restore cooling and drive comfortably—without a costly shop visit.


