Changing the tail light on a 2009 Jeep might sound difficult, but it’s actually a simple job that most people can do in their driveway. Whether your tail light bulb is burned out or your lens is cracked, replacing it yourself saves time and money. With clear steps, the right tools, and a bit of patience, you’ll have your Jeep’s tail light shining bright again.
Tools And Supplies Needed
Before you start, gather these basic items:
- Replacement tail light bulb or assembly (check your Jeep model for the correct part)
- Screwdriver (usually Phillips)
- Socket wrench (often 8mm or 10mm)
- Gloves (optional, to protect your hands)
- Clean cloth (to wipe dust)
Having everything ready prevents delays and makes the job smoother.
1. Locate The Tail Light Assembly
The tail light assembly sits at the rear corners of your Jeep. Open the rear hatch or trunk to access the screws holding the light in place. Some models have plastic covers; remove these gently to avoid damage.
Tip: Look for hidden screws under the hatch trim or inside the light housing. Missing a screw can make removal harder.

2. Remove The Screws
Use your screwdriver or socket wrench to remove all visible screws. Most 2009 Jeeps have two or three screws per tail light. Keep them safe—you’ll need them to reattach the assembly.
Non-obvious insight: Sometimes, screws are rusted or stuck. Apply a little WD-40 and wait a few minutes if you have trouble loosening them.
3. Pull Out The Tail Light Assembly
With screws out, gently pull the assembly away from the Jeep body. Don’t force it; wiggle side to side if it feels stuck. The tail light will still be connected by wires.
Example: On a Jeep Wrangler, the tail light pops out easily, while the Grand Cherokee may require a little extra movement to release.

4. Disconnect The Wiring Harness
Find the wiring harness attached to the back of the tail light. Press the locking tab and pull the connector out. If your Jeep has multiple bulbs, remember their positions for reinstallation.
Common mistake: Pulling on wires instead of the connector. Always grab the plastic connector to avoid damaging the wiring.
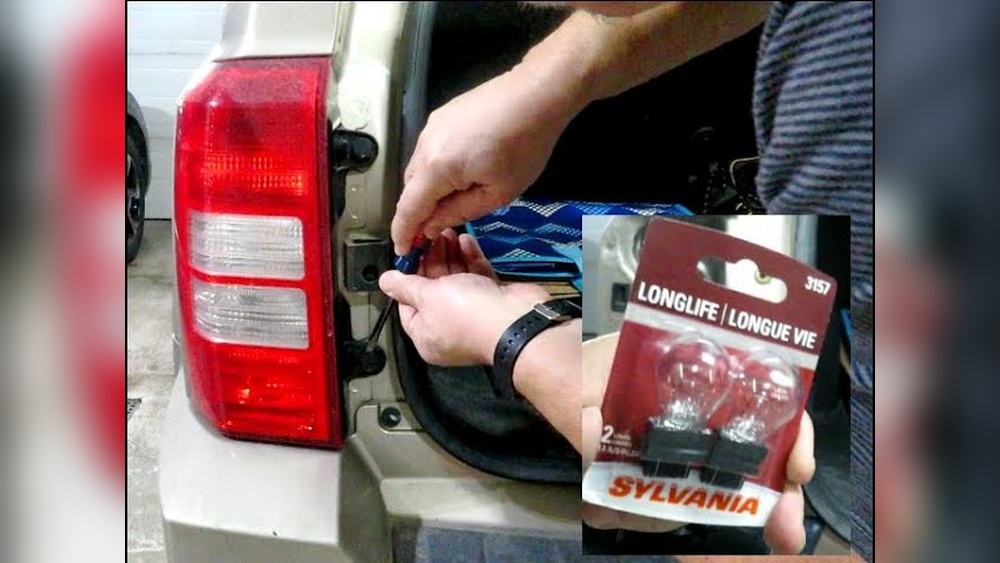
5. Remove The Old Bulb
Twist the bulb holder counterclockwise to release it from the assembly. Pull the bulb straight out. Inspect the socket for corrosion or debris; clean with a cloth if needed.
Practical tip: If the bulb is hard to reach, use gloves for better grip and avoid touching the new bulb with bare fingers—oil from your skin can shorten bulb life.
6. Install The New Bulb
Push the new bulb firmly into the socket. Align the bulb holder tabs and twist clockwise to lock it back in place. Double-check that the bulb is secure and sitting straight.
Data: Most 2009 Jeeps use 3157 or 1157 bulbs for tail lights. Check your manual or the old bulb for the correct number.
7. Reconnect The Wiring Harness
Plug the wiring harness connector back into the tail light assembly until it clicks. Make sure the connection is tight—loose wires can cause the light to flicker or fail.
Non-obvious insight: Sometimes, connectors get dirty. If the harness does not click in easily, check for dust and clean with a dry cloth.
8. Reattach The Tail Light Assembly
Carefully fit the tail light assembly back into position. Align it with the screw holes. Insert and tighten the screws with your screwdriver or wrench. Do not overtighten; this can crack the housing.
Example: On the Jeep Liberty, the assembly fits flush with the body. Double-check for gaps before securing screws.
9. Test The New Tail Light
Turn on your Jeep’s lights and check the tail light. Also, test the brake light and turn signal in that assembly. If everything works, you’ve finished the job.
Common mistake: Forgetting to check all functions. Always test brake, signal, and reverse lights before closing up.

Comparing Bulb Types
Choosing the right bulb helps your tail light last longer and shine brighter. Here’s a simple comparison:
| Bulb Type | Lifespan (Hours) | Brightness | Cost (USD) |
|---|---|---|---|
| Standard Halogen | 1,000 | Moderate | 5-8 |
| LED | 25,000 | High | 15-25 |
| Long Life Halogen | 2,000 | Moderate | 8-12 |
LED bulbs cost more but last much longer and are brighter. For frequent drivers, LEDs are a smart choice.
Jeep Models And Tail Light Access
Different 2009 Jeep models have unique access points for tail light removal:
| Model | Number of Screws | Assembly Removal Method |
|---|---|---|
| Wrangler | 2 | Pull out after removing screws |
| Grand Cherokee | 3 | Slide out and disconnect harness |
| Liberty | 2 | Lift slightly, then pull out |
Knowing your model helps avoid confusion and speeds up the process.
Common Problems After Replacement
After changing your tail light, you might face a few issues:
- Light not working: Recheck bulb position and wiring harness.
- Moisture inside assembly: Make sure the seal is tight.
- Dashboard warning: Some Jeeps alert you if the bulb is incorrect—use the right type.
If problems continue, check your owner’s manual or ask a mechanic for help. For extra tips, you can visit the official Jeep website: Jeep.
Frequently Asked Questions
How Do I Know Which Bulb To Use For My 2009 Jeep?
Check your owner’s manual or look at the old bulb for the number (like 3157 or 1157). This ensures you buy the correct replacement.
Can I Use Led Bulbs Instead Of Halogen?
Yes, LED bulbs work in most 2009 Jeep tail lights and last longer. Make sure the LED fits your socket and is compatible with your Jeep’s wiring.
Do I Need To Disconnect The Battery?
It’s not required, but disconnecting the battery adds safety, especially if you’re worried about short circuits or working with exposed wires.
What If My Tail Light Lens Is Cracked?
You’ll need to replace the entire tail light assembly. The steps are similar, but order the correct assembly for your Jeep model.
Is It Legal To Drive With A Broken Tail Light?
No, driving with a broken tail light is unsafe and illegal in most states. Fix it as soon as possible to avoid fines and ensure safety.
Changing the tail light on your 2009 Jeep is a simple repair you can do at home. With the right parts, tools, and careful steps, you’ll avoid mistakes and keep your vehicle safe on the road. Even if you’re new to car repairs, following this guide will help you succeed quickly and confidently.