Upgrading Your Jeep Wrangler Tj: A Bumper Installation Guide
The Jeep Wrangler TJ is an iconic off-road vehicle, and one of the most popular upgrades for these rugged machines is a new bumper.
A well-chosen aftermarket bumper can do more than just improve the look of your TJ; it can significantly enhance its off-road capability, provide vital protection, and even offer practical features like winch mounts and recovery points.
However, the process of installing a new bumper might seem daunting to some. This guide will walk you through the essential parts, tools, and steps involved in a typical Jeep Wrangler TJ bumper installation, offering tips and insights to make the process smoother and more successful.
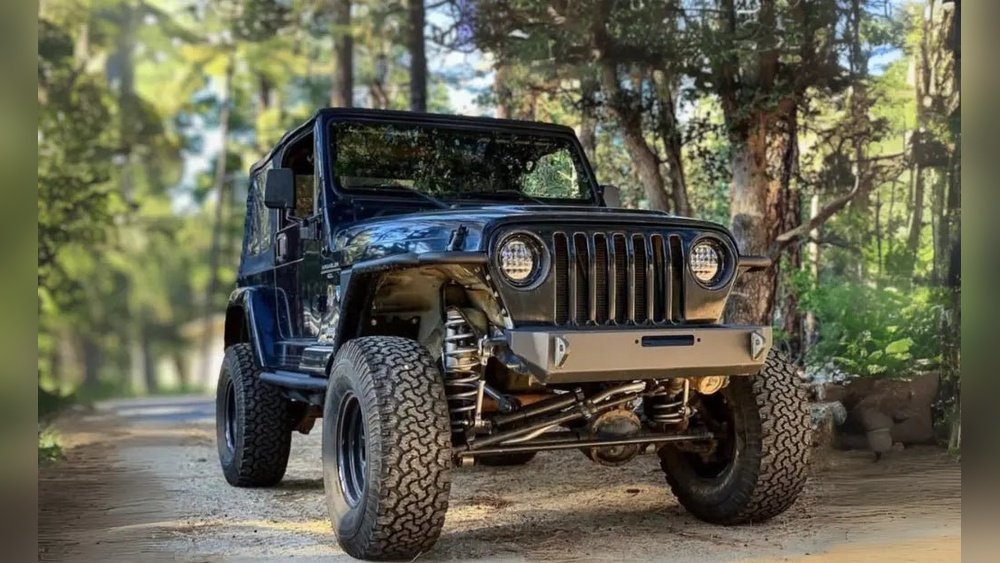
Installing a new bumper is a rewarding DIY project that can transform your Jeep's appearance and functionality. Whether you're looking for a sleek, minimalist design or a heavy-duty, utilitarian setup, there's a bumper out there for you.
Understanding the components, preparing your workspace, and following a systematic approach are key to a successful installation.
This guide aims to demystify the process, providing you with the confidence to tackle this upgrade yourself or to better understand what’s involved if you choose to have it done professionally.
Understanding Your New Bumper: Essential Parts And Features
Before you even think about unbolting your old bumper, it’s crucial to understand the different types of bumpers available for the Jeep Wrangler TJ and the parts that typically come with them. Bumpers vary greatly in design, material, and functionality, each offering a different set of benefits.
Types Of Tj Bumpers
- Stock Replacement Bumpers: These are designed to look similar to the original factory bumper but are often made from stronger materials or offer slightly improved styling. They are the simplest to install as they usually bolt directly into the factory mounting points.
- Aftermarket Standard Bumpers: These offer a noticeable upgrade in style and durability over stock. They are typically made from steel and come in various finishes like black powder coat or raw steel. They bolt onto the frame, often requiring some minor drilling or using existing frame holes.
- Stinger Bumpers: Characterized by a raised bar (the “stinger”) extending forward from the top of the bumper. This stinger serves a dual purpose: it helps prevent the Jeep from flipping forward on steep inclines and can also act as a point to secure the vehicle if it rolls forward.
- Bull Bar Bumpers: These feature a horizontal bar across the front, offering protection for the grille and headlights. They are often combined with other bumper designs.
- Winching Bumpers: These are heavy-duty bumpers designed with an integrated winch plate. They are essential for serious off-roaders who plan to use a winch for recovery. These are usually the most complex to install due to the added weight and mounting requirements for the winch.
- Corner-Wrap Bumpers: These bumpers extend around the front corners of the Jeep, offering protection for the fenders and body panels, which are particularly vulnerable off-road.
Key Components Of An Aftermarket Bumper
When you purchase an aftermarket bumper for your TJ, it will typically include the following:
- The Bumper Body: This is the main structure of the bumper, usually made from steel (mild steel or stainless steel) or sometimes aluminum for lighter weight.
- Mounting Brackets: These are L-shaped or custom-fabricated pieces that connect the bumper to the Jeep’s frame rails. The design of these brackets is critical for a secure fit.
- Hardware Kit: This is the collection of nuts, bolts, washers, and sometimes specialized inserts or brackets needed to attach the bumper and its brackets to the Jeep’s frame. The quality of hardware can vary significantly between manufacturers; always check if it’s Grade 5 or Grade 8 hardware for optimal strength.
- Shackle Mounts (D-ring Mounts): Many aftermarket bumpers come with integrated mounts for D-ring recovery shackles. These are usually welded directly to the bumper or its mounting brackets and are a crucial safety feature for off-road recovery.
- Winch Plate (if applicable): For winching bumpers, a reinforced plate designed to hold a standard winch is integrated into the bumper’s structure.
- Optional Accessories: Some bumpers come with built-in light mounts, skid plates, or even integrated LED light bars.
Materials And Finishes
- Steel: The most common material for aftermarket bumpers due to its strength and durability.
- Mild Steel: Strong and cost-effective, but susceptible to rust if not properly coated.
- Stainless Steel: More resistant to corrosion but can be more expensive and slightly less strong than mild steel.
- Aluminum: Lighter than steel, offering good strength-to-weight ratio. It’s also naturally rust-resistant but can be more prone to denting than steel.
- Finishes:
- Powder Coating: A durable, attractive finish that provides good protection against the elements. Black is the most common color.
- Raw Steel: The bumper is unfinished, allowing you to paint or coat it yourself to match your Jeep or preference. Requires immediate protective coating to prevent rust.
- Chrome: Less common for off-road bumpers but available for a more classic look.
Pro Tip: Always check the weight of the bumper you are considering. Heavy steel bumpers, especially winching bumpers, can add significant weight to the front of your TJ, potentially affecting suspension performance and requiring upgrades.
Tools And Preparation: Getting Ready For The Install
Before you begin the actual installation, gathering the right tools and preparing your workspace is essential. This will not only make the job easier but also safer.
Essential Tools You’ll Need
- Socket Set and Ratchet: You’ll need a range of socket sizes, typically from 10mm up to 19mm or larger, depending on the hardware provided. A good quality ratchet with a long handle will provide better leverage.
- Wrench Set: Both metric and standard wrenches might be necessary, especially for holding nuts while tightening bolts.
- Torque Wrench: Crucial for tightening bolts to the manufacturer’s specifications. Overtightening can strip threads or damage components, while undertightening can lead to a loose bumper.
- Drill and Drill Bits: If your new bumper requires drilling new mounting holes, you’ll need a powerful drill and high-quality drill bits (cobalt or titanium coated are best for metal).
- Measuring Tape: For accurate placement of holes if drilling is required.
- Marker or Awl: To mark drilling locations.
- Safety Glasses: Absolutely essential to protect your eyes from debris.
- Work Gloves: To protect your hands from sharp edges and grease.
- Jack and Jack Stands: To safely lift and support the front of your Jeep if necessary, providing better access to the frame and mounting points.
- Pry Bar: Can be helpful for aligning holes or maneuvering the bumper into place.
- Wire Brush: For cleaning rust or debris from mounting points.
- Penetrating Oil (e.g., WD-40 or PB Blaster): To loosen stubborn or rusted bolts.
- Reciprocating Saw or Angle Grinder (Optional): In rare cases, you might need to cut off old, rusted bolts or trim a minor interfering piece of the frame. Use with extreme caution.
Preparing Your Jeep And Workspace
- Park on a Level Surface: Ensure your Jeep is on a stable, flat surface. Engage the parking brake and, if you have an automatic transmission, put it in Park. If it’s a manual, put it in first gear.
- Disconnect the Battery: For safety, especially if you’re working near any electrical components or plan to remove the grille, it’s a good practice to disconnect the negative terminal of your battery.
- Remove the Stock Bumper: This is usually the first step. The factory TJ bumper is typically held on by a few bolts on each side, often accessible from behind the bumper or underneath the frame rails. They can be rusted in place, so penetrating oil might be your best friend here.
- Clean Mounting Points: Once the old bumper is off, use a wire brush to clean the frame rails and any existing bolt holes. This ensures a clean surface for the new brackets and hardware.
- Inspect the Frame: While the bumper is off, take a moment to inspect the frame rails for any rust, damage, or cracks. Address any structural issues before installing a new, heavy bumper.
- Test Fit (Optional but Recommended): Before final tightening, loosely attach the new bumper and brackets to ensure everything aligns correctly. This is the time to identify any fitment issues or necessary modifications.
The Installation Process: Step-by-step
The exact installation steps can vary depending on the specific bumper manufacturer and design. Always refer to the manufacturer's instructions that came with your bumper.
However, here’s a general outline of the process for a typical aftermarket steel bumper.
Step 1: Removing The Stock Bumper
For most TJ models, the stock bumper is secured by four bolts on each side, typically 13mm or 15mm. These bolts go through the frame horns.
- Locate the bolts on each side of the frame.
- Apply penetrating oil to the bolts and let it soak for a few minutes (or longer if they are heavily rusted).
- Use your socket set and ratchet to remove the bolts. If they are too tight or rusted, you might need a breaker bar or an impact wrench.
- Once all bolts are removed, the stock bumper should slide off. If it’s stuck, a gentle pry bar or a few taps with a rubber mallet might help.
Step 2: Installing The New Bumper Brackets
Aftermarket bumpers usually attach to the Jeep’s frame horns via robust brackets.
- Identify the correct brackets for your bumper and the left/right sides of your Jeep.
- Align the brackets with the frame horns. Some bumpers use existing bolt holes, while others might require you to drill new ones.
- If drilling is required, carefully measure and mark the locations for the new holes as per the manufacturer’s instructions. Use an awl to create a starting divot for your drill bit.
- Drill the holes using the appropriate size drill bit. Start with a smaller pilot hole and then enlarge it to the final size. Always wear safety glasses.
- Clean the drilled holes with a wire brush and apply a rust inhibitor or paint to protect the bare metal.
- Attach the brackets to the frame using the provided hardware. Do not fully tighten them yet; leave them slightly loose to allow for adjustment.
Step 3: Mounting The Bumper To The Brackets
Now it’s time to attach the main bumper assembly to the brackets.
- With the help of a friend (bumpers can be heavy! ), position the new bumper onto the installed brackets.
- Align the bolt holes on the bumper with the corresponding holes on the brackets.
- Insert the provided bolts, nuts, and washers. Again, do not tighten them fully at this stage.
Step 4: Aligning And Tightening
This is a crucial step for achieving a clean, professional look and ensuring the bumper is securely mounted.
- Center the Bumper: Ensure the bumper is centered between the fenders and sits at the desired height. Adjust the brackets as needed.
- Check for Clearance: Make sure the bumper doesn’t interfere with any other components, such as the grille, headlights, or sway bar disconnects.
- Tighten Hardware: Once you’re satisfied with the alignment, begin tightening all the bolts. Start with the bolts connecting the brackets to the frame, then move to the bolts connecting the bumper to the brackets.
- Torque Specifications: Use your torque wrench to tighten all fasteners to the manufacturer’s specified torque values. This is critical for safety and longevity. If the manufacturer doesn’t provide specs, a common torque for heavy-duty bumper bolts is around 50-80 ft-lbs, but always err on the side of caution and check with the bumper maker if unsure.
Step 5: Installing Optional Accessories (winch, Lights, Etc.)
If your bumper includes provisions for a winch, lights, or other accessories, this is the time to install them.
- Winch Installation:
- Ensure the winch plate is properly secured.
- Carefully place the winch onto the plate, aligning its mounting holes.
- Secure the winch with the hardware provided with the winch itself.
- Connect the winch wiring according to the winch manufacturer’s instructions.
- Light Installation:
- Mount any auxiliary lights to the designated light tabs on the bumper.
- Wire the lights according to their instructions, usually connecting them to a switch and the Jeep’s electrical system.
Step 6: Final Checks
- Double-Check All Bolts: Go over every bolt and nut one last time to ensure they are tight and torqued correctly.
- Test Steering and Suspension: Turn the steering wheel lock-to-lock and check for any rubbing or interference. Bounce the front end of the Jeep to ensure the suspension is settling correctly.
- Reconnect Battery: If you disconnected the battery, reconnect the negative terminal.
- Test Drive: Take your Jeep for a short, slow test drive. Listen for any unusual noises and check for any signs of looseness or rubbing.
Example: When installing my own TJ bumper, I found that one of the pre-drilled holes on the bracket didn’t quite line up with the frame. I had to slightly enlarge the hole with a die grinder to achieve perfect alignment before I could tighten everything down. This is where having a few extra tools can save a lot of frustration.

Essential Tips For A Smooth Installation
Even with clear instructions and the right tools, certain tips can make your bumper installation experience much better.
Tip 1: Don’t Rush The Process
This is perhaps the most important tip. Take your time, especially if it's your first time doing this kind of modification.
Rushing can lead to mistakes, stripped bolts, scratched paint, or even injury. Break the job down into manageable steps.
If you get frustrated, take a break.
Tip 2: Get A Helper
Many aftermarket bumpers are surprisingly heavy. Trying to maneuver a large steel bumper into place by yourself is difficult and potentially dangerous.
Having a second person to help lift, hold, and align the bumper makes the job significantly easier and safer.
Tip 3: Prepare For Rusted Bolts
Older Jeeps, especially those used off-road or in areas with road salt, often have heavily rusted bolts. Be prepared to spend time soaking them in penetrating oil. If they still won’t budge, you