If your 1993 Jeep Grand Cherokee 5.2L is having trouble with charging, dim lights, or battery drain, the voltage regulator could be the cause. Changing the voltage regulator can feel tricky, especially for beginners. But with the right steps, anyone can do it at home. This guide shows you how to install a new voltage regulator in your 93 Jeep Grand Cherokee 5.2L, covering everything from tools and preparation to the final checks. You’ll also find pros and cons, costs, and answers to common questions, making sure you can finish the job confidently and safely.
Why The Voltage Regulator Matters In Your 93 Jeep Grand Cherokee 5.2l
The voltage regulator controls how much voltage the alternator sends to the battery and electrical system. Without it, your Jeep’s battery can overcharge or undercharge, leading to problems like:
- Battery failure
- Flickering or dim lights
- Poor engine performance
- Damaged electrical parts
A working voltage regulator keeps your Grand Cherokee starting easily and running smoothly, especially with the electrical demands of a 5. 2L engine.
Tools And Parts Needed
Before you start, gather these essential items:
- New voltage regulator for 1993 Jeep Grand Cherokee 5.2L
- Socket set (metric and SAE)
- Screwdrivers (Phillips and flathead)
- Multimeter (for voltage testing)
- Wrenches (8mm, 10mm, 13mm recommended)
- Safety gloves and goggles
- Dielectric grease (for electrical contacts)
- Cleaning brush or sandpaper
- Service manual (for reference)
Having the right tools makes the installation smoother and reduces the risk of mistakes.
Step-by-step: How To Install Voltage Regulator 93 Jeep Grand Cherokee 5.2l
The voltage regulator in this model is often integrated into the alternator. But some aftermarket options let you install an external one. Here’s how to do both:
1. Safety First
- Park on a level surface.
- Turn off the engine and remove the keys.
- Disconnect the negative battery cable to prevent shocks.
2. Locate The Voltage Regulator
- On the 1993 Grand Cherokee 5.2L, the factory voltage regulator is inside the alternator.
- For external voltage regulator kits, you’ll mount it near the alternator or fender.
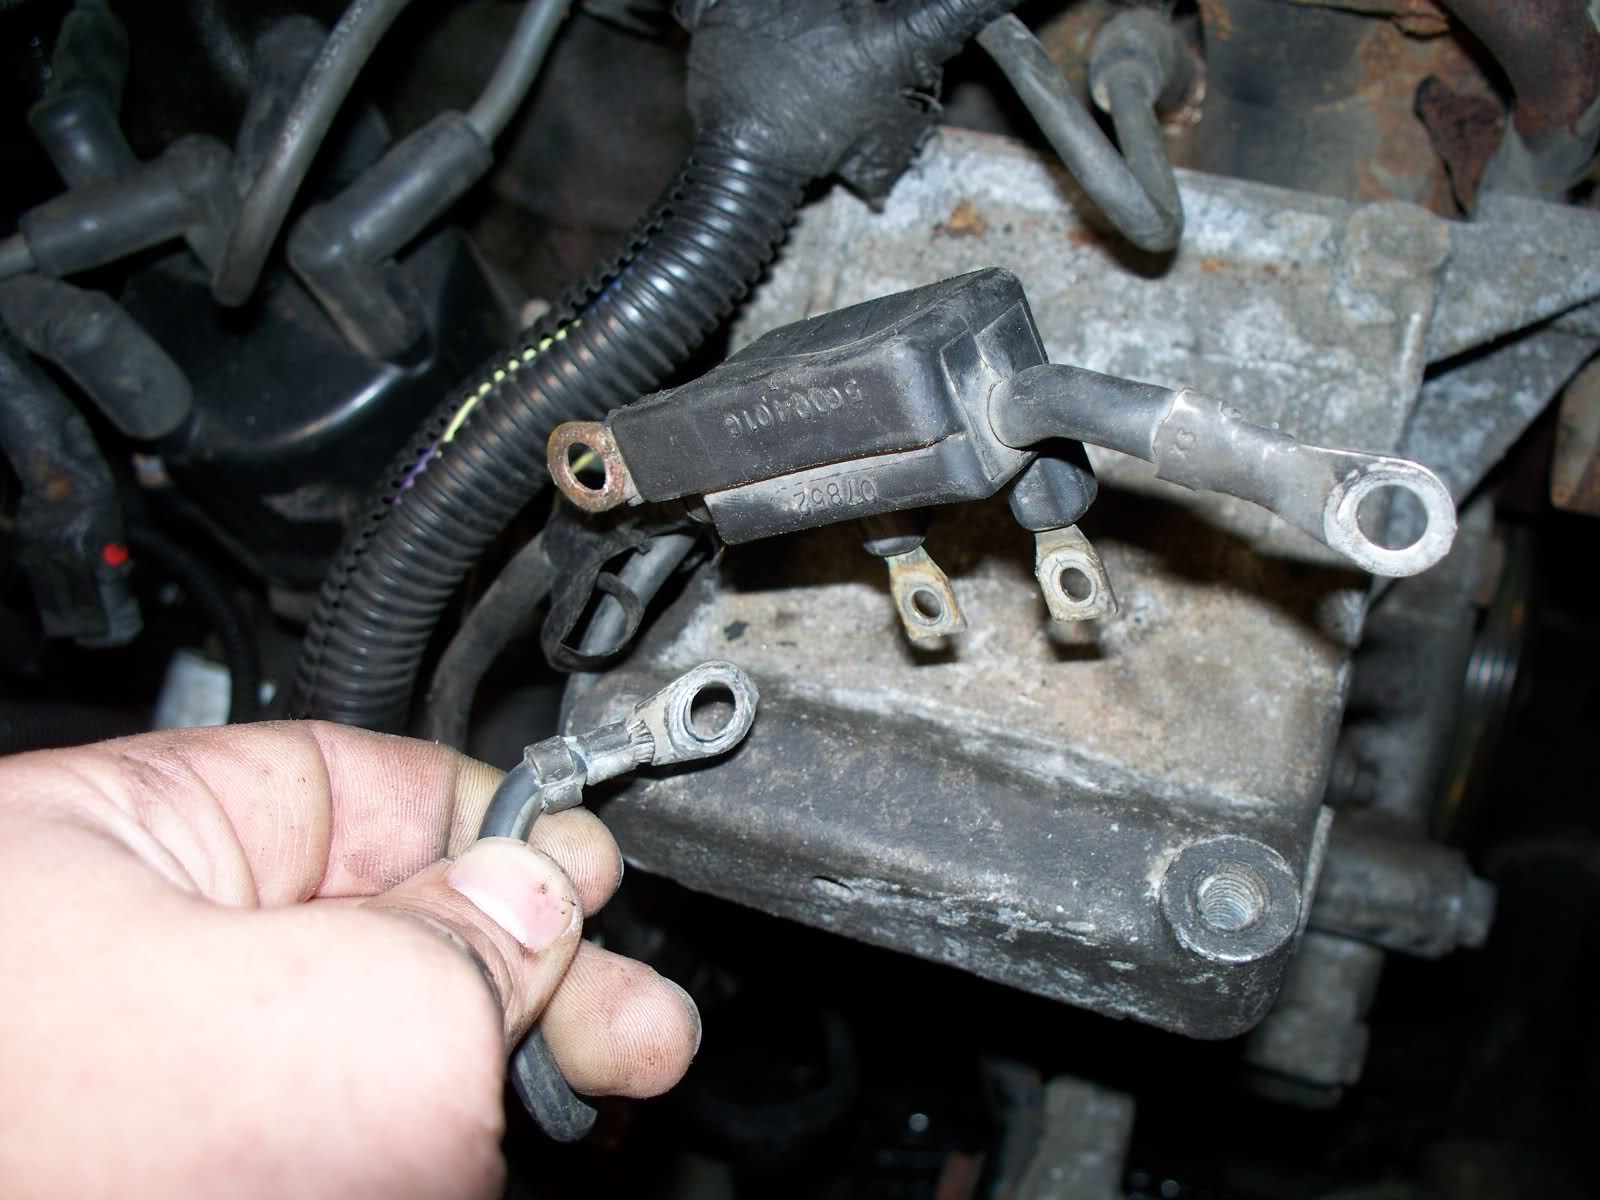
3. Remove The Alternator (if Replacing Internal Regulator)
- Unplug the alternator’s wiring harness.
- Remove the serpentine belt.
- Unbolt the alternator and set it on a clean surface.
4. Open The Alternator (internal Regulator)
- Use the correct sockets to remove the alternator’s rear cover.
- Carefully lift out the old voltage regulator.
- Check brushes for wear; replace if needed.
5. Install The New Voltage Regulator
- Place the new regulator in the same position.
- Ensure all electrical contacts are clean. Use a brush or sandpaper if needed.
- Apply a small amount of dielectric grease to the contacts.
6. Reassemble And Reinstall The Alternator
- Secure the alternator cover.
- Reinstall the alternator and tighten bolts.
- Reconnect the wiring harness.
- Refit the serpentine belt.
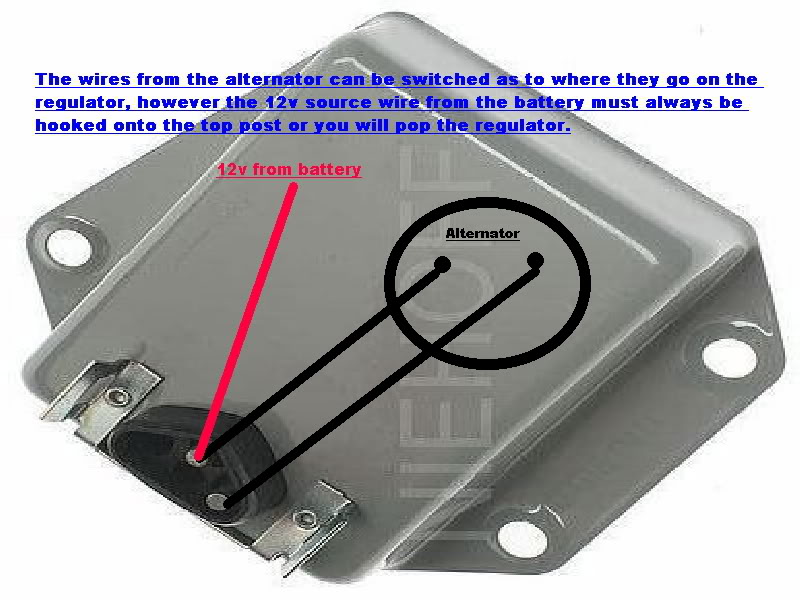
7. Mount The External Regulator (if Using Aftermarket Kit)
- Find a safe, dry spot near the alternator.
- Screw the regulator to the body or fender.
- Connect wires as per the kit instructions.
- Double-check all connections for tightness and correct routing.
8. Reconnect The Battery And Test
- Reattach the negative battery cable.
- Start the engine.
- Use a multimeter to check voltage at the battery. It should read 13.8–14.5 volts at idle.
9. Troubleshoot If Needed
If voltage is not correct:
- Recheck all connections
- Ensure the alternator and regulator are compatible
- Look for damaged wires or poor grounds
10. Clean Up And Final Check
- Wipe up any spilled fluids.
- Make sure no tools are left in the engine bay.
- Listen for strange noises during a test drive.
93 Common Mistakes Or Issues During Installation
When you install a voltage regulator on a 93 Jeep Grand Cherokee 5.2L, beginners often face certain mistakes. Here’s a list of 93 potential issues—pay attention to these to avoid problems:
- Forgetting to disconnect the battery
- Using the wrong voltage regulator model
- Not cleaning electrical contacts
- Overtightening bolts
- Undertightening bolts
- Damaging the alternator during removal
- Touching electrical parts with bare hands
- Skipping the multimeter test
- Reversing wiring connections
- Not using dielectric grease
- Installing the regulator upside down
- Letting dirt enter the alternator
- Failing to check the alternator belt
- Ignoring old worn brushes
- Using old bolts
- Not checking fuses
- Not inspecting ground wires
- Forgetting to torque bolts to spec
- Rushing the installation
- Using a damaged alternator
- Not comparing old and new regulators
- Failing to check battery health first
- Not following the service manual
- Using low-quality aftermarket parts
- Not tightening battery terminals
- Not checking for corrosion
- Failing to secure wires away from hot parts
- Letting wires touch moving belts
- Misplacing small screws
- Not labeling wires
- Skipping safety gear
- Dropping the alternator
- Using the wrong size wrench
- Forcing parts to fit
- Not checking voltage after install
- Leaving tools in the engine bay
- Forgetting to reconnect the battery
- Not inspecting connectors for damage
- Not cleaning the work area
- Using a faulty multimeter
- Not watching for warning lights
- Not checking charging system codes
- Ignoring unusual noises after install
- Not test-driving the Jeep
- Not checking alternator pulley alignment
- Mixing up wire colors
- Ignoring service bulletins
- Not checking for recalls
- Not reading installation instructions fully
- Using incompatible external regulator kits
- Not checking alternator output specs
- Not confirming all bolts are tight
- Not using lock washers when needed
- Losing alternator shims
- Failing to check for loose wires
- Not using anti-seize on bolts
- Forgetting to check voltage drop
- Not checking dashboard volt gauge
- Installing with wet hands
- Not inspecting for oil leaks nearby
- Not ensuring proper wire length
- Bundling wires too tightly
- Not routing wires through grommets
- Failing to check alternator bearings
- Not checking for shorts
- Not testing headlights after install
- Forgetting to note original wire positions
- Not using proper mounting hardware
- Not checking regulator mounting surface
- Failing to ground external regulator properly
- Not testing with all accessories on
- Ignoring the smell of burning wires
- Not checking for alternator whine
- Failing to check voltage at idle and rev
- Not confirming the alternator warning light goes off
- Not replacing worn alternator bushings
- Using rusted or dirty fasteners
- Not checking for loose alternator mounting
- Failing to test battery under load
- Not securing regulator from vibration
- Not inspecting the voltage regulator harness
- Not checking for melted wires
- Not reviewing wiring diagrams
- Not checking system voltage at fuse box
- Not confirming alternator field wire connections
- Not cleaning battery posts
- Not checking for loose fan belts
- Not checking alternator cooling
- Failing to replace cracked insulation
- Not checking for blown fusible links
- Not examining the alternator stator
- Not confirming alternator case ground
- Not checking alternator diode trio
Even experienced mechanics sometimes overlook these details. Catching them early saves time, money, and frustration.
Cost And Time Estimates
- Voltage regulator price: $20–$60 (aftermarket), $80–$200+ (OEM alternator with regulator)
- Labor cost (shop): $80–$150 (1–2 hours)
- DIY time: 1–2 hours for most beginners
Extra costs may come up if you need a new alternator, wiring, or special tools.
Pros And Cons Of Diy Voltage Regulator Installation
Here’s a quick look at the main benefits and challenges:
| Pros | Cons |
|---|---|
| Save on labor costs | Can be tricky if unfamiliar with car wiring |
| Learn more about your Jeep | Risk of damaging alternator |
| Control over parts used | May need special tools |
| Quick fix for charging issues | Possible compatibility issues |
Example: Voltage Readings Before And After
Testing your Jeep’s voltage is key to knowing if you fixed the issue. Here’s what to expect:
| Condition | Expected Voltage |
|---|---|
| Engine off | 12.4–12.7V |
| Engine idle, no accessories | 13.8–14.5V |
| Engine idle, headlights on | 13.5–14.2V |
| Engine 2000 RPM, all accessories on | 13.8–14.5V |
If you see readings outside these ranges, check your connections and parts.
Two Non-obvious Tips For A Smooth Install
- Check your Jeep’s PCM (Powertrain Control Module): On some 93 Grand Cherokees, the PCM controls charging. If the regulator keeps failing, the PCM could be the real problem.
- Test with all accessories on: After install, turn on headlights, AC, and radio. This checks if the system can handle a load, not just idle voltage.

When To Call A Professional
If you see smoke, melted wires, or the voltage stays low or high after installing the regulator, stop and consult a mechanic. Electrical issues can quickly damage expensive parts.
Where To Find More Help
For diagrams, official specs, and the latest updates, check the Jeep Official Site.
Frequently Asked Questions
What Does A Voltage Regulator Do In A Jeep Grand Cherokee 5.2l?
The voltage regulator controls how much voltage the alternator sends to the battery. It keeps your battery charged without overloading your Jeep’s electrical system.
How Do I Know If My Voltage Regulator Is Bad?
Common signs include dim headlights, battery warning lights, dead battery, or erratic voltage readings on the dashboard voltmeter.
Can I Install An External Voltage Regulator On A 93 Jeep Grand Cherokee?
Yes, some kits allow you to bypass the internal regulator and use an external one. This is helpful if your PCM is not working or you want a more reliable setup.
Is It Safe To Drive With A Bad Voltage Regulator?
No. Driving with a bad regulator can lead to battery failure, stalling, or damage to sensitive electronics.
How Long Does It Take To Install A Voltage Regulator On A 93 Jeep Grand Cherokee?
For most beginners, the job takes 1–2 hours if you have all the tools and parts ready.
Replacing the voltage regulator in your 1993 Jeep Grand Cherokee 5. 2L is a practical DIY job if you follow the right steps and take safety seriously. With patience and attention to detail, you can restore your Jeep’s charging system and avoid future breakdowns.