Understanding your Jeep headlight wiring diagram is crucial for any owner who wants to maintain their vehicle, perform upgrades, or troubleshoot electrical issues. Headlights are essential for safety, and their wiring system, while seemingly straightforward, involves several components working together.
This guide will break down the typical wiring for Jeep headlights, explain the function of each part, and offer practical advice for working with this system.
Whether you own a classic CJ, a JK, or a newer JL, the fundamental principles of headlight wiring remain similar, though specific colors and connector types may vary.
The Basics Of Jeep Headlight Wiring
At its core, a headlight system connects your headlights to the vehicle’s power source (the battery) through a series of switches and protective components. When you flip the headlight switch, you complete a circuit, allowing electricity to flow from the battery, through fuses and relays, to the bulbs that illuminate the road.
Understanding this flow is the first step to deciphering any wiring diagram.
The main components typically found in a Jeep headlight circuit include:
- Battery: The primary source of electrical power for your vehicle.
- Headlight Switch: The control you operate from inside the cabin to turn headlights on and off.
- Fuses: Safety devices that protect the circuit from overcurrents. If too much electricity flows, the fuse blows, breaking the circuit and preventing damage to other components.
- Relays: Electromechanical switches that use a low-current signal to control a high-current circuit. This protects the headlight switch from the high amperage draw of the headlights.
- Headlight Bulbs: The actual light-emitting components, usually H4, H13, or LED units depending on the Jeep model.
- Ground Wires: Essential for completing the electrical circuit. All components need a good connection to the vehicle’s chassis (ground).
- Wiring Harness: The bundle of wires that connect all these components together.
How The Circuit Works
When you turn on your headlights, the headlight switch receives power from the battery (often through an ignition-switched circuit to prevent battery drain when the engine is off). This switch then sends a low-voltage signal to the headlight relay. The relay, energized by this signal, closes its internal contacts, allowing a direct, high-current path from the battery (usually via a main fuse) to the headlight bulbs. The bulbs then illuminate.
The high beams and low beams are typically controlled by separate circuits or by a mechanism within the headlight switch or a separate dimmer switch. When you switch from low to high beams, the circuit is rerouted to the high-beam filament in the bulb, or to a different set of bulbs altogether in some older setups.
Common Jeep Headlight Wiring Diagram Elements
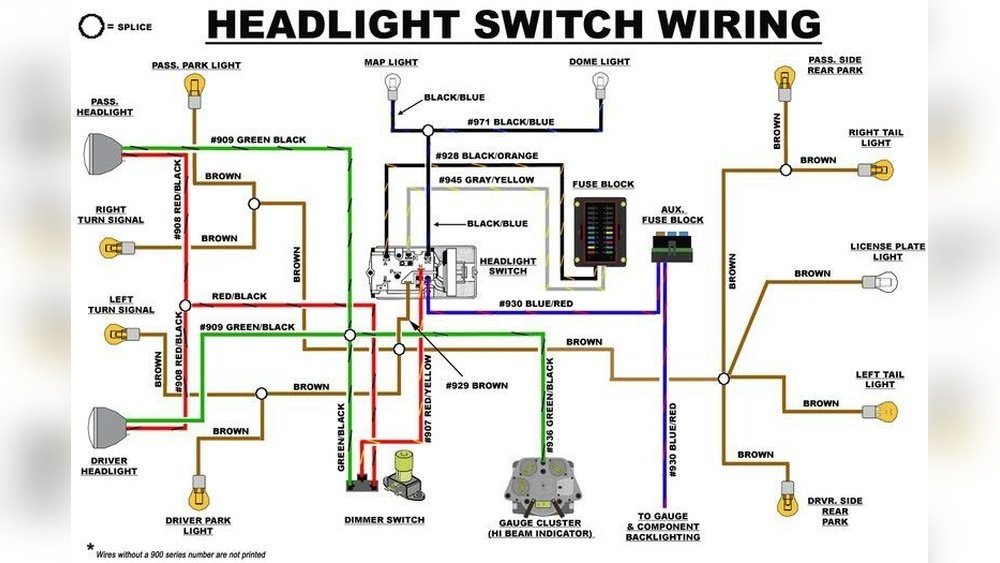
When you look at a Jeep headlight wiring diagram, you’ll see various symbols and lines representing different components and connections. Familiarizing yourself with these is key.
Understanding Wire Colors
Wire colors are a crucial part of any wiring diagram. While they can vary slightly between model years and trim levels, some common color codes exist for Jeep headlights:
- Red: Often used for main power feeds, especially from the battery or fuse box.
- Black: Almost universally used for ground connections.
- Yellow or Brown: Frequently used for low beam circuits.
- Green or Blue: Often used for high beam circuits.
- White: Can be used for various functions, including parking lights or turn signals integrated into the headlight assembly.
Pro Tip: Always verify wire colors against your specific Jeep’s service manual or a reliable online resource for your exact year and model. Colors can change, and relying solely on general knowledge can lead to errors.
Key Components And Their Symbols
- Fuses: Typically shown as a rectangle with a line or a specific symbol inside, often labeled with an amperage rating (e.g., 15A, 20A).
- Relays: Usually depicted as a box with multiple terminals, often with a coil symbol and contact symbols.
- Switches: Represented by lines and dots that show how a circuit is opened or closed. The headlight switch might be a more complex symbol showing multiple positions.
- Grounds: Indicated by a series of horizontal lines getting progressively shorter, or a specific ground symbol.
- Bulbs: Shown as a circle with an ‘X’ or a filament symbol inside.
Identifying Left Vs. Right
Diagrams will clearly label which side of the vehicle the wiring pertains to, usually indicated as “Left Headlight” (Driver’s side in the US) and “Right Headlight” (Passenger’s side in the US). Sometimes, they might use “LH” and “RH”.

Troubleshooting Common Headlight Problems
When your Jeep’s headlights aren’t working correctly, the wiring diagram is your best friend. Here are common issues and how the diagram helps:
Headlights Not Turning On At All
- Check the Fuse: Locate the headlight fuse on the diagram. Find the corresponding fuse in your Jeep’s fuse box and check if it’s blown. If it is, replace it with one of the same amperage. If the new fuse blows immediately, there’s a short circuit somewhere.
- Check the Relay: The diagram will show the headlight relay. You can often test a relay by swapping it with an identical one from a non-critical circuit (like the horn or fog lights, if they use the same type of relay). If the headlights now work, the relay was faulty.
- Check the Headlight Switch: If fuses and relays are good, the issue might be the headlight switch itself. The diagram shows the switch’s internal connections. You can test for power coming into and going out of the switch using a multimeter.
- Check for Ground: A poor ground connection is a common culprit. The diagram shows where the ground wire connects to the chassis. Ensure this connection is clean, tight, and free of rust or corrosion.
Only One Headlight Working
This often points to a problem specific to that one side:
- Bulb: The simplest explanation is a burnt-out bulb.
- Connection: Check the connector at the back of the non-working bulb. Corrosion or loose pins can prevent power from reaching the bulb.
- Wiring: Trace the wires from the diagram for that specific headlight. Look for any breaks, cuts, or damage in the harness leading to that side.
- Ground: Ensure the ground wire for that specific headlight is intact and properly connected.
Headlights Dim Or Flickering
This usually indicates a poor electrical connection or a weak power source:
- Grounds: Dim lights are very often caused by corroded or loose ground connections for the headlights or even the battery ground. Clean and tighten all ground points.
- Battery/Alternator: A weak battery or an alternator not charging properly can lead to low voltage, causing dim lights. Test your battery voltage and your alternator’s output.
- Wiring: Damaged or undersized wiring can cause voltage drop, especially under load. Check the main power feed wires.
- Corrosion: Corrosion in connectors, fuse holders, or relay sockets can increase resistance and reduce current flow.
High Beams Not Working (or Low Beams Not Working)
This typically points to:
- High Beam Switch/Relay: Many Jeeps have a separate relay for high beams or the headlight switch itself handles the switching. Check the diagram for this specific component.
- Separate Circuit: The high beam circuit might have its own fuse or wiring path.
- Bulb Filaments: If your bulbs have separate filaments for high and low beams, one filament might have burned out.
Wiring Specific Jeep Models
While the principles are the same, the exact diagrams and wire colors can differ significantly between Jeep generations.
Jeep Cj (1945-1986)
Older CJ models have a simpler wiring system. They often used a single headlight bulb for both low and high beams (dual-filament) and relied more on mechanical switches and simpler relays or direct connections.
- Power Source: Battery.
- Control: Headlight switch, often with a separate dimmer switch (foot-operated or on the steering column).
- Protection: Fuses for the headlight circuit. Relays might be present in later CJ models.
- Wiring: Typically heavier gauge wire due to less sophisticated protection systems.
Example Diagram Breakdown (Conceptual for CJ):
Battery (+) -> Main Fuse -> Headlight Switch (On position) -> Dimmer Switch (Low/High Beam selection) -> Headlight Bulbs (Low/High filaments) -> Ground (-).
Jeep Yj (1987-1995)
The YJ introduced more modern electrical systems. Headlights are usually H4 or H6054 (composite) bulbs. Relays become more common.
- Power Source: Battery.
- Control: Headlight switch and a dimmer switch.
- Protection: Fuses and relays are standard for the headlight circuits.
- Wiring: More complex harness, often with connectors specific to the YJ.
Jeep Tj (1997-2006)
The TJ has a similar electrical system to the YJ, often using H4 or H13 bulbs. The wiring harness is well-integrated.
- Power Source: Battery.
- Control: Headlight switch (often integrated into the turn signal stalk) and dimmer switch.
- Protection: Fuses and relays are essential. The headlight relay is a common point of failure.
- Wiring: Standardized connectors, but corrosion can still be an issue, especially on off-road vehicles.
Jeep Jk (2007-2018)
The JK generation saw significant updates, especially with the introduction of LED options and more complex body control modules (BCMs) influencing lighting.
- Power Source: Battery.
- Control: Headlight switch, often linked to the BCM.
- Protection: Fuses and relays are critical. The BCM itself can sometimes be involved in headlight control logic.
- Wiring: More complex, with multiple connectors. Aftermarket LED headlights often require adapter harnesses, as they may have different pinouts or require resistors to prevent hyper-flashing or dashboard errors.
Jeep Jl (2018-present)
The JL generation features highly integrated electronics, often with LED lighting as standard. The wiring is managed by sophisticated computers.
- Power Source: Battery.
- Control: Body Control Module (BCM) plays a significant role.
- Protection: Fuses, relays, and sophisticated electronic controls within the BCM.
- Wiring: Advanced multiplexed systems. Aftermarket lighting compatibility can be more challenging, often requiring specific CAN bus decoders or adapters.
Upgrading Your Jeep Headlights: Wiring Considerations
Many Jeep owners opt to upgrade their headlights for better visibility, especially for off-roading or night driving. Common upgrades include halogen, HID, or LED headlights. Each requires careful consideration of the wiring.
Halogen Upgrades
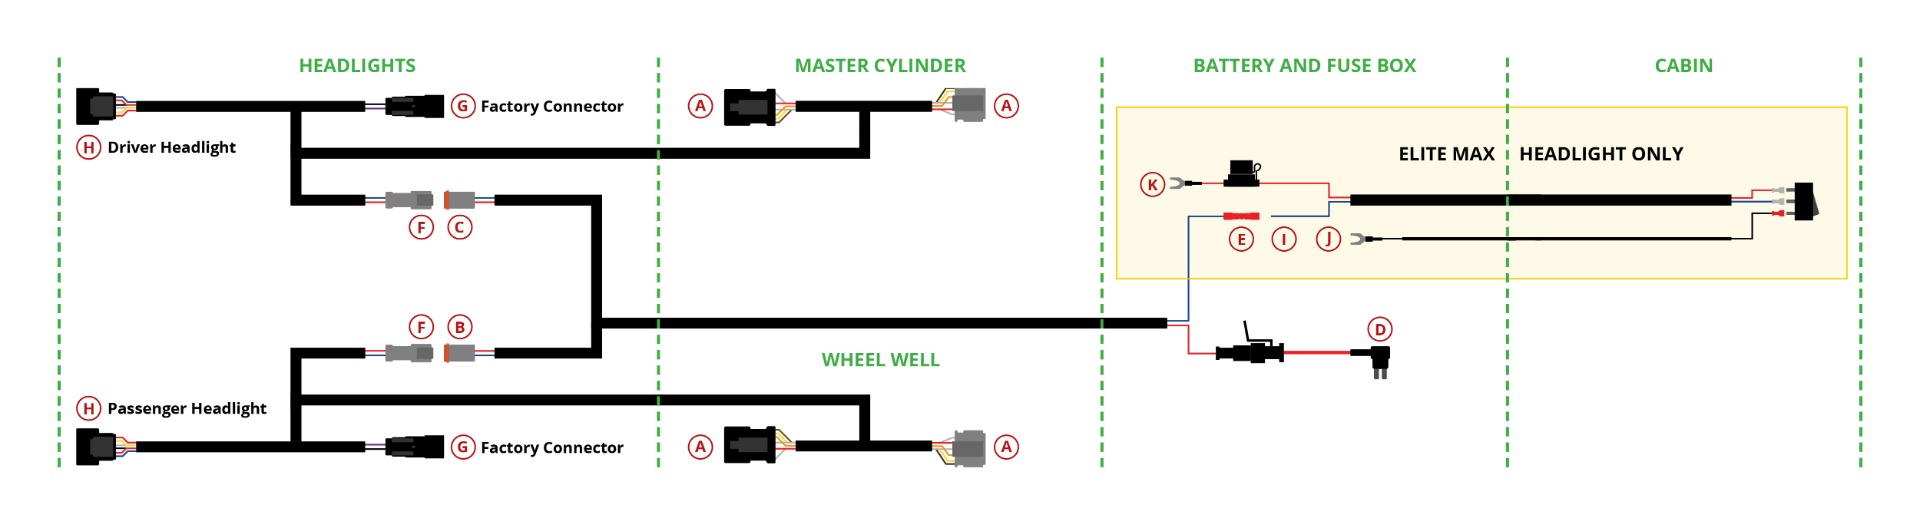
If you’re upgrading from older sealed-beam units to modern halogen H4 bulbs, you’ll likely need an adapter harness. The original wiring might not have the correct connector, and H4 bulbs have distinct pins for low beam, high beam, and ground.
Hid (high-intensity Discharge) Kits
HID kits offer brighter light but require ballast units to ignite and regulate the high voltage needed for the bulb.
- Ballast Connection: The ballast connects to the vehicle’s power (usually via a relay and fuse) and then to the HID bulb.
- Relay Requirement: It’s highly recommended to use a new relay and fuse for HID kits, even if they come with adapters. This ensures the headlights draw power directly from the battery and protects the original headlight switch and wiring from the higher current draw.
- Canbus Issues: Some modern vehicles (like JK and JL) may require CAN bus decoders to prevent the vehicle’s computer from detecting the HID system as a fault (e.g., bulb out warning).
Led Headlights
LED headlights are increasingly popular due to their brightness, efficiency, and longevity.
- Plug-and-Play: Many LED kits are designed as plug-and-play, using adapters that match your Jeep’s original headlight connector.
- Wiring Adapters: For JK and JL models, especially when switching from halogen to LED, you might need specific adapters or decoder modules to handle the different electrical load and prevent dashboard errors. These modules simulate the resistance of a halogen bulb to the vehicle’s computer.
- Power Draw: While LEDs are more efficient, high-power LED headlights can still draw significant current. Ensure your Jeep’s alternator can handle the load, especially if you have many other electrical accessories.
- Focus and Beam Pattern: Proper wiring also ensures the LED headlights are oriented correctly. Some LED units have specific mounting points or adjustments to achieve the correct beam pattern and avoid blinding oncoming drivers.
Pro Tip: When installing aftermarket headlights, always test them *before* fully reassembling everything. Connect the new lights, turn them on, and check both low and high beams. Ensure there are no flickering issues or dashboard warning lights.
Essential Tools For Headlight Wiring
Working on your Jeep’s headlights requires a few basic tools:
- Multimeter: Absolutely essential for testing voltage, continuity, and resistance. This is how you’ll trace power and identify breaks in the circuit.
- Wire Strippers/Crimpers: For preparing wires and attaching connectors or terminals.
- Screwdrivers and Socket Set: To remove headlight bezels, grilles, and other body panels.
- Work Light: Crucial for seeing what you’re doing, especially when working under the hood or in the dark.
- Electrical Tape and Connectors: For making secure and insulated connections. Use high-quality automotive-grade tape and connectors.
- Service Manual: The most important tool. It provides the specific wiring diagram for your Jeep model, wire colors, connector locations, and troubleshooting steps. You can often find these online or purchase them from Jeep dealerships or auto parts stores.

Advanced Wiring Concepts
Beyond the basic on/off circuit, Jeep headlight wiring can involve more complex systems, especially in newer models.
Daytime Running Lights (drls)
Many Jeeps have DRLs, which are often a lower-power version of the headlights or separate small lights that turn on automatically when the engine is running and the headlights are off. The wiring diagram will show how these are controlled, often involving a dedicated fuse, relay, or integration with the BCM.
Automatic Headlights
Some Jeeps feature automatic headlights that turn on based on ambient light sensors. These systems add complexity, with the light sensor feeding information to the