When the cup holder trim in your Jeep Grand Cherokee starts to look worn, cracked, or just plain ugly, it can really detract from the overall interior appeal of your vehicle. This small but noticeable part plays a role in the aesthetics and even the functionality of your car's cabin.
Replacing it might seem like a daunting task, perhaps requiring a trip to a mechanic or a costly dealership visit. However, for many Jeep Grand Cherokee owners, this is a surprisingly DIY-friendly repair.
This guide will walk you through the process, from identifying the right part to successfully installing your new cup holder trim, helping you restore that factory-fresh look to your interior without breaking the bank.
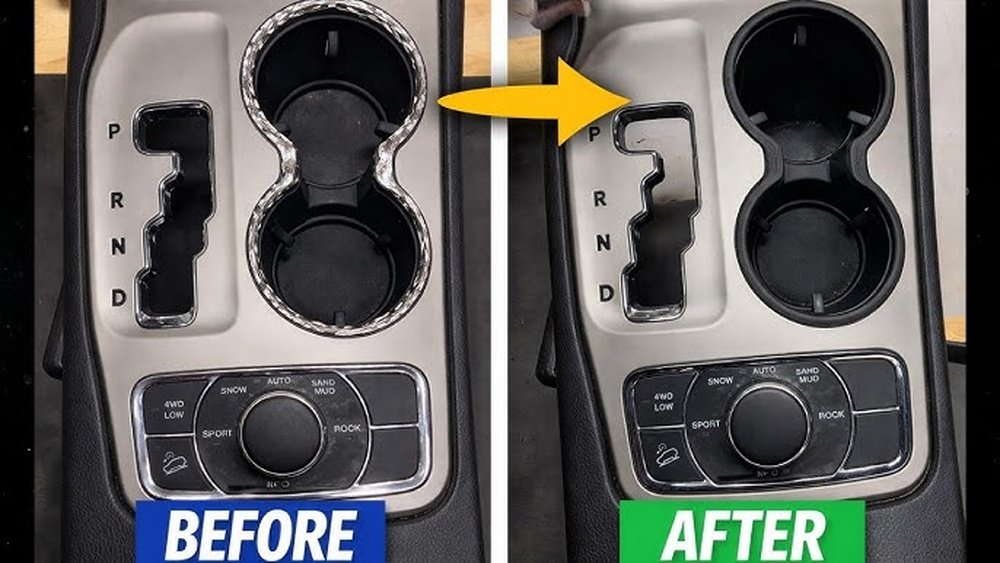
We’ll cover common issues, essential tools, and step-by-step instructions to make this a smooth and rewarding experience.
Understanding The Jeep Grand Cherokee Cup Holder Trim
The cup holder trim in a Jeep Grand Cherokee isn’t just a simple piece of plastic; it’s an integrated part of the center console designed to house your beverages while complementing the vehicle’s interior design. Over time, this trim can suffer from various forms of damage. Exposure to sunlight can cause UV degradation, leading to fading and cracking. Spills, especially sugary drinks, can leave stubborn stains that are impossible to clean and can even eat away at the plastic. Frequent use, or even careless placement of items, can result in scratches, scuffs, and chips. In some cases, the trim might become loose, rattling during driving, or a piece might even break off entirely.
Jeep Grand Cherokees, depending on the model year and trim level, can feature different styles of cup holder assemblies and trim pieces. Some models have a single, larger trim piece that encompasses the entire cup holder area, while others might have smaller, individual components.
It’s crucial to identify the exact part number or description that matches your specific Jeep year and model to ensure a perfect fit. For instance, a trim piece designed for a 2015 Grand Cherokee might not be interchangeable with one for a 2020 model, even if they look similar at first glance.
Understanding these variations is the first step in a successful replacement.
Common Issues Affecting Cup Holder Trim
The wear and tear on your Jeep Grand Cherokee’s cup holder trim can manifest in several ways, impacting both its appearance and structural integrity. Recognizing these common problems will help you pinpoint the exact issue and find the correct replacement part.
- Cracking and Fading: Prolonged exposure to direct sunlight, particularly in warmer climates, is a primary culprit. The UV rays break down the plastic polymers, causing the trim to become brittle, leading to cracks that can start small but spread over time. Fading is also a common symptom, where the original color of the trim darkens or lightens unevenly, making it look old and neglected.
- Scratches and Scuffs: Everyday use is unavoidable. Keys, coins, phones, and other items placed in or around the cup holders can easily leave scratches and scuff marks. These are often superficial but can accumulate, making the trim look messy and worn. Deep gouges can also occur if sharp objects are dropped or dragged across the surface.
- Stains and Discoloration: Spilled drinks, especially coffee, soda, or juices, can leave permanent stains if not cleaned up immediately. The porous nature of some plastic trims means liquids can seep in, causing stubborn discoloration that resists cleaning. In some instances, acidic or sugary spills can even etch the surface of the plastic.
- Loose or Broken Pieces: With age and repeated stress, the clips or mounting points that hold the trim in place can weaken or break. This can result in the trim becoming loose and rattling during driving, which is not only annoying but also indicates a potential safety issue if it obstructs other controls. In severe cases, parts of the trim can break off completely.
- Wear on Buttons or Covers: Some Grand Cherokee models feature integrated buttons or sliding covers for the cup holders. The trim surrounding these elements can also wear down, with button labels rubbing off or the sliding mechanism becoming stiff or inoperable.
Identifying Your Specific Trim Part
Before you can replace your cup holder trim, you need to identify the exact part number or description for your specific Jeep Grand Cherokee model and year. This is crucial because Jeep often makes subtle changes between model years and even between different trim levels within the same year.
One of the most reliable ways to find the correct part is to check your vehicle’s VIN (Vehicle Identification Number). Many online auto parts retailers and dealerships allow you to enter your VIN to see a catalog of parts specifically compatible with your vehicle. This eliminates guesswork.
Alternatively, you can consult your Jeep owner’s manual. While it might not list every individual trim piece by name, it can sometimes provide diagrams of the interior components or direct you to the parts department for specific information.
If you have the original part removed, look for part numbers stamped directly onto the underside or edges of the trim piece. These numbers are usually a combination of letters and numbers and are the most definitive way to ensure you order the correct replacement.
Finally, browsing online forums dedicated to Jeep Grand Cherokees can be incredibly helpful. Other owners who have performed similar replacements often share the exact part numbers they used for specific model years.
You can also find detailed photos and descriptions that help you visually confirm you're looking at the right component.
Tools And Materials Needed For Replacement
Successfully replacing your Jeep Grand Cherokee’s cup holder trim doesn’t require a professional mechanic’s toolkit. Most of the necessary items are common household tools or inexpensive items you can find at any auto parts store or hardware store.
Having the right tools makes the job significantly easier and reduces the risk of damaging surrounding components.
Here’s a list of common tools and materials you’ll likely need:
- Trim Removal Tools: These are essential. They are typically made of plastic or nylon and are designed to pry away interior trim panels without scratching or damaging the surrounding surfaces. Metal tools like screwdrivers can easily mar the plastic or paint. A set usually includes various shapes and sizes, perfect for getting into tight spaces.
- Screwdrivers: You might need a Phillips head and a flathead screwdriver. While trim tools are preferred for prying, screws are often used to secure the cup holder assembly or surrounding console pieces. Ensure you have a few different sizes.
- Socket Set or Wrenches: In some cases, the cup holder assembly might be held in place by nuts or bolts. A basic socket set with common sizes (like 10mm, 12mm, 13mm) will be useful.
- Gloves: Wearing work gloves can provide a better grip and protect your hands from sharp edges or dirt.
- Cleaning Supplies: Before installing the new trim, it’s a good idea to clean the area. This includes all-purpose cleaner, microfiber cloths, and possibly some rubbing alcohol for removing any adhesive residue or grime.
- Replacement Trim Piece: This is the star of the show! Ensure you have the correct part that matches your Jeep Grand Cherokee’s year, make, and model.
- Small Container or Bag: To keep track of any screws or small parts you remove during the disassembly process. Labeling these containers can save a lot of confusion later.
- Optional: Small Pry Bar or Flathead Screwdriver (with tape): If you don’t have dedicated trim tools, you can use a small flathead screwdriver or pry bar, but wrap the tip with masking tape to prevent scratching the plastic. Use these with extreme caution.
Having these tools readily available before you start will ensure a smoother and more efficient replacement process. It’s always better to be over-prepared than to get halfway through the job and realize you’re missing a crucial tool.

Step-by-step Replacement Guide
Replacing the cup holder trim in your Jeep Grand Cherokee is a manageable DIY project. The exact steps can vary slightly depending on the specific model year and trim, but the general process involves carefully removing the old trim, preparing the area, and installing the new piece.
1. Prepare Your Workspace And Gather Tools
First, ensure you have a well-lit workspace. If you’re working outdoors, make sure the weather is cooperative. Lay out all your tools and the new trim piece. It’s also a good idea to place a towel or mat on the floor of your Jeep to catch any dropped screws or parts and to protect the carpet.
2. Access The Cup Holder Area
In most Jeep Grand Cherokees, the cup holder trim is part of the center console. You might need to remove a few surrounding panels to gain access.
- Center Console Shifter Plate: Often, the trim surrounding the gear shifter needs to be removed first. This piece usually clips into place. Use your trim removal tools to gently pry it upwards, starting from the rear and working your way forward. Be patient, as some clips can be stubborn. You might hear popping sounds as the clips release.
- Remove Screws: Once the shifter plate is lifted, you’ll likely see screws securing the cup holder assembly or adjacent panels. Remove these screws and place them in your labeled container.
- Pry Away Additional Panels: Depending on your model, there might be other small panels or trim pieces around the cup holder that need to be detached. Use your trim removal tools to carefully release their clips.
3. Remove The Old Cup Holder Trim
With the surrounding panels removed, you should have better access to the cup holder trim itself.
- Identify Mounting Points: Look for screws or clips holding the trim in place. Sometimes, the entire cup holder assembly lifts out as one unit, and the trim is attached to it. In other cases, the trim might be a separate piece that snaps or clips around the cup holder opening.
- Disconnect Electrical Connectors (If Applicable): If your cup holder area has features like USB ports, 12V outlets, or illuminated elements, there might be electrical connectors attached to the assembly. Gently disconnect these by pressing the release tab and pulling the connector straight out.
- Gently Pry or Lift: If the trim is a separate piece, use your trim removal tools to carefully pry it away from the console. Work slowly around the edges, releasing the clips one by one. If the entire cup holder assembly needs to be removed, look for specific tabs or screws that hold it down. Lift it carefully to avoid damaging wires.
4. Clean The Area
Before installing the new trim, take this opportunity to thoroughly clean the area where the old trim was. Use your all-purpose cleaner and microfiber cloths to remove any dust, grime, or sticky residue. If there were any spills, ensure the area is completely dry and clean. This ensures the new trim sits flush and looks its best.
5. Install The New Cup Holder Trim
Now, it’s time to install the new part.
- Position the New Trim: Align the new trim piece with the opening or the cup holder assembly. If it’s a separate trim piece, ensure all clips align with their corresponding slots in the console. If you removed the entire assembly, reconnect any electrical connectors that were unplugged.
- Secure the Trim: Gently press the new trim into place. You should hear or feel the clips snapping into position. If screws were removed, reinsert them and tighten them snugly, but avoid over-tightening, which can strip the threads or crack the plastic.
- Reassemble Console Panels: Once the new trim is securely in place, begin reassembling the center console panels in the reverse order of removal. Make sure all clips snap firmly into place and all screws are reinserted.
6. Final Check
After reassembly, test the new trim. Make sure it feels secure and doesn't rattle.
Check that the cup holders function properly and that any associated buttons or covers work as expected. Clean any fingerprints off the new trim with a microfiber cloth.
Troubleshooting Common Installation Issues
Even with careful preparation, you might encounter a few hiccups during the replacement process. Knowing how to troubleshoot common issues can save you time and frustration.
- Stubborn Clips: If clips refuse to release, don’t force them too hard. Sometimes, a little wiggle or a different angle with your trim removal tool can help. Applying a small amount of penetrating lubricant (like WD-40, used sparingly) to the area around a stubborn clip might help, but be sure to wipe away any excess to avoid staining or attracting dirt.
- Mismatched Part: If the new trim doesn’t seem to fit, double-check that you ordered the correct part number for your specific Jeep Grand Cherokee year and trim level. Even minor differences can prevent proper installation. Refer back to your VIN or the part number on the old piece.
- Loose Screws or Clips: If screws don’t seem to tighten properly, the threaded hole might be stripped. You can try using a slightly larger screw of the same thread type, or if it’s a plastic clip that’s broken, you might need to use a small amount of strong plastic adhesive (like E6000 or a two-part epoxy) to secure it. Use adhesive sparingly.
- Rattling After Installation: If the new trim rattles, it might not be fully seated, or a clip might not have engaged properly. Go back and gently press around the edges of the trim to ensure it’s flush. Check that all surrounding panels are also securely fastened. Sometimes, a small piece of felt tape or foam padding can be applied to areas where plastic meets plastic to dampen vibrations.
- Damage to Surrounding Trim: If you accidentally scratch or mar the surrounding plastic during removal or installation, don’t panic. Minor scratches can sometimes be buffed out with a plastic polish. For deeper scratches, you might consider using a color-matching plastic repair kit or touch-up paint, though this can be challenging to get perfect.
By approaching these issues methodically and using the right tools, you can overcome most common installation problems and achieve a professional-looking result.
Maintaining Your New Cup Holder Trim
Once you’ve successfully replaced your Jeep Grand Cherokee’s cup holder trim, you’ll want to keep it looking its best for as long as possible. Proper maintenance is key to preserving its appearance and preventing premature wear.
The most important aspect of maintenance is regular cleaning. Dust and light debris can be wiped away with a dry microfiber cloth. For more stubborn dirt or minor spills, use a damp cloth with a mild all-purpose cleaner. Avoid harsh chemicals, abrasive cleaners, or scouring pads, as these can scratch or dull the surface of the new trim.
Promptly clean up any spills. Sugary drinks or acidic liquids are particularly damaging. Blot up spills immediately with a clean cloth. If residue remains, use a slightly damp cloth with a diluted solution of car interior cleaner. Ensure the area is dried thoroughly afterward.
Be mindful of what you place in the cup holders. Avoid sharp or heavy objects that could