Wiring KC lights on your Jeep JK can transform your off-road adventures, making night trails safer and giving your vehicle a rugged, custom look. For many Jeep owners, installing extra lighting is one of the first upgrades they try.
But wiring these powerful lights isn't just about connecting wires and flipping a switch it requires planning, the right tools, and a clear step-by-step approach.
If you’re not sure how to begin, don’t worry. This guide will walk you through every part of the process, from choosing the right KC lights to making safe, reliable electrical connections that will last for years.

Understanding Kc Lights And Jeep Jk Compatibility
KC lights have a strong reputation in the off-road world. They offer powerful illumination, durable construction, and a wide range of designs. Before you begin wiring, it’s important to understand what makes them special and how they fit with your Jeep JK’s electrical system.
What Are Kc Lights?
KC lights are auxiliary lighting. They are not meant to replace your headlights but to add extra visibility in dark or foggy conditions. There are several types:
- Spotlights: Focused beams, long-range
- Floodlights: Wide beams, short-range
- Combo lights: Mix of spot and flood
Electrical Capacity Of Jeep Jk
The Jeep JK’s electrical system can handle extra lights, but only if you plan correctly. KC lights draw between 35 to 100 watts each, depending on the model. Your JK’s alternator typically provides about 160 amps. However, adding too many lights without relays or proper wiring can overload your circuits.
Placement Options
Most Jeep JK owners mount KC lights on:
- The front bumper
- The windshield pillar (A-pillar)
- The roof rack or above the windshield
Each location affects wiring length, difficulty, and weather exposure.
Tools And Materials Needed
Before you start, gather all necessary tools and materials. This will save time and make the process smoother.
Essential Tools
- Wire stripper/crimper
- Socket wrench set
- Screwdrivers (Phillips and flat)
- Electrical tape
- Heat shrink tubing
- Multimeter (for testing voltage)
Materials
- KC light kit (includes lights, switch, relay, and wiring harness)
- Extra wire (14-16 gauge, for longer runs)
- Ring terminals
- Inline fuse holder (usually 15-30 amps)
- Zip ties (for cable management)
A KC light kit often comes with most of what you need, but you may need to purchase longer wires or extra connectors for custom setups.
Planning The Wiring Path
Planning is often overlooked, but it’s a critical step. A smart wiring plan can prevent electrical problems, keep your Jeep looking tidy, and make future repairs much easier.
Map Your Route
Think about where you want to mount your lights and where the wiring will go. The most common path is:
- From the lights to the relay (close to the battery)
- From the relay to the switch (inside the cabin)
- From the relay to the battery (power)
- From the relay to ground (chassis)
Avoiding Damage
Run wires along factory harnesses when possible. Avoid sharp edges, hot engine parts, and moving components like the steering shaft.
Choosing Relay And Fuse Location
Place the relay close to the battery but away from direct water spray. Mount the inline fuse within 12 inches of the battery terminal for maximum safety.
Step-by-step Wiring Process
Once you’ve planned your route, it’s time to wire the KC lights. Take your time rushing can lead to mistakes.
Step 1: Disconnect The Battery
Safety first. Disconnect the negative terminal of your Jeep’s battery to prevent accidental shorts.
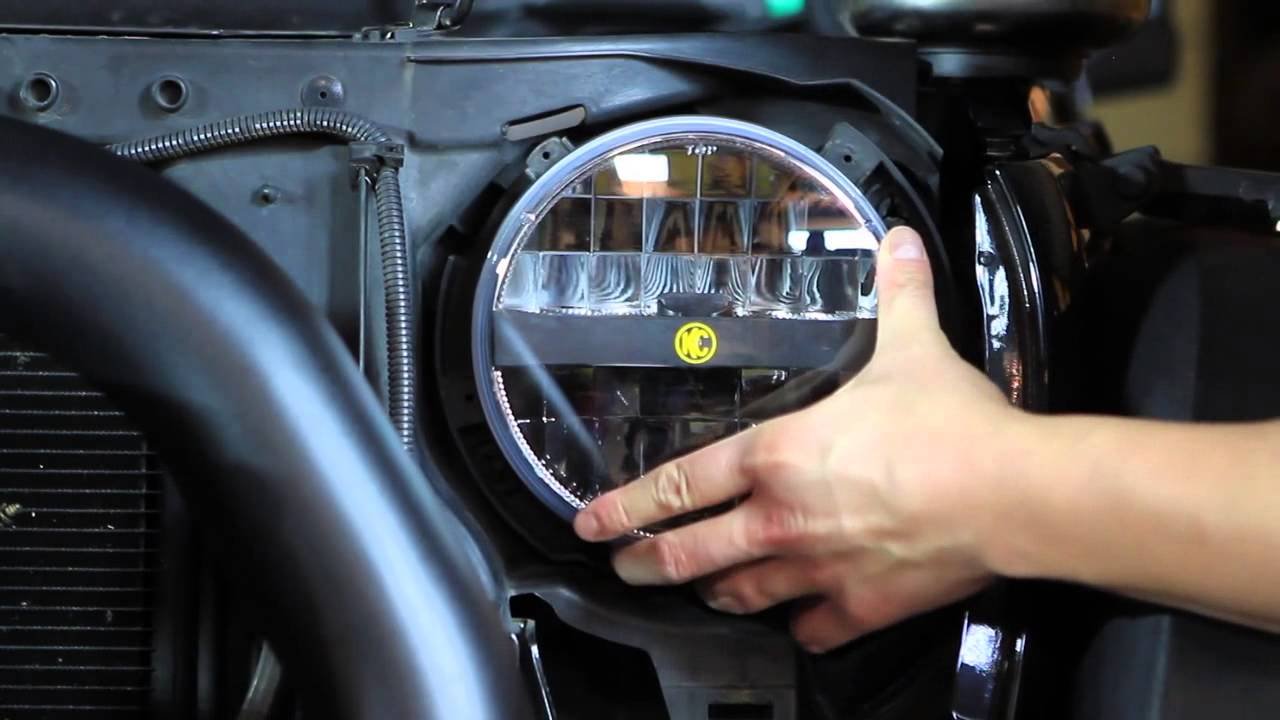
Step 2: Mount The Kc Lights
Follow the included instructions for your specific lights. Use sturdy brackets and make sure they’re pointed where you want them.
Step 3: Install The Relay
Mount the relay near the battery using a factory bolt or screw. The relay is essential for handling the higher current of the KC lights without burning out your Jeep’s switches.
Step 4: Run The Wires
- From the lights to the relay: Use the wires provided, or extend them with 14-16 gauge wire if necessary. Connect the positive wire from each light to the relay output.
- From the relay to the battery: Use a ring terminal to connect the relay’s power input to the positive battery post, with the inline fuse in between.
- From the relay to ground: Attach the relay ground wire to a clean, bare metal spot on the chassis.
- From the relay to the switch: Route the switch wire through the firewall grommet into the cabin, then to your chosen switch location.
Step 5: Install The Switch
Pick a spot on your dashboard or center console for the switch. Drill a small hole if necessary.
Connect the switch to the relay trigger wire, and ground the switch if required.
Step 6: Secure And Protect Wires
Bundle wires with zip ties and cover exposed connections with heat shrink tubing or electrical tape. Double-check that nothing is loose or rubbing against metal.
Step 7: Reconnect The Battery And Test
Reconnect the negative battery cable. Turn on the ignition, flip the switch, and make sure the KC lights work.
Test both with the engine off and running to check for flicker or dimming.
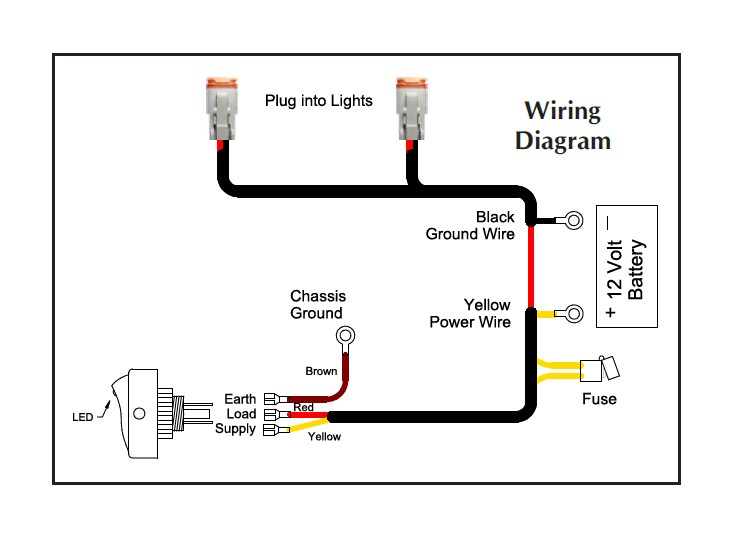
Wiring Diagram For Kc Lights On Jeep Jk
A simple diagram can make sense of all these connections. Here’s a basic overview:
| Component | Connection |
|---|---|
| KC Light | Positive wire to relay output, negative to chassis ground |
| Relay | Input from battery (with fuse), output to KC light, trigger from switch, ground to chassis |
| Switch | One wire to relay trigger, one to ground (if needed) |
| Battery | Positive to relay (with fuse), negative to chassis |
Common Mistakes And How To Avoid Them
Many first-timers run into problems that could have been avoided with a little extra care. Here are some issues to watch out for:
- Skipping the relay: Never wire high-wattage lights directly to a switch. This can burn out the switch or even cause a fire.
- Not using a fuse: Always protect your circuit with an inline fuse. Without it, a short could damage your battery or wiring.
- Poor grounding: A weak ground connection causes flickering or dim lights. Always sand the grounding spot to bare metal.
- Exposed connections: Moisture can cause corrosion and shorts. Use heat shrink tubing or weatherproof connectors.
A useful tip: Many people overlook the importance of wire gauge. Using wire that’s too thin can lead to overheating. Stick with 14-16 gauge wire for most KC lights; if you’re running more than 2-3 lights together, consider 12 gauge.
Comparing Kc Lights: Power And Beam Patterns
Different KC lights have different features. To help you choose the right ones for your Jeep JK, here’s a quick comparison.
| Model | Beam Type | Wattage | Lumens | Best Use |
|---|---|---|---|---|
| KC Gravity Pro6 | Combo | 40W per light | 2,300 | All-purpose/off-road |
| KC Daylighter | Spot | 100W | 2,000 | Long-distance |
| KC Flex Array | Flood | 20W per light | 1,200 | Wide-area |
Example: Wiring Two Kc Spotlights On The Front Bumper
Let’s look at a real-world example to bring everything together.
Suppose you want to wire two KC Daylighters on your front bumper. Here’s how you’d do it:
- Mount both lights using the included hardware.
- Run the positive wires from each light to the relay output terminal.
- Connect the relay’s power input to the battery with a 20A inline fuse.
- Connect the relay ground to the chassis.
- Route the relay trigger wire through the firewall to a switch on your dashboard.
- Attach the negative wires from each light to a chassis ground point near the bumper.
- After securing all wires, reconnect the battery and test.
With this method, you can easily add more lights in the future by connecting additional relays and following the same basic steps.
Troubleshooting Kc Light Wiring Problems
Even with careful planning, issues can occur. Here’s a quick troubleshooting guide:
| Problem | Likely Cause | Solution |
|---|---|---|
| Lights won’t turn on | Blown fuse, bad ground, switch not connected | Check fuse, tighten ground, inspect switch wiring |
| Lights flicker | Loose connection, thin wire, poor ground | Secure all wires, use thicker gauge, sand ground |
| Switch gets hot | No relay used, too much current | Install relay, use proper switch |
| Battery drains overnight | Relay stuck closed, light wired direct to battery | Replace relay, wire through switch |
One thing beginners often miss: If your Jeep JK has a complicated electrical system (with remote start, alarm, or aftermarket stereo), check that your new wiring does not interfere with these circuits.
Final Safety Checks And Legal Considerations
Before you hit the road or trail, do a final inspection:
- Make sure all wires are secure and away from moving parts.
- Double-check that the inline fuse is installed.
- Test the lights in both daytime and nighttime conditions.
Also, check your local laws about auxiliary lighting. In some states, extra lights must be covered while driving on public roads, or they must turn off with the high beams. Staying legal helps avoid fines and keeps you safe.
If you ever feel unsure about working with vehicle wiring, consider consulting a professional. Poorly installed electrical components can lead to dangerous situations.
KC lights are a great way to customize your Jeep JK. With the right planning, quality components, and careful work, you’ll have powerful, reliable lighting for years to come. For more in-depth technical guidance, visit the official KC Hilites Installation Guides.

Frequently Asked Questions
How Many Kc Lights Can I Safely Run On My Jeep Jk?
Most Jeep JKs can handle up to four KC lights without major upgrades, as long as you use relays and proper wiring. If you add more, consider upgrading your alternator or battery.
Do I Need A Relay For Every Set Of Kc Lights?
Yes, a relay is important for each set of lights to protect your switches and wiring. Never wire high-wattage lights directly to a dash switch.
Can I Wire Kc Lights To Turn On With My High Beams?
Yes, you can use a tap-in wire from the high beam circuit as the relay trigger. This way, your KC lights will only come on with high beams. Be sure it’s legal in your area.
What Gauge Wire Should I Use For Kc Light Wiring?
For most KC lights, 14-16 gauge wire is enough. If wiring multiple lights together, use 12 gauge for safety and to prevent voltage drop.
Why Are My Kc Lights Dim Or Flickering After Wiring?
This is often due to a bad ground connection or wires that are too thin. Check your ground points and upgrade to thicker wire if needed.


















