How To Change The Tail Light On A 2010 Jeep Liberty: A Step-by-step Guide
Dealing with a broken tail light on your 2010 Jeep Liberty can be a frustrating experience. Not only does it affect your vehicle’s appearance, but more importantly, it poses a safety risk and can lead to unwanted attention from law enforcement.
Driving with a faulty tail light is illegal in most places because it impairs your ability to signal turns and indicates your presence to other drivers, especially at night. Fortunately, replacing a tail light bulb or the entire tail light assembly on a 2010 Jeep Liberty is a manageable DIY project that most vehicle owners can tackle with basic tools and a little patience.
This guide will walk you through the entire process, from identifying the problem to successfully installing the new part. We’ll cover everything you need to know, ensuring you can get your Jeep Liberty back to its safe and legal operating condition.
Understanding Your 2010 Jeep Liberty’s Tail Light System
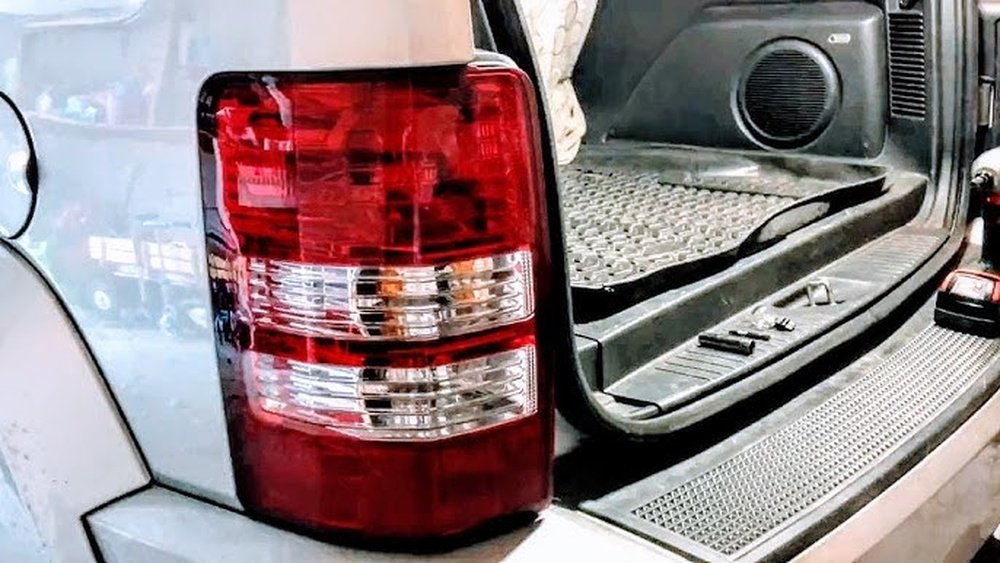
The tail light assembly on your 2010 Jeep Liberty is designed to provide essential signaling and visibility functions. It typically houses multiple bulbs, each serving a specific purpose: the brake light, the tail light (running light), the turn signal, and the reverse light. Sometimes, these are individual bulbs, and other times they are integrated into a single bulb with multiple filaments. Understanding which bulb is out is the first step. A tail light that is always on when the headlights are on indicates a problem with the running light filament. If it only lights up when you press the brake pedal, the brake light filament might be the issue. If the light flashes incorrectly or not at all when you activate the turn signal, that specific bulb or circuit is the culprit. Finally, if the light doesn’t illuminate when you shift into reverse, the reverse light bulb needs attention.
The entire tail light assembly is usually secured to the Jeep’s body by a few screws or bolts, often accessible from inside the cargo area. The electrical connection is made via a wiring harness that plugs into the back of the assembly.
For a 2010 Jeep Liberty, the tail light assembly is a single unit that contains all the necessary lights for one side of the vehicle. When a bulb burns out, you might be able to replace just the bulb, but often, especially if the housing is cracked or the electrical contacts are corroded, it’s more practical and reliable to replace the entire tail light assembly.
This ensures all bulbs are fresh and the electrical connections are sound.
Tools And Materials You’ll Need
Before you begin the replacement process, gather all the necessary tools and materials. Having everything on hand will make the job smoother and prevent you from having to stop midway to find a missing item.
Essential Tools:
- Screwdriver Set: You will likely need a Phillips head screwdriver and possibly a flathead screwdriver for prying or turning stubborn screws.
- Socket Wrench Set: A standard set with various socket sizes, particularly a 10mm or 13mm socket, is often required for removing bolts that secure the tail light assembly.
- Trim Removal Tools: Plastic trim removal tools are highly recommended. They allow you to pry away interior panels and trim pieces without scratching or damaging the plastic. Metal tools can easily mar your Jeep’s interior.
- Gloves: Wearing gloves will protect your hands from dirt, grease, and potential sharp edges on the old tail light assembly.
- Safety Glasses: Essential for protecting your eyes from debris that might fall or be dislodged during the process.
- Rag or Shop Towels: Useful for cleaning the area around the tail light and wiping away any dirt or moisture.
Materials:
- Replacement Tail Light Assembly or Bulb: Ensure you have the correct part number for your 2010 Jeep Liberty. You can find this information in your owner’s manual, by searching online with your Jeep’s specific year, make, and model, or by visiting an auto parts store. It’s often best to purchase a replacement part from a reputable auto parts supplier to ensure quality and fitment.
- New Bulbs (if only replacing bulbs): If you’re only replacing the bulbs, make sure you have the correct type and wattage for each function (brake, tail, turn signal, reverse). The owner’s manual will specify these.
Having these items ready will set you up for success. Don’t underestimate the usefulness of trim removal tools; they can save you a lot of hassle and potential damage to your vehicle’s interior.
Step-by-step Guide To Replacing The Tail Light Assembly
Replacing the tail light assembly on your 2010 Jeep Liberty is a straightforward process. Follow these steps carefully to ensure a correct and secure installation.
Step 1: Access the Tail Light Assembly
- Open the rear liftgate of your Jeep Liberty.
- Locate the tail light assembly you need to replace on the side of the vehicle.
- Look inside the cargo area, along the edge of the interior trim panel where the tail light assembly meets the body. You should find access to the mounting bolts or screws.
- For most 2010 Jeep Liberty models, there will be two or three nuts or bolts holding the tail light assembly in place. These are typically accessible by peeling back the carpeted trim panel or by removing a plastic cover.
- Use your Phillips head screwdriver or socket wrench to remove these fasteners. Keep them in a safe place, like a small container or your pocket, so you don’t lose them.
Step 2: Remove the Old Tail Light Assembly
- Once the fasteners are removed, the tail light assembly should be loose.
- Gently pull the assembly away from the body of the Jeep. It might be a bit stiff due to the rubber gasket that seals it against the body.
- Be careful not to pull too hard or too quickly, as the wiring harness is still attached to the back of the assembly.
- On the back of the tail light assembly, you’ll find the electrical connector. Press the release tab on the connector and carefully pull it away from the assembly.
Step 3: Transfer Bulbs (If Necessary)
- If you purchased a new tail light assembly that does not come with bulbs pre-installed, or if you are only replacing a bulb within the assembly, you will need to transfer the bulbs from the old assembly to the new one.
- The bulbs are usually held in place by a socket that twists and locks into the tail light housing.
- Gently twist each bulb socket counter-clockwise to release it from the housing.
- Pull the socket and bulb straight out.
- Note the position of each bulb so you can install them correctly in the new assembly.
- If you are replacing a bulb, carefully pull the old bulb straight out of the socket and insert the new bulb, ensuring it’s seated properly.
Step 4: Connect the New Tail Light Assembly
- Take your new tail light assembly and align the electrical connector with the wiring harness coming from the Jeep.
- Push the connector firmly onto the assembly until it clicks into place, ensuring a secure connection.
Step 5: Mount the New Tail Light Assembly
- Carefully align the new tail light assembly with the mounting holes on the body of the Jeep.
- Gently push the assembly into place, ensuring the gasket seals properly against the body.
- Reinstall the bolts or nuts that you removed in Step 1. Tighten them securely, but do not overtighten, as this could crack the plastic housing or damage the body.
Step 6: Test the New Tail Light
- Before closing everything up, it’s crucial to test the new tail light assembly.
- Turn on your Jeep’s headlights to check the tail light (running light).
- Step on the brake pedal to verify the brake lights are working.
- Activate your turn signals (left and right) to confirm the turn signals are functioning correctly.
- If your Jeep has a reverse light integrated into the tail light assembly, shift into reverse with the engine running to check its operation.
- Ensure all lights illuminate as expected and are the correct brightness and color.
Step 7: Reassemble Interior Trim
- If you had to peel back or remove any interior trim panels or covers, carefully put them back into place. Ensure they snap or screw back in securely.
By following these steps, you should be able to successfully replace the tail light assembly on your 2010 Jeep Liberty, restoring both the appearance and safety of your vehicle.
Replacing Individual Bulbs (if Applicable)
In some cases, you might find that only a specific bulb within the tail light assembly has failed, rather than the entire unit. If the housing is intact and free from cracks, and the electrical connections seem clean, replacing just the bulb can be a more economical solution.
Locating the Bulb Socket:
- First, identify which bulb needs replacing. This might involve having a helper observe the lights as you test them (headlights on, brake pedal pressed, turn signals activated).
- Access the back of the tail light assembly as described in Step 1 of the assembly replacement guide. You’ll need to remove the interior trim panel to get to the back of the lights.
- Once you can see the back of the tail light assembly, you’ll see several bulb sockets. They are typically circular plastic pieces that twist into the housing.
Removing the Old Bulb:
- Each bulb socket usually twists counter-clockwise about a quarter turn to unlock it from the tail light housing.
- Gently pull the socket and the old bulb straight out.
- If the bulb is stuck in the socket, you might need to carefully wiggle it or use a small flathead screwdriver to gently pry it out, being careful not to damage the socket.
Installing the New Bulb:
- Purchase the correct replacement bulb. Your 2010 Jeep Liberty owner’s manual will specify the bulb types (e.g., 7443 for dual-filament bulbs, 3157 for brake/turn, etc.). Auto parts stores can also help you find the correct ones.
- Hold the new bulb by its base, avoiding touching the glass part with your bare fingers. Skin oils can cause the bulb to overheat and burn out prematurely. If you do touch the glass, clean it with rubbing alcohol and a lint-free cloth.
- Insert the new bulb straight into the socket. It should seat firmly.
- Twist the socket clockwise to lock it back into the tail light housing. Ensure it’s snug and properly aligned.
Testing:
- After replacing the bulb, reassemble any trim panels.
- Test the specific light function to ensure the new bulb is working correctly.
Pro Tip: If you’re unsure about the bulb type or if multiple bulbs seem to be out, it might be simpler and more cost-effective in the long run to replace the entire tail light assembly. This ensures all bulbs are new and the electrical connections are fresh.
Common Issues And Troubleshooting
While replacing a tail light is generally straightforward, you might encounter a few common issues. Knowing how to troubleshoot them can save you time and frustration.
1. Tail Light Still Doesn’t Work After Replacement:
- Check the Bulb: Ensure the new bulb is seated correctly in its socket and that the socket is properly locked into the housing. Double-check that you purchased the correct bulb type for your 2010 Jeep Liberty.
- Check the Electrical Connector: Make sure the wiring harness connector is firmly plugged into the tail light assembly. Sometimes the connector can seem plugged in but isn’t fully seated. Inspect the connector for any signs of corrosion, bent pins, or damage. Clean any corrosion with electrical contact cleaner.
- Check Fuses: Your Jeep has a fuse box that protects the electrical circuits. Consult your owner’s manual to locate the fuse(s) related to the tail lights or brake lights. If a fuse is blown (you’ll see a broken wire inside), replace it with a new fuse of the exact same amperage rating. If the new fuse blows immediately, there’s a short circuit in the wiring that needs professional diagnosis.
- Check Wiring: Inspect the wiring harness for any damage, cuts, or frayed wires between the tail light assembly and the fuse box.
- Grounding Issue: A poor ground connection can cause lights to malfunction. Ensure the ground wire (if separate) is securely attached to a clean metal surface on the Jeep’s chassis.
2. New Assembly Doesn’t Fit Properly:
- Incorrect Part: Verify that you purchased the correct tail light assembly for a 2010 Jeep Liberty. There might be slight variations between model years or trim levels.
- Obstructions: Make sure there are no hidden clips, wires, or debris preventing the assembly from seating flush against the body.
- Alignment: Ensure you are aligning the assembly with the mounting studs or holes correctly before attempting to secure it.
3. Water Leaks into the Tail Light Assembly:
- Gasket Seal: The rubber gasket around the tail light assembly is crucial for preventing water intrusion. Ensure the gasket is properly seated on the new assembly and that it creates a tight seal against the vehicle’s body. If the gasket is damaged or missing, you may need to replace it.
- Cracked Housing: If the tail light housing itself has cracks, water can enter. In this case, the entire assembly needs to be replaced.
4. Turn Signal Blinks Too Fast or Too Slow:
- Bulb Wattage: This issue is more common with LED replacements but can sometimes occur with incandescent bulbs. If you installed a bulb with a different wattage than specified, it can affect the blinker speed. Ensure you are using the correct wattage bulbs.
- Faulty Flasher Relay: The flasher relay controls the blinking speed. If it’s malfunctioning, it can cause erratic blinking. This relay is usually located in the fuse box.
Example: When I replaced a tail light on my old SUV, the new brake light wouldn’t come on at all. After checking the bulb and connection, I found a blown fuse in the fuse box. Replacing the fuse fixed the problem instantly.
If you’ve tried these troubleshooting steps and the issue persists, it’s advisable to consult a qualified mechanic. Electrical issues can sometimes be complex and require specialized diagnostic tools.
Comparing Tail Light Options: Oem Vs. Aftermarket
When it comes time to replace your 2010 Jeep Liberty’s tail light, you’ll likely encounter two main categories of replacement parts: Original Equipment Manufacturer (OEM) and aftermarket. Understanding the differences can help you make an informed decision based on your budget and needs.
OEM (Original Equipment Manufacturer) Parts:
- What they are: These are parts made by the same company that manufactured the original tail light for your Jeep Liberty when it was built. They are often sourced directly from the vehicle manufacturer or their authorized suppliers.
*