If you own a classic Jeep CJ5 from 1971, you know it’s a vehicle built for adventure. But if you still have the old full-time drive system, you might be missing out on some big benefits. One simple upgrade—installing free wheel hubs—can improve fuel efficiency, reduce wear on your drivetrain, and make steering easier. Many Jeep owners are surprised by how much difference free wheel hubs make on and off the trail. This guide will walk you through the full process, step by step, with practical advice, important warnings, and tips even seasoned Jeep fans sometimes overlook.
Why Install Free Wheel Hubs On A 1971 Jeep Cj5?
When your Jeep is in two-wheel drive, the front wheels usually turn the front axle, driveshaft, and differential, even if power is not going to them. Free wheel hubs (also called locking hubs) disconnect these parts, so they don’t spin when you don’t need four-wheel drive. The result? Better fuel economy, quieter rides, and less wear on expensive parts.
Some owners upgrade for off-road performance. Others do it to keep their classic CJ5 running longer.
But before you start, it’s important to know what’s involved and what tools you’ll need.
Tools And Parts You Need
Before you start, gather the right tools and parts. Some are common, but a few are specialized for this job:
- Socket wrench set (including 1/2″ and 9/16″ sockets)
- Screwdrivers (both flat and Phillips)
- Snap ring pliers
- Torque wrench
- Hammer and punch
- Grease (wheel bearing type)
- Clean rags
- Jack and sturdy jack stands
- Wheel chocks
- New free wheel hub kit (make sure it matches the Dana 27 or Dana 30 front axle)
- Service manual (Jeep’s official or a reputable aftermarket version)
Pro tip: Don’t skimp on the hub kit. Cheap models can fail quickly, especially in rough conditions. Always check the kit for missing parts before starting.
Safety First: Preparing Your Jeep
Never work under a vehicle that isn’t properly supported. Here’s how to get your Jeep ready:
- Park on a level surface.
- Put the transmission in gear and set the parking brake.
- Use wheel chocks to block the rear wheels.
- Loosen the front wheel lug nuts slightly before lifting the Jeep.
- Use a jack to lift the front end. Place jack stands under the frame for solid support.
- Remove the front wheels for easy access.
Take your time with this step. Many injuries happen because vehicles aren’t supported correctly.
Removing The Old Hubs
Most 1971 CJ5s came with drive flanges (not locking hubs). Here’s how to remove them:
- Clean the hub face. Dirt can hide small screws or pins.
- Remove the bolts or screws holding the drive flange in place.
- Gently tap around the flange with a hammer if it’s stuck. Don’t pry hard—you might damage the hub.
- Once loose, pull the flange off. Some models have a snap ring on the axle shaft—remove this with snap ring pliers.
- Clean the exposed area. Remove old gasket material with a scraper.
Watch for small parts. Springs, pins, or washers can fall out and get lost.
Inspecting Wheel Bearings And Seals
Before installing new parts, check the wheel bearings and seals:
- Spin the hub by hand. It should turn smoothly without grinding or wobble.
- If you feel roughness, now is the time to repack or replace the bearings.
- Inspect the grease seals. Old or leaking seals should be replaced.
Tip even pros miss: Many Jeep owners skip this check, but installing new hubs on worn bearings can cause vibration and early failure. Take a few extra minutes for this step.
Installing New Free Wheel Hubs
Now comes the main event. Here’s how to install your new free wheel hub kit:
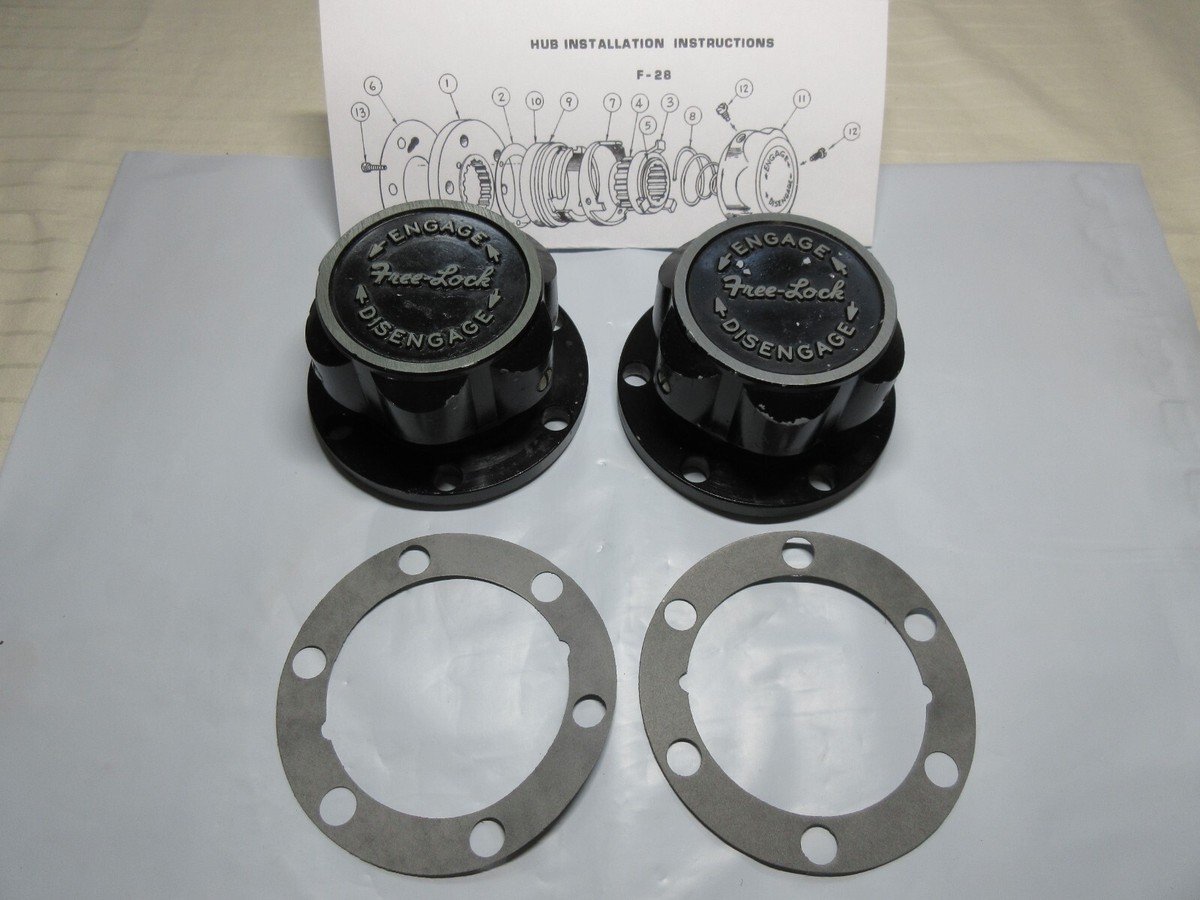
- Test-fit the hub body. Make sure it slides over the axle easily.
- Lightly grease the splines on the axle shaft and the inside of the new hub.
- Slide the new hub onto the axle.
- Reinstall the snap ring on the axle shaft if required.
- Mount the hub body to the wheel hub using the supplied bolts or screws. Tighten them evenly in a crisscross pattern.
- Place the locking mechanism (the part you turn by hand) into the hub body.
- Secure it with screws or a snap ring as required by your kit.
- Turn the hub knob to make sure it moves smoothly between “Lock” and “Free” positions.
- Repeat for the other side.
Always follow the instructions included with your specific hub kit. Some brands have small differences in parts or installation order.
Five Key Steps In Detail
Here are the five main steps you must follow for a successful installation. Each one matters:
1. Remove The Old Drive Flange
Start by unbolting and carefully removing the old solid flange from the hub. This exposes the axle shaft and makes way for the new locking hub.
Clean the surface to ensure the new hub fits flat and seals well.
2. Inspect And Prepare The Axle
Look at the end of the axle for damage, rust, or worn splines. Clean it thoroughly.
If you see pitting or deep grooves, consider replacing the axle or having a pro inspect it.
3. Install The New Hub Body
Slide the new hub body over the axle. Some kits require a thin gasket between the hub and wheel hub don’t skip it.
Tighten all bolts evenly to avoid warping the hub.
4. Secure The Locking Mechanism
Place the locking part (the dial or knob) into the hub body. Secure it with the right fasteners.
Check that it clicks and turns easily. If it feels stiff, check alignment before forcing it.
5. Test Operation And Reinstall Wheels
Before putting the wheels back, turn the hub by hand. Move it between Lock and Free positions to confirm smooth action.
If everything feels right, reinstall the wheels, torque the lug nuts, and lower the Jeep.
Missing any of these steps can cause leaks, vibration, or hub failure.
Practical Tips And Common Mistakes
- Don’t over-grease: Too much grease can attract dirt and make the hub hard to turn in cold weather.
- Use a torque wrench: Tighten all bolts to the manufacturer’s specs. Loose bolts can cause leaks or allow the hub to fall off.
- Retorque after first drive: Hubs can settle after installation. Check all bolts after 50 miles.
- Avoid cheap gaskets: Bad gaskets lead to leaks. If your kit’s gasket looks flimsy, buy a quality replacement.
- Double-check snap rings: Missing or poorly seated snap rings are a leading cause of hub failures.
- Label your parts: Take photos as you disassemble. This helps you remember the order and orientation of parts.
Data Table: Comparison Of Drive Flange Vs Free Wheel Hub
Here’s a quick look at the main differences:
| Feature | Drive Flange | Free Wheel Hub |
|---|---|---|
| Fuel Efficiency | Lower | Higher |
| Steering Effort | Heavier | Lighter |
| Drivetrain Wear | Higher | Reduced |
| Off-Road Reliability | Excellent | Excellent |
How To Select The Best Free Wheel Hub Kit
Choosing the right kit for your 1971 CJ5 is important. Here’s what to look for:
- Axle compatibility: Most 1971 CJ5s have a Dana 27 or Dana 30 front axle. Double-check before ordering.
- Build quality: Cast or forged steel is better than cheap alloys.
- Weather sealing: Good O-rings or gaskets protect against water and mud.
- Brand reputation: Warn, Mile Marker, and Superwinch are reliable brands for classic Jeeps.
- Warranty: Look for a 1-year or longer warranty.
Insider tip: Some aftermarket hubs stick out further than stock. Make sure they clear your wheels and aren’t at risk of hitting rocks or curbs.
Data Table: Popular Free Wheel Hub Brands For Cj5
Here’s how some top brands compare:
| Brand | Material | Warranty | Approx. Price (pair) |
|---|---|---|---|
| Warn | Forged Steel | Lifetime | $120 |
| Mile Marker | Cast Steel | 1 Year | $90 |
| Superwinch | Aluminum/Steel | 1 Year | $80 |
Testing And Maintenance After Installation
Once everything is back together:
- Engage and disengage the hubs several times with the wheels off the ground.
- Roll the Jeep forward and backward, then check for leaks or strange noises.
- Test drive in a safe area. Listen for clicking, grinding, or vibration.
- After your first trip, recheck all bolts and hub operation.
Maintenance tip: Every oil change, inspect the hubs for dirt or water. Clean and re-grease as needed. Keeping hubs clean extends their life.
Troubleshooting Issues
If something isn’t right, don’t ignore it. Here’s what to check:
- Hub won’t turn: Dirt or too much grease inside. Disassemble, clean, and re-grease lightly.
- Leaking grease: Bad gasket or over-tightened bolts.
- Clicking noise: Snap ring not seated or broken.
- Hub pops out of lock: Worn parts or wrong installation order.
Most problems come from rushing or missing small parts. Take your time and double-check each step.
Data Table: Troubleshooting Common Problems
| Problem | Possible Cause | Solution |
|---|---|---|
| Hub hard to turn | Over-greased or misaligned | Clean and reassemble |
| Noise in front end | Loose bolts or bad bearings | Retorque, inspect bearings |
| Leaking oil or grease | Bad gasket or seal | Replace gasket/seal |
Final Thoughts
Installing free wheel hubs on your 1971 Jeep CJ5 is one of the best upgrades for both daily driving and off-road fun. You’ll notice better fuel mileage, easier steering, and less wear on your drivetrain. It’s a project that’s doable for most home mechanics with patience and the right tools. Remember: careful preparation, attention to detail, and post-install checks are the keys to success. For more about classic Jeep upgrades, check the Wikipedia Jeep CJ page.
What Are Free Wheel Hubs?
Free wheel hubs are devices that let you disconnect the front wheels from the axle. When “unlocked,” the wheels spin freely, improving fuel efficiency and reducing wear.
Do I Need To Grease The New Hubs?
Yes, but only use a thin layer of wheel bearing grease on the splines and moving parts. Too much grease can make the hubs hard to turn, especially in cold weather.
Will Free Wheel Hubs Affect My Jeep’s Four-wheel Drive?
No. When locked, the hubs restore full four-wheel drive.
Just remember to lock them before going off-road or using 4WD.
How Often Should I Check Or Service The Hubs?
Inspect your hubs every oil change or after driving in deep water or mud. Clean and re-grease if needed.
Can I Install Free Wheel Hubs Myself, Or Do I Need A Mechanic?
Most people with basic tools and mechanical skill can do this at home. If you’re unsure or run into problems, a trusted mechanic can help finish the job safely.