Changing the brake light on a Jeep Liberty is a task many drivers can do themselves. You don’t need special tools or advanced skills. Brake lights are a small detail, but they’re critical for safety and avoiding tickets. If your brake light goes out, other drivers may not see you stop, and police can fine you. In this guide, you’ll learn step-by-step how to replace a brake light on your Jeep Liberty, what tools you need, and common mistakes to avoid. By the end, you’ll feel confident doing it yourself and save money on labor.
Why Brake Lights Matter
The brake lights help other drivers see when you are stopping. If one fails, your risk of being rear-ended increases. According to the National Highway Traffic Safety Administration, defective brake lights contribute to thousands of accidents every year. Also, in many states, driving with a broken brake light can result in fines from $50 to $150.
Tools And Materials Needed
Before you start, gather these:
- New brake light bulb (check your owner’s manual for the correct type, usually 3157 or 1157 for Jeep Liberty)
- Screwdriver (Phillips or flathead, depending on your Jeep’s year)
- Gloves (optional, protect hands and bulb from oils)
- Clean cloth (for wiping the bulb area)
Here’s a quick comparison of bulb types for Jeep Liberty models:
| Model Year | Bulb Type | Average Price |
|---|---|---|
| 2002-2007 | 3157 | $5-$10 |
| 2008-2012 | 1157 | $7-$12 |
Always double-check the bulb type before buying. Using the wrong bulb can cause electrical problems or poor visibility.
Step-by-step Brake Light Replacement
1. Turn Off The Vehicle
Make sure your Jeep is parked and the engine is off. This prevents shocks and avoids draining the battery.
2. Open The Rear Hatch
Lift the hatch for easy access to the tail light assembly. Some Jeep Liberty models may require opening the tailgate as well.
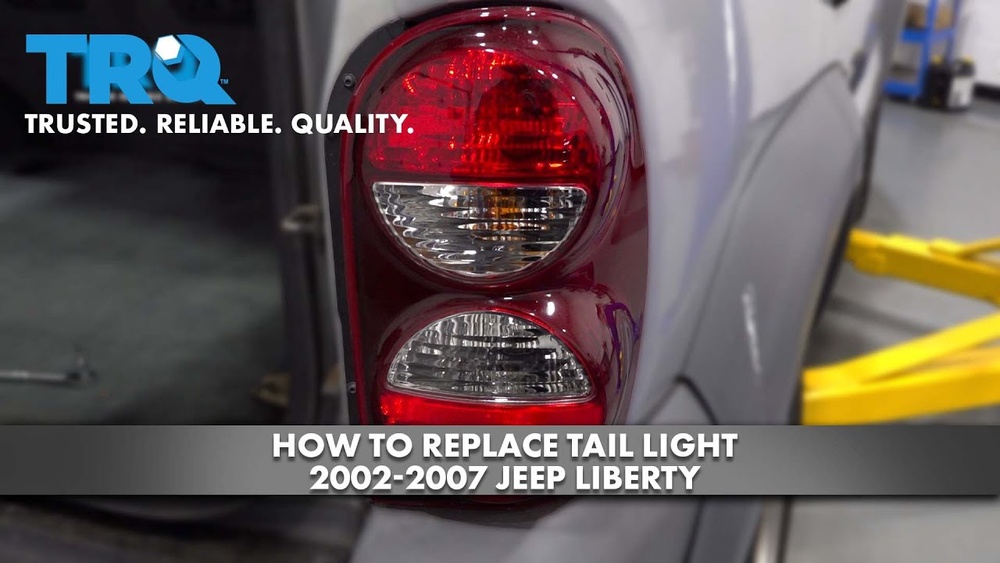
3. Locate The Tail Light Assembly
The brake lights are inside the rear tail light cluster. On Jeep Liberty, these are on both sides of the rear.
4. Remove The Screws
Use your screwdriver to remove the screws holding the tail light assembly. There are usually two to four screws.
5. Pull Out The Assembly
Gently pull the tail light assembly away from the vehicle. Be careful not to break the plastic clips.
6. Find The Brake Light Bulb Socket
The socket with the brake light bulb is usually the middle or top one. Twist the socket counterclockwise to remove it.
7. Remove The Old Bulb
Pull the bulb straight out. If it sticks, wiggle gently but do not use force.
8. Install The New Bulb
Push the new bulb into the socket until it clicks. Avoid touching the glass with your fingers; oils can shorten the bulb’s life.
9. Reinstall The Socket And Assembly
Place the socket back into the assembly and twist clockwise. Slide the assembly back and tighten the screws.
10. Test The Brake Light
Ask someone to press the brake pedal while you watch. If it lights up, you’ve done it right.
Here’s a comparison of the time and cost between DIY and professional brake light replacement:
| Method | Time Needed | Cost |
|---|---|---|
| DIY | 10-20 minutes | $5-$12 |
| Professional | 30-45 minutes | $25-$60 |
Practical Tips For Success
- Check both brake lights when one fails; often, both go out within weeks.
- Use gloves to handle bulbs. Skin oils can create hot spots, causing bulbs to burn out faster.
- Keep a spare bulb in your glove box. Bulbs can fail unexpectedly, especially during wet weather.
- Inspect the socket for corrosion. If you see greenish or brown residue, clean it with a cloth and a bit of rubbing alcohol.
- Double-check the bulb type. Some Jeep Liberty years use dual-filament bulbs for brake and tail lights.

Common Mistakes To Avoid
- Forcing the tail light assembly: This can break clips, making the assembly loose.
- Touching the bulb glass: Oils from your skin can damage the bulb.
- Using the wrong bulb: Even a small difference can cause electrical issues.
- Not testing before finishing: Always check the light before reassembling everything.
- Ignoring corrosion: Dirty sockets can cause the new bulb to fail.
Signs Of Brake Light Issues
If your brake light is not working, you may notice:
- The brake warning light on the dashboard
- Other drivers honking or flashing lights
- A police officer stopping you
- Visible darkness in the brake light area
Sometimes, the issue is not the bulb. It could be a fuse, wiring, or socket problem. If the new bulb does not solve the issue, check the fuse box. Jeep Liberty’s brake light fuse is usually in the interior fuse panel or under the hood.

When To Seek Professional Help
Changing a brake light is simple, but if the light still won’t work after replacement, the problem may be deeper. Bad wiring, broken sockets, or fuse problems can be tricky. If you’re unsure, consult a certified mechanic. This prevents further damage and ensures safety.
For official Jeep Liberty maintenance guidance, visit the Jeep Owner’s Site.
Frequently Asked Questions
How Often Should I Replace Brake Lights?
Most bulbs last 2-4 years. Replace as soon as you notice a failure. It’s wise to check brake lights during regular oil changes.
Can I Use Led Bulbs In My Jeep Liberty?
Yes, but make sure the LED is compatible with your vehicle’s socket and voltage. Some LEDs require adapters. LEDs last longer and use less power.
What If Both Brake Lights Go Out At Once?
Usually, this means a fuse has blown or there’s a wiring issue. Check the fuse box and replace the fuse if needed.
Is It Safe To Drive With One Brake Light Out?
No. It reduces your visibility and can lead to accidents or fines. Fix brake lights immediately.
Do I Need Any Special Tools?
No special tools are needed. A basic screwdriver is enough. Gloves and a clean cloth help, but are optional.
Changing the brake light on your Jeep Liberty is straightforward and saves money. With the right bulb, simple tools, and careful steps, you can restore safety and avoid fines. If you run into problems, don’t hesitate to ask a mechanic. Proper brake lights keep you and others safe on the road.