The 2004 Jeep Liberty, a popular compact SUV, features a straightforward lighting system, but identifying the specific brake light can sometimes be a point of confusion for owners, especially when a bulb needs replacing.
Understanding which bulb serves as your brake light is crucial for safety and for passing vehicle inspections.
This guide will break down the brake light system for the 2004 Jeep Liberty, explaining its function, location, and common issues.
Understanding Your Jeep Liberty’s Brake Lights
Brake lights are a critical safety feature on any vehicle. Their primary purpose is to alert drivers behind you that you are slowing down or stopping. When you press the brake pedal, a switch is activated, sending a signal to illuminate these lights. For the 2004 Jeep Liberty, this system involves a few key components: the brake pedal switch, the bulbs themselves, and the wiring that connects them.
The brake lights on the 2004 Jeep Liberty consist of two main sets of lights: the primary taillights located on the rear corners of the vehicle, and a high-mounted brake light, often referred to as the third brake light, situated above the rear window. Both sets illuminate simultaneously when the brake pedal is depressed. This redundancy ensures that your intention to stop is clearly communicated, even if one of the primary taillights is obscured by another vehicle or damage.
Locating The Brake Lights On Your 2004 Jeep Liberty
The brake lights on your 2004 Jeep Liberty are integrated into the taillight assemblies at the rear corners of the vehicle. These assemblies typically contain multiple bulbs for different functions, including brake lights, tail lights (which are illuminated when your headlights are on), turn signals, and reverse lights.
The high-mounted brake light is a separate unit. On most 2004 Jeep Liberty models, it is mounted on the liftgate or the rear spoiler above the rear window. Its elevated position makes it more visible to drivers in larger vehicles that might otherwise have their view of the lower taillights blocked.
The Primary Taillight Assemblies
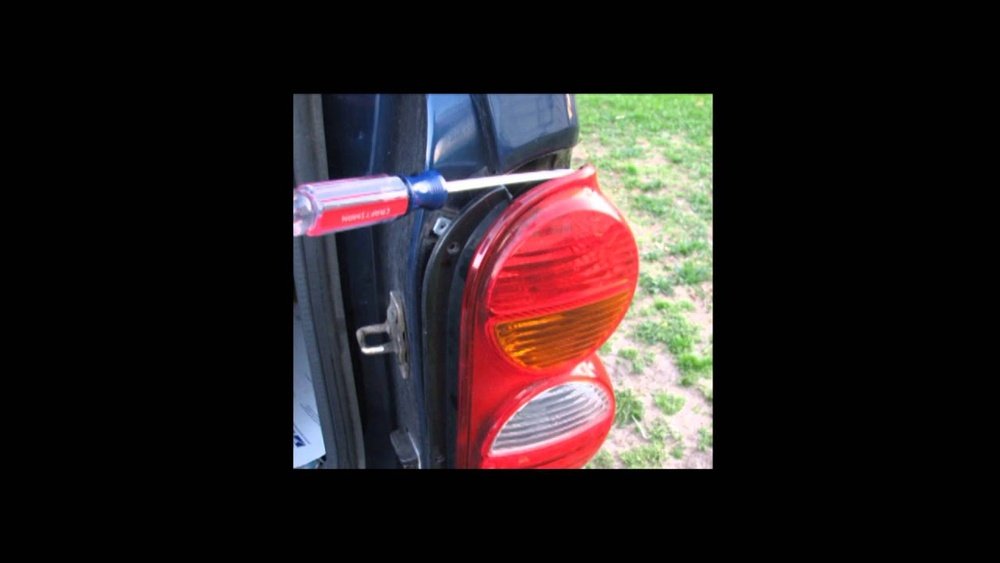
The main brake light bulbs are housed within the red lenses of the taillight assemblies. These assemblies are usually secured by screws or clips and can be accessed from the outside of the vehicle. When you open the liftgate, you might also be able to access the rear of the taillight assembly from inside, depending on your specific trim level and any cargo or trim panels present.
Within the taillight assembly, you will find sockets for various bulbs. The brake light bulb is typically a dual-filament bulb, meaning it has two separate filaments within a single bulb. One filament is for the taillight function (dimmer, always on with headlights) and the other is for the brake light function (brighter, only on when braking). This dual-filament design allows one bulb to serve two purposes, simplifying the lighting system.
The High-mounted Brake Light (third Brake Light)
The third brake light assembly is often a more slender unit, containing a row of individual red LEDs or a single bulb behind a red lens. It is designed to be highly visible.
Accessing this light can vary. On some models, it might be attached to the liftgate with screws, while on others, it could be part of a spoiler assembly that requires more involved removal.
Identifying The Correct Bulb Type
For the 2004 Jeep Liberty, the primary brake light bulbs are typically 7528 bulbs, also known as BAU15s or PY21W bulbs. These are often amber or clear bulbs with an offset bayonet base. The dual-filament nature means they provide both the lower intensity taillight and the higher intensity brake light.
The third brake light might use a different bulb type, or it could be an LED array. Common bulb types for the third brake light include 1156 or 7506 bulbs (single filament) if it’s a traditional bulb, or it could be a sealed LED unit that requires replacing the entire assembly if it fails. It’s always best to consult your owner’s manual or visually inspect the bulb you are replacing to confirm the exact type.
Common Bulb Types And Their Functions
- 7528 (BAU15s/PY21W): This is the most common bulb for the primary brake light and taillight function in the rear corner assemblies. It’s a dual-filament bulb.
- 1156 (BA15s): Often used for reverse lights or sometimes for the third brake light if it’s a single-function bulb.
- LEDs: Newer models or aftermarket replacements might use LEDs, which are more durable and energy-efficient but usually require replacing the entire assembly if they fail.
Why Your Brake Light Might Not Be Working
Several issues can cause a brake light to stop working. Understanding these potential problems can help you diagnose and fix the issue efficiently.
1. Burned-out Bulb
This is the most common reason for a single brake light failure. Like any incandescent bulb, the filament inside can break over time, causing the light to stop illuminating.
If one brake light is out, the first step is always to check and replace the bulb.
2. Faulty Brake Light Switch
The brake light switch is located near the brake pedal. When you press the pedal, it activates the switch, completing the circuit and turning on the brake lights.
If this switch fails, the lights may not come on at all, or they might stay on constantly.
Symptoms can include both brake lights not working, or them staying lit even when you’re not pressing the pedal.
3. Blown Fuse
Your Jeep Liberty's electrical system is protected by fuses. A fuse related to the brake lights could blow due to a short circuit or an overload.
If a fuse blows, it will interrupt the flow of electricity to the brake lights.
Check your owner’s manual for the location of the fuse box and the specific fuse for the brake lights.
4. Wiring Issues
Corrosion, loose connections, or damaged wires in the lighting harness can prevent the brake lights from working. This is more common in older vehicles or those exposed to harsh weather conditions.
Inspect the wiring around the taillight assemblies and the brake light switch for any visible damage or corrosion.
5. Issues With The Third Brake Light Assembly
If only your third brake light is out, the problem could be with the bulb itself (if it uses a replaceable bulb), the wiring specific to that light, or the entire assembly might have failed, especially if it’s an LED unit.
How To Replace A Brake Light Bulb
Replacing a brake light bulb on your 2004 Jeep Liberty is a relatively simple DIY task.
Tools You’ll Need
- New brake light bulbs (correct type, e.g., 7528 for primary, 1156 for third light if applicable)
- Screwdriver (Phillips head is common)
- Gloves (to keep the new bulb clean)
- Possibly a small pry tool or flathead screwdriver for stubborn lenses.
Step-by-step Replacement
- Park your Jeep on a level surface and turn off the engine.
- Open the liftgate to access the rear taillight assemblies.
- Locate the screws holding the taillight assembly in place. These are usually visible on the inside edge of the assembly.
- Remove the screws and carefully pull the taillight assembly away from the vehicle body. You might need to gently wiggle it or use a pry tool to release clips.
- Identify the bulb socket for the brake light. It’s typically the one in the section that lights up red.
- Twist and pull the bulb socket out of the taillight housing.
- Remove the old bulb by gently pulling it straight out of the socket.
- Insert the new bulb into the socket, ensuring it’s seated firmly. Avoid touching the glass of the new bulb with your bare fingers, as oils from your skin can cause it to overheat and burn out prematurely. Use gloves or a clean cloth.
- Reinsert the socket into the taillight housing and twist to lock it in place.
- Align the taillight assembly with the mounting holes and push it back into place.
- Reinstall the screws to secure the assembly.
- Test the brake lights by having someone press the brake pedal while you observe from behind.
Replacing The Third Brake Light Bulb
The process for the third brake light can differ:
- If it’s on the liftgate: You might need to remove interior trim panels to access the back of the light assembly. Then, follow a similar process of removing the old bulb and inserting the new one.
- If it’s integrated into a spoiler: This might require removing the spoiler itself, which can be more complex.
If you are unsure, consulting a repair manual or a professional mechanic is recommended.
Troubleshooting Common Brake Light Issues
When a brake light isn’t working, a systematic approach to troubleshooting is key.
Scenario 1: One Brake Light Is Out
- Likely Cause: Burned-out bulb in that specific taillight assembly.
- Action: Replace the bulb (usually a 7528). If the new bulb doesn’t work, check the socket for corrosion or damage, and inspect the wiring connection.
Scenario 2: Both Brake Lights Are Out
- Likely Cause: Blown fuse, faulty brake light switch, or a problem with the main wiring harness.
- Action:
- Check the brake light fuse. Consult your owner’s manual for its location and replace if blown.
- If the fuse is good, inspect the brake light switch. You can test it by pressing the brake pedal and listening for a click, or by using a multimeter to check for continuity.
- If the switch and fuse appear fine, the issue might be with the wiring or the body control module (BCM), which is less common.
Scenario 3: Third Brake Light Is Out (but Primary Ones Work)
- Likely Cause: Burned-out bulb in the third brake light assembly, or a faulty assembly if it’s LED.
- Action: Access the third brake light assembly. If it uses a replaceable bulb (like an 1156), replace it. If it’s an LED unit and not working, the entire assembly likely needs to be replaced. Check the wiring connection to the third brake light.
Scenario 4: Brake Lights Stay On
- Likely Cause: The brake light switch is stuck in the “on” position, or there’s an electrical fault.
- Action: Inspect the brake light switch. It might be obstructed or faulty. You may need to replace it.
The Importance Of Functional Brake Lights
Functional brake lights are not just about passing a safety inspection; they are vital for preventing rear-end collisions. When your brake lights are out, drivers behind you may not realize you are slowing down, leading to accidents.
- Visibility: Brake lights are your primary signal to others that you are decelerating.
- Communication: They are a form of non-verbal communication on the road.
- Safety: Ensuring all brake lights, including the third one, are working is a crucial part of vehicle maintenance.
Regular Maintenance And Checks
Making a habit of checking your brake lights regularly can save you from potential trouble.
- Monthly Check: Park your Jeep in a safe, visible location (like a driveway or parking lot at dusk or night). Have a friend or family member stand behind your vehicle while you press the brake pedal to confirm all brake lights illuminate.
- Visual Inspection: Periodically look at your taillights for any signs of cracks, moisture ingress, or discoloration of the lenses, which can affect light output.
- Owner’s Manual: Keep your owner’s manual handy. It provides specific details about your vehicle’s lighting system, bulb types, and fuse locations.
Frequently Asked Questions
What Is The Specific Bulb Number For The Brake Lights On A 2004 Jeep Liberty?
The most common bulb type for the primary brake lights in the rear corner assemblies of a 2004 Jeep Liberty is the 7528 (also known as BAU15s or PY21W). This is a dual-filament bulb. The third brake light may use a different bulb, such as an 1156, or it might be an LED assembly. Always verify by checking the bulb itself or consulting your owner’s manual.
How Can I Tell If My Brake Light Switch Is Bad?
Signs of a bad brake light switch include both brake lights not working at all, or the brake lights staying on even when you are not pressing the brake pedal. You might also notice that your cruise control stops working, as it often relies on the brake light switch to disengage.
Testing the switch with a multimeter or by observing its mechanical action when the pedal is pressed can confirm if it’s functioning correctly.
My Third Brake Light Is Out, But The Main Ones Work. What Should I Do?
If your third brake light is out but the primary brake lights in the rear corners are working, the issue is likely isolated to the third brake light assembly. First, check if it uses a standard bulb (like an 1156) and try replacing it.
If it’s an LED unit, it might have failed, and the entire assembly will need to be replaced. Also, check the wiring harness leading to the third brake light for any loose connections or damage.
Can I Use A Clear Bulb Instead Of An Amber One For My Brake Lights?
For the primary brake lights, a 7528 bulb is typically used. While some versions of this bulb are amber, clear versions are also available and often function correctly. However, local regulations may vary regarding the color of replacement bulbs. It’s generally recommended to replace a bulb with the same type and color as the original to ensure compliance and proper light output. For the third brake light, it must be red to comply with safety standards.
What Happens If My Brake Lights Are Not Working?
If your brake lights are not working, your vehicle is unsafe to drive. Drivers behind you will not be alerted when you are slowing down or stopping, significantly increasing the risk of a rear-end collision.
It is also illegal to drive with non-functional brake lights, and you can fail a vehicle inspection or receive a ticket.
It’s essential to address the issue promptly by diagnosing and replacing the faulty component, whether it’s a bulb, fuse, switch, or wiring.