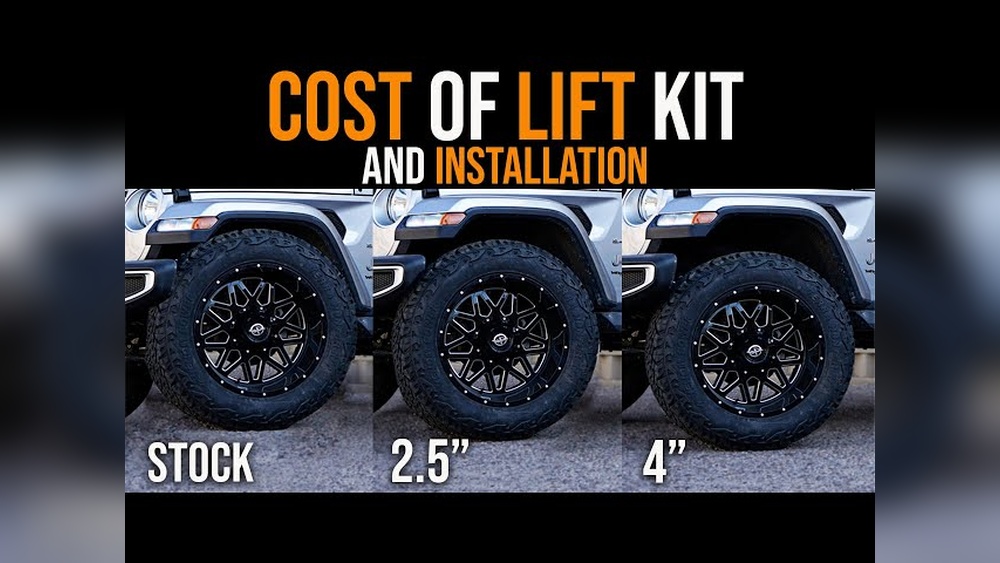
A suspension lift kit for your Jeep JK 2009 is more than just an upgrade; it’s an invitation to explore further and tackle tougher terrain. This modification raises your Jeep’s body and suspension system, giving you more ground clearance and allowing for larger tires.
For a 2009 Jeep JK, a suspension lift kit can transform its capabilities, whether you’re looking for enhanced off-road performance, a more aggressive stance, or simply the ability to clear larger obstacles.
This guide will walk you through everything you need to know about choosing, installing, and benefiting from a suspension lift kit for your specific JK model.
We'll cover the different types of kits, what to consider before buying, the installation process, and the impact on your Jeep’s handling and longevity.
Understanding Suspension Lift Kits For Your Jeep Jk 2009
A suspension lift kit works by increasing the distance between your Jeep’s frame and its axles. This is achieved through various components, depending on the type and height of the lift.
For a 2009 Jeep JK, the primary goal is usually to gain enough clearance to fit larger tires, which dramatically improve off-road traction and the ability to crawl over rocks and obstacles.
Beyond tire clearance, increased ground clearance under the axles and differential housings also protects vital components from damage on the trail.
The height of the lift is a crucial factor. Common lift heights for a Jeep JK range from 2 to 6 inches.
A 2-inch lift is often sufficient for fitting slightly larger tires (like 33-inch) without major modifications. A 4-inch lift typically allows for 35-inch tires, and anything above 4 inches, especially 6 inches or more, can accommodate 37-inch tires and larger, often requiring additional modifications like extended brake lines, differential drop brackets, and sometimes even re-gearing the axles.
Types Of Suspension Lift Kits Available
When looking for a suspension lift kit for your 2009 Jeep JK, you’ll encounter several types, each offering different benefits and complexities. Understanding these will help you make the best choice for your needs and budget.
Economy/budget Lifts (spacers)
These are typically the most affordable lift options. They usually consist of spring spacers that are installed above or below the coil springs. A common type is a budget boost, which often uses pucks or spacers to lift the body a couple of inches.
- Pros: Low cost, easy to install, minimal changes to suspension geometry.
- Cons: Limited lift height (usually 1-2 inches), can negatively affect ride quality by compressing springs, may not address other necessary geometry changes, can cause issues with suspension droop.
- Best for: Those looking for a slight increase in tire clearance for a modest size upgrade (e.g., 33-inch tires) without significant investment or major off-road use.
Coil Spring Lifts
These kits replace the factory coil springs with taller, often stiffer, aftermarket springs. This is a more involved lift than simple spacers and provides a true suspension lift, not just a body lift.
- Pros: True suspension lift, can improve off-road articulation, often available in various heights (2.5, 3, 4 inches), better ride quality than spacer lifts if designed well.
- Cons: More expensive than budget boosts, requires more mechanical skill for installation, may necessitate adjustments to other suspension components (like track bars and sway bar links) to maintain proper geometry.
- Best for: Owners wanting a noticeable increase in ground clearance and improved off-road capability, suitable for fitting 33-inch to 37-inch tires depending on the lift height.
Long Arm Lifts
These are high-end suspension systems designed for serious off-roading. They replace the stock short control arms with longer ones, which significantly improves suspension geometry, articulation, and on-road handling compared to short arm systems.
- Pros: Superior off-road performance and articulation, improved on-road ride quality and stability, corrects suspension geometry issues inherent in taller lifts.
- Cons: Very expensive, complex installation requiring frame modifications, typically used for lifts of 4 inches and higher.
- Best for: Dedicated off-road enthusiasts who demand the best performance and are willing to invest heavily in their JK’s suspension.
Complete Suspension Systems
Many manufacturers offer comprehensive kits that include everything needed for a particular lift height. These often include new springs, shocks, control arms (short or long), sway bar links, track bars, brake lines, and sometimes even driveshaft upgrades.
- Pros: All necessary components are included and engineered to work together, often provides the best overall performance and ride quality for the intended lift height.
- Cons: Highest cost, installation can be complex and time-consuming.
- Best for: Owners who want a fully integrated and well-performing suspension upgrade without having to piece together individual components.

Key Considerations Before Buying A Lift Kit
Choosing the right suspension lift kit for your 2009 Jeep JK involves more than just picking a height. Several factors will influence your decision and ensure you get the most out of your investment.
Intended Use: On-road Vs. Off-road
Your primary use case for the JK is the most critical factor.
- Mostly On-Road with Occasional Light Trails: If your Jeep spends most of its time on paved roads, with only occasional trips on gravel or dirt paths, a smaller lift (1-2.5 inches) with slightly larger tires might be sufficient. Prioritize ride comfort and on-road handling. Kits that include improved shocks and maintain good suspension geometry will be beneficial.
- Balanced Use (On-Road and Moderate Off-Road): For a mix of daily driving and weekend trail adventures, a 2.5 to 4-inch lift is a popular choice. This height offers a good compromise between on-road drivability and off-road capability, usually accommodating 33-inch to 35-inch tires. Look for kits that include adjustable control arms or track bars to correct alignment.
- Dedicated Off-Roading (Rock Crawling, Mudding): If your JK is primarily built for challenging off-road terrains, you’ll likely need a taller lift (4 inches or more). This allows for larger tires (37 inches+) and greater ground clearance. Long arm kits or complete suspension systems are often preferred here for their articulation and geometry correction. Be prepared for potential driveline modifications and re-gearing.
Tire Size Goals
The main reason most people lift their Jeep JK is to fit larger tires. Larger tires offer better traction, allow you to roll over obstacles more easily, and contribute to a more aggressive look.
However, fitting larger tires requires not only lift height but also potential modifications to other systems.
- 33-inch Tires: Generally achievable with a 1-2.5 inch lift, sometimes even with stock suspension if you trim fenders. May require minor fender trimming or wheel spacers for clearance.
- 35-inch Tires: Typically require a 3.5-4 inch lift. Fender trimming is almost always necessary, and you might need to upgrade steering components and consider re-gearing your axles for optimal performance. Extended brake lines are often included or recommended.
- 37-inch Tires and Larger: Require a 4-6 inch lift, and often more. Significant modifications are usually needed, including potential fender flares, longer control arms, extended brake lines, possibly a slip-yoke eliminator (SYE) for the transfer case, and re-gearing axles to a lower ratio (e.g., 4.56 or 4.88) to compensate for the larger tire diameter.
Ride Quality And Handling
A lift kit significantly alters your Jeep’s suspension. A poorly designed kit or one that isn’t properly installed can lead to a harsh ride, poor handling, and premature wear on other components.
- Shocks: The shocks included in a lift kit play a crucial role in ride quality. Higher-quality shocks can absorb bumps better and offer better damping.
- Springs: Aftermarket springs are often designed to provide a slightly firmer ride than stock, which can be beneficial for carrying extra weight (like bumpers and winches) but might feel stiff for daily driving if not chosen carefully.
- Geometry Correction: Kits that include adjustable track bars, control arms, or brackets to correct caster angle are vital for maintaining good on-road handling and steering feel. Without these, your Jeep might wander, have excessive steering play, or experience premature tire wear.
Budget
Lift kits vary widely in price. A simple spacer lift can cost a few hundred dollars, while a complete long arm system can run into thousands.
Consider not only the kit price but also the cost of installation (if you're not doing it yourself), potential additional parts (tires, wheels, alignment, driveline components), and future maintenance.
Installation Complexity
Some lift kits are designed for DIY installation with basic tools, while others require specialized equipment, welding, or significant mechanical expertise.
- DIY Friendly: Budget boosts and basic coil spring lifts (up to 2.5 inches) can often be installed in a weekend by someone with moderate mechanical experience.
- Professional Installation Recommended: Taller lifts (4 inches+), long arm kits, or systems requiring frame modifications will likely benefit from professional installation to ensure safety and proper function.
Essential Components Of A Suspension Lift Kit
A comprehensive suspension lift kit for a 2009 Jeep JK typically includes several key components designed to work together. Understanding what each part does is important for appreciating the system’s overall function.
Coil Springs
These are the heart of a suspension lift. Aftermarket springs are taller than stock and are designed to provide the desired lift height.
They can also be valved differently to offer a firmer or softer ride depending on the manufacturer's tuning.
Shocks (shock Absorbers)
Shocks dampen the spring oscillations, controlling the up-and-down movement of the suspension. Lift kits often come with longer-travel shocks designed to match the new spring height and provide adequate damping.
High-quality shocks improve both off-road performance and on-road comfort.
Control Arms
Control arms connect the axles to the Jeep's frame, controlling axle movement and alignment. When you lift a Jeep, the stock control arms are at an angle, which can negatively affect caster and pinion angles.
Many kits include longer or adjustable control arms to correct these angles, improving steering and stability.
- Short Arms: Stock-like control arms that are longer to accommodate the lift. Common in smaller lifts.
- Long Arms: Significantly longer control arms that mount to the frame further back. These offer greatly improved suspension geometry, articulation, and ride quality, especially in taller lifts (4 inches+).
Track Bars (panhard Rods)
The track bars keep the axles centered under the Jeep. Lifting the Jeep causes the axles to shift to one side. A lift kit usually includes a relocator bracket for the stock track bar or an adjustable aftermarket track bar to recenter the axle. For taller lifts, an adjustable track bar is highly recommended.
Sway Bar Links
Sway bar links connect the sway bars to the suspension, helping to reduce body roll during cornering. When you lift a Jeep, the stock links become too short.
Lift kits include longer links or quick-disconnect end links for off-road use, allowing for greater suspension travel.
Bump Stops
Bump stops prevent the suspension from compressing too far, protecting components like fenders, tires, and shocks from damage. Lift kits often include extended bump stop mounts or spacers to account for the increased suspension travel and to prevent tire contact with the fenders at full compression.
Brake Lines
As the suspension extends, the stock brake lines can become stretched or even snap. Lift kits often include extended stainless steel braided brake lines to accommodate the increased suspension travel safely.
Other Potential Components
Depending on the lift height and kit quality, you might also find:
- Caster Correction Brackets: To correct the angle of the front axle.
- Drag Link Flip/Relocation: To correct steering geometry after a lift.
- Driveshaft Modifications: For lifts over 4 inches, the pinion angle might change, requiring a slip-yoke eliminator (SYE) or a new driveshaft to prevent vibrations.
- Steering Stabilizer: Often included or recommended to help dampen steering shimmy and improve steering control.

Installation Process For A 2009 Jeep Jk Suspension Lift
Installing a suspension lift kit on a 2009 Jeep JK can range from a moderately challenging DIY project to a complex job requiring professional help. The process generally involves lifting the Jeep, disassembling suspension components, installing new parts, and reassembling.
Disclaimer: Working on vehicle suspension involves safety-critical components. If you are not comfortable with mechanical work or do not have the proper tools and safety equipment, it is highly recommended to have a professional mechanic install your lift kit. Always consult the specific instructions provided by the lift kit manufacturer.
Pre-installation Steps
- Gather Tools and Equipment: You’ll need a comprehensive set of sockets and wrenches, torque wrench, jack stands, floor jack, pry bars, possibly a spring compressor (though many JK kits don’t require it for coil replacement), and safety glasses.
- Prepare the Jeep: Park the JK on a level, stable surface. Engage the parking brake and block the wheels.
- Disconnect Battery: For safety, it’s a good practice to disconnect the negative battery terminal.
Disassembly
- Lift the Jeep: Use a floor jack to lift the Jeep and place jack stands securely under the frame rails. Ensure the Jeep is stable before proceeding.
- Remove Wheels: Remove all four wheels.
- Support Axles: Use a floor jack to support the front and rear axles. This allows you to control their movement as you disconnect components.
- Disconnect Components: This is the most labor-intensive part. You’ll need to disconnect:
- Front: Sway bar links, track bar, drag link, brake lines (carefully), shocks, and potentially control arms.
- Rear: Sway bar links, track bar, brake lines (carefully), shocks, and potentially control arms.
- Remove Springs: Carefully lower the axles or manipulate the suspension to remove the factory coil springs.
Installation Of New Components
- Install New Springs and Shocks: Place the new, taller coil springs into position. Install the new shocks according to the manufacturer’s instructions.
- Install Control Arms (if applicable): Replace stock control arms with the new ones, ensuring proper alignment and torque. For adjustable arms, set them to the approximate length recommended by the manufacturer or for your desired alignment.
- Install Track Bars and Brackets: Install any new track bars or relocation brackets. Ensure the track bar is properly centered.