Swapping drum brakes for disc brakes on a Jeep XJ is one of the most popular upgrades among Cherokee owners. The XJ, produced from 1984 to 2001, came standard with rear drum brakes. While these work fine for daily driving, they can limit stopping power, especially when you add bigger tires or tow heavy loads. A disc brake conversion improves braking, makes maintenance easier, and can boost the overall safety of your Jeep. If you’re thinking about this upgrade, here’s what you need to know to do it right.
Why Upgrade Your Jeep Xj To Disc Brakes?
Drum brakes are simple and reliable, but they have real limitations. Disc brakes offer several important advantages:
- Better stopping power: Discs cool faster, so you get more consistent braking even on long descents.
- Easier maintenance: Pads are quicker to check and replace than drum shoes.
- Improved performance in mud and water: Discs self-clean and dry faster, which is important for off-roading.
- More options for customization: Many disc brake kits let you choose bigger rotors or multi-piston calipers.
If you’ve ever noticed your Jeep’s brakes fading after a trail run or struggled to stop with a loaded roof rack, a disc swap is worth considering.
What Parts Do You Need For A Jeep Xj Disc Brake Conversion?
Several kits are available, but many XJ owners use parts from other Jeep models like the Jeep Liberty (KJ) or Grand Cherokee (ZJ). Here’s a typical parts list for a rear disc swap:
- Donor axle or backing plates (from a ZJ, KJ, or Ford Explorer)
- Calipers (with brackets)
- Rotors
- Brake pads
- Parking brake assemblies (shoes and hardware)
- Brake hoses and hard lines
- Wheel studs (sometimes longer ones are needed)
- Proportioning valve (to balance front and rear braking)
Always confirm the donor parts match your axle type. The most common axles on XJs are the Dana 35 and Chrysler 8.25. ZJ disc brakes work for both with minor changes.
Steps To Convert Jeep Xj To Rear Disc Brakes
Swapping to discs isn’t difficult for someone with basic tools and mechanical knowledge. Here’s a simplified overview:
- Lift and secure the Jeep. Remove the rear wheels.
- Pull drum assemblies. Remove drums, shoes, and all hardware.
- Remove axles. Unbolt axle shafts to access the backing plates.
- Install disc backing plates. Use new bolts and torque to spec.
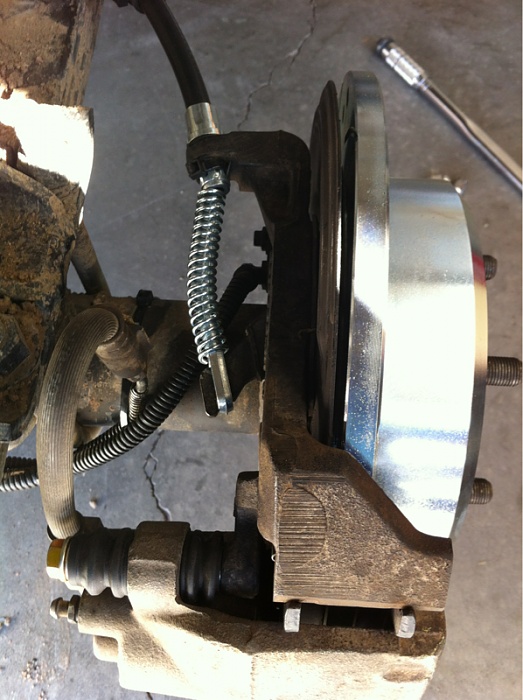
- Mount calipers and rotors. Slide rotors on, then bolt on caliper brackets and calipers.
- Connect brake lines. Use new hoses; check for leaks.
- Install parking brake hardware. Set up the internal e-brake shoes.
- Reinstall axles and wheels.
- Bleed the brakes to remove air.
- Test the system at low speed before regular driving.
Some kits require modifications to the axle flange or minor grinding. Always double-check fitment before final assembly.
Cost Comparison: Drum Vs Disc Brake Setup
Here’s how costs often compare for a rear brake refresh:
| Item | Drum Brakes (Stock) | Disc Brakes (Conversion) |
|---|---|---|
| Parts (average) | $180 | $350–$600 |
| Labor (shop install) | $120 | $250–$400 |
| Maintenance cost (5 yrs) | $200 | $120 |
While the initial cost is higher for disc brakes, you often save money over time with cheaper, easier pad replacements.
Performance Differences: Drum Vs Disc Brakes
How much of a difference does the swap make? Here’s a look:
| Feature | Drum Brakes | Disc Brakes |
|---|---|---|
| Stopping distance (60-0 mph) | 165 ft (average XJ) | 145 ft (with disc swap) |
| Brake fade on long descents | Moderate–high | Low |
| Maintenance difficulty | Medium | Easy |
| Water/mud performance | Poor | Good |
Disc brakes give you shorter stops and more control, especially in wet or muddy conditions.
Tips For A Successful Xj Disc Brake Conversion
- Check your axle type before buying parts.
- Upgrade to stainless steel brake lines for better durability.
- Replace your master cylinder if you notice a soft pedal after the swap.
- Adjust the proportioning valve to avoid rear wheel lockup.
- Use anti-seize on all bolts to make future maintenance easier.
- Test the parking brake thoroughly; disc setups use a small drum inside the rotor, which can require fine adjustment.
A common beginner mistake is forgetting to match the brake lines or not bleeding the system fully. Always double-check connections and test brakes at low speeds first.
Is A Disc Brake Swap Worth It?
For most XJ owners, the answer is yes. If you use your Cherokee for off-roading, towing, or just want more confidence in daily driving, the upgrade pays for itself in safety and convenience. The improvement in braking feel is noticeable from the first drive. You’ll also spend less time crawling under your Jeep dealing with worn-out drum hardware.
Frequently Asked Questions
How Long Does A Jeep Xj Disc Brake Conversion Take?
Most people can finish the swap in 6 to 8 hours with standard tools. If you run into rusted bolts or need to modify the axle flange, it might take longer.
Do I Need To Change My Master Cylinder After The Swap?
Sometimes. If your brake pedal feels soft or travels too far after the conversion, upgrading to a larger master cylinder or adjusting the proportioning valve can help.
Will My Factory Parking Brake Still Work?
Yes, but it works differently. Most disc brake kits use a small drum inside the rotor for the parking brake. Make sure to install and adjust it correctly for best performance.
Can I Use Parts From A Ford Explorer Or Zj Grand Cherokee?
Yes, many XJ owners use Ford Explorer or ZJ Grand Cherokee disc brakes for their swaps. Just be sure the backing plates and calipers fit your axle type.
Where Can I Find More Detailed Instructions?
There are many step-by-step guides on Jeep forums and dedicated sites. For an overview, see the official Jeep XJ Wikipedia page for more information on model years and specs.
A rear disc brake conversion is one of the best safety and performance upgrades for your Jeep XJ. It takes some effort, but you’ll notice the difference every time you hit the brakes—on or off the road.