Swapping the rear drum brakes of a Jeep Cherokee XJ for disc brakes is one of the most popular upgrades among off-road and daily drivers. Disc brakes deliver better stopping power, easier maintenance, and improved safety—especially when driving with a lifted suspension or larger tires. For XJ owners, the rear disc brake conversion is both a performance upgrade and a way to modernize an already capable 4×4.
Why Convert To Rear Disc Brakes?
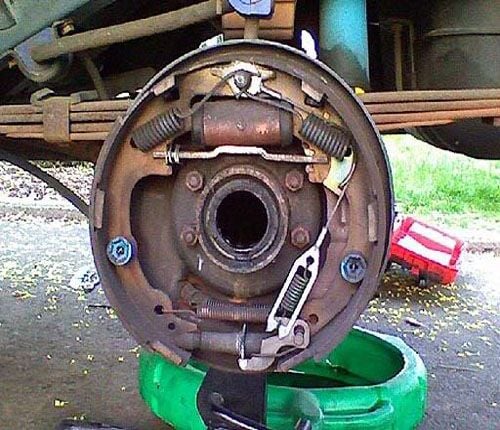
Many Jeep XJ models, especially those built before 1997, came with rear drum brakes. While drum brakes are reliable, they have clear drawbacks compared to discs:
- Less stopping power: Discs grip better, especially in wet or muddy conditions.
- Faster heat dissipation: Discs cool down quicker, reducing brake fade on long descents.
- Easier maintenance: Pads are simpler to check and replace than drum shoes.
- Better performance with larger tires: Lifted Cherokees need more braking force to safely stop bigger wheels.
Some XJ drivers report up to a 15-20% shorter stopping distance after a disc conversion, especially when paired with a quality front brake upgrade.
Rear Disc Conversion Options
There are several ways to add rear disc brakes to your Jeep Cherokee XJ. The main choices are:
- Junkyard Swap: Use parts from a compatible vehicle, such as a 1996-2002 Jeep Grand Cherokee (ZJ).
- Aftermarket Kits: Buy a complete kit designed for the XJ axle.
- Custom Mix-and-Match: Combine parts from multiple vehicles with custom brackets.
Comparison Of Conversion Methods
Here’s a quick look at how the main conversion methods compare:
| Method | Cost | Difficulty | OEM Look |
|---|---|---|---|
| Junkyard Swap | Low | Medium | Yes |
| Aftermarket Kit | Medium-High | Low | Sometimes |
| Custom Mix | Varies | High | No |
Most XJ owners go with the ZJ rear disc swap or a bolt-on aftermarket kit, as both options are proven, reliable, and don’t require advanced fabrication.
Parts You Need
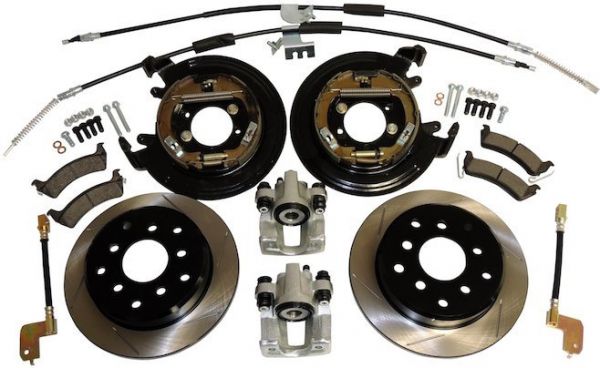
For a ZJ swap, you’ll need:
- ZJ disc brake backing plates
- Rotors (ZJ or compatible)
- Calipers and brackets
- Brake pads
- New parking brake shoes and hardware
- Brake lines (sometimes XJ lines work, sometimes you need ZJ flex lines)
- Proportioning valve or a way to modify the existing one
For aftermarket kits, most items come included, but you may still need new brake fluid and tools.
Example Parts Comparison
Let’s see how costs break down for each method (average prices):
| Item | Junkyard Swap | Aftermarket Kit |
|---|---|---|
| Complete Parts | $150–$300 | $400–$700 |
| Installation Labor | $200–$400 | $150–$300 |
| Total Cost (DIY) | $200–$350 | $400–$700 |
Tip: The ZJ swap is more affordable if you can do the labor yourself.
Step-by-step Conversion Guide
- Lift and secure your Jeep. Make sure it’s on jack stands and the wheels are off.
- Remove the rear drums. Take off the wheels, then the drum assemblies.
- Detach brake lines and cables. Carefully disconnect the brake lines (have a pan ready for fluid) and parking brake cables.
- Remove the axle shafts. This is needed to access the backing plates. Save the axle seals; replace if worn.
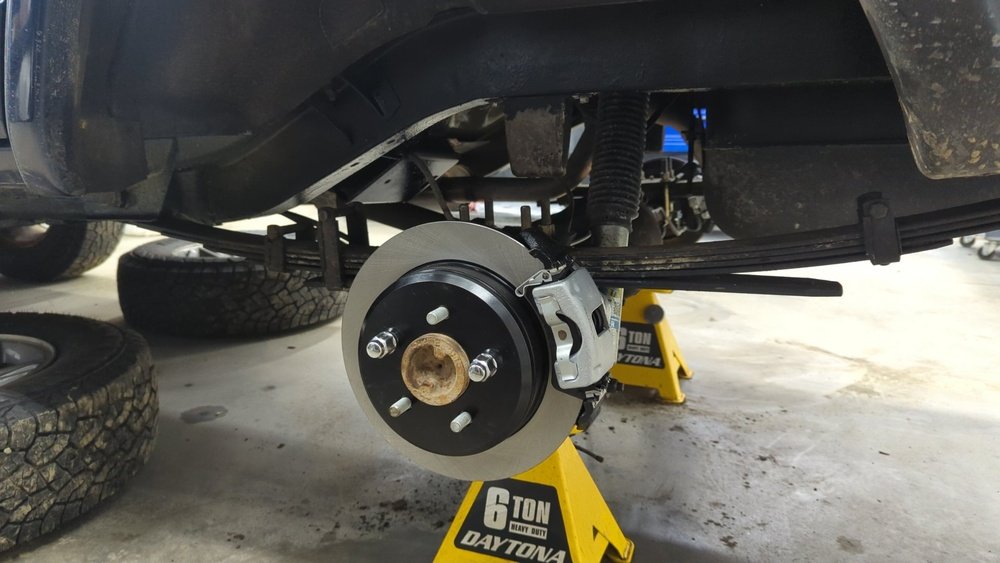
- Install disc backing plates. Bolt on the ZJ or aftermarket plates.
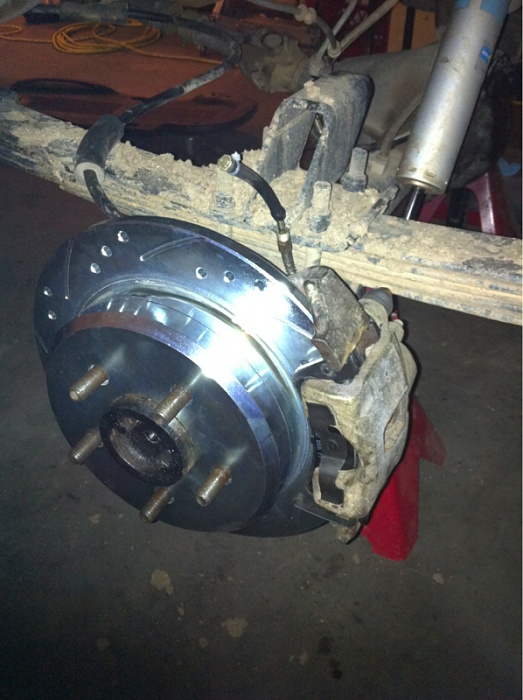
- Mount the calipers and rotors. Slide rotors onto the axle, then attach caliper brackets and calipers.
- Connect brake lines. Use ZJ lines or adapters as needed.
- Attach parking brake cables. ZJ cables fit best, but some owners modify XJ cables.
- Bleed the brakes. Fill the system with new fluid and bleed air from the lines.
- Test the brakes. Before driving, pump the pedal to ensure firm pressure.
Expert Insight: Many beginners forget to adjust the parking brake shoes inside the rotor “hat.” If left loose, your parking brake won’t hold. Also, check axle seals—leaks can destroy new pads quickly.
Common Mistakes To Avoid
- Using wrong rotors or calipers: Not all ZJ rear disc brakes are the same. Check if your donor parts match your axle type (Chrysler 8.25 or Dana 35).
- Skipping the proportioning valve adjustment: Drum brake valves send less pressure to the rear. After converting to discs, you may need to swap in a ZJ valve or modify your XJ valve for balanced braking.
- Not replacing old hardware: Worn parking brake shoes or rusty lines can ruin your new setup.
Real-world Benefits
After converting, most XJ owners notice:
- Shorter stopping distances
- Better performance in mud and rain
- Easier pad inspections and replacements
- Improved resale value for those selling upgraded rigs
Some drivers also mention the rear end feels more stable during hard braking, especially on steep trails.
Advanced Tips
- If you run 35”+ tires, consider upgrading the master cylinder for more fluid volume.
- For daily drivers, ceramic brake pads produce less dust and last longer.
- Always check local laws—some states require DOT-approved parts for road use.
For more technical details on the Cherokee XJ brake system, visit the official Jeep Cherokee XJ Wikipedia page.
Frequently Asked Questions
Can I Use Grand Cherokee Wj Rear Brakes On My Xj?
No, the WJ brakes are not a direct fit and require extensive fabrication. The ZJ rear disc swap is much simpler for most XJ models.
Do I Need To Upgrade My Master Cylinder?
Most stock master cylinders handle the swap, but for larger tires or heavy loads, a master cylinder from a ZJ or aftermarket unit may improve pedal feel.
Will The Parking Brake Still Work After The Conversion?
Yes, if you install the parking brake shoes and connect the cables properly, your parking brake will function like stock.
How Long Does The Conversion Take?
For a first-time DIYer, expect 5–8 hours. With experience and the right tools, it can be done in about 4 hours.
Is This Upgrade Legal For Street Use?
In most states, yes, but you should check your local laws to ensure the parts meet safety standards.
Upgrading your Jeep Cherokee XJ with rear disc brakes is a project that offers real performance and safety benefits. With the right parts and careful installation, you’ll enjoy better stopping power and a more modern feel on and off the road.