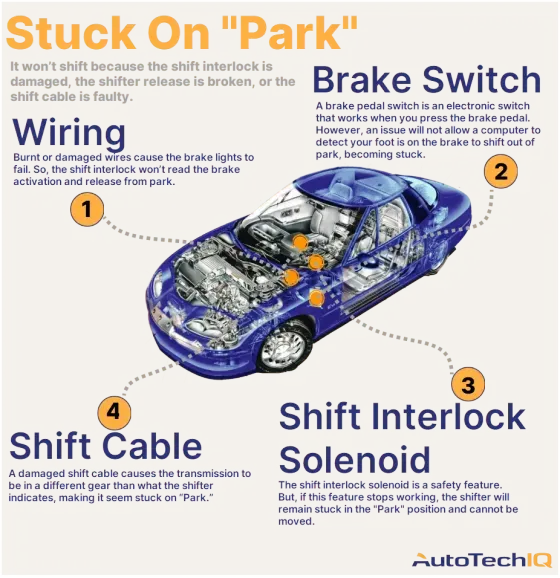
Wiring a light bar on your Jeep JK is one of the most popular upgrades for off-road enthusiasts and anyone who needs better visibility at night. But many beginners worry about doing the wiring themselves. The process can seem complicated, but with the right steps, tools, and a careful approach, you can install a light bar safely and get professional results. This guide will walk you through every step, from planning your setup to final testing. Along the way, you’ll learn practical tips, common mistakes to avoid, and a few expert tricks that most guides miss.
Planning Your Light Bar Installation
Before picking up any tools, plan your installation carefully. The right plan makes the wiring process easier and safer.
Choosing The Right Light Bar
There are many types of light bars for the Jeep JK. Popular choices include LED light bars for their brightness and low power use. Sizes range from 12 inches to over 50 inches. Think about:

- Purpose: Is it for off-roading, daily driving, or emergencies?
- Mounting Location: Above windshield, bumper, or grille.
- Wattage: Higher watts mean more brightness but need thicker wires.
If you’re unsure, check the manufacturer specs and compare brightness, beam pattern, and size. Here’s a quick comparison:
| Light Bar Size | Typical Wattage | Mounting Location | Recommended Wire Gauge |
|---|---|---|---|
| 12-20 inch | 72-120W | Bumper/Grille | 16 AWG |
| 30-40 inch | 180-240W | Windshield | 14 AWG |
| 50+ inch | 288-300W | Roof | 12 AWG |
Gathering Tools And Materials
You’ll need a few basic items:
- Light bar kit (with brackets and wiring harness)
- Switch (toggle or rocker)
- Relay (for safety)
- Fuse (matched to light bar’s amperage)
- Wire (proper gauge, see table above)
- Wire connectors and heat shrink tubing
- Drill and screwdrivers
- Multimeter (for testing)
- Electrical tape
- Zip ties
Having everything ready saves time and prevents mistakes.
Understanding Wiring Basics
Knowing some wiring basics helps avoid common errors and keeps your Jeep safe.
Why Use A Relay?
A relay is a switch controlled by electricity. It lets you use a small switch to turn on a big light bar without running heavy current through the cabin. This prevents melted wires and switch failure.
Fuse Sizing
A fuse protects your Jeep’s wiring. Pick a fuse that matches the light bar’s amperage. For example, a 120W light bar at 12V draws 10A, so use a 15A fuse. Too small, and the fuse blows; too big, and it can’t protect against overload.
| Light Bar Wattage | Fuse Size (Amps) | Wire Gauge |
|---|---|---|
| 72W | 10A | 16 AWG |
| 120W | 15A | 14 AWG |
| 240W | 20A | 12 AWG |
Wire Gauge Matters
Using the wrong wire gauge can cause overheating. Always use thicker wire for higher wattage light bars. Refer to the tables above.

Step-by-step Wiring Guide
Now let’s get to the actual installation. Follow each step carefully.
1. Mount The Light Bar
Install the light bar on your chosen location. Most light bars come with brackets for easy mounting. Secure the bar tightly so it doesn’t move when driving.
- Use the right bolts and washers.
- Align the bar for the best beam angle.
- Avoid over-tightening, which can damage brackets.
2. Route The Wiring Harness
A typical light bar kit includes a wiring harness. Run the harness from the light bar down to the engine bay. Keep wires away from hot parts and moving objects.
- Use zip ties to secure wires.
- Route wires along existing cable paths.
- Leave some slack for vibration.
3. Connect The Relay
Mount the relay in a dry spot, usually near the battery. Connect the harness as follows:
- Relay Pin 30: To battery positive (with fuse).
- Relay Pin 85: To ground (chassis).
- Relay Pin 86: To switch output.
- Relay Pin 87: To light bar positive wire.
Many beginners forget to mount the relay securely. Loose relays can cause intermittent failures.
4. Install The Fuse
Place the fuse holder as close to the battery as possible. This protects your Jeep in case of a short circuit.
- Use a weatherproof fuse holder.
- Double-check fuse rating.
5. Connect The Switch
Mount the switch inside the cabin, where it’s easy to reach but not in the way. Drill a small hole if needed. Run the switch wire through the firewall using a factory grommet.
- Seal any holes to keep water out.
- Label the switch if you have multiple lights.
6. Final Connections
Connect the ground wire from the light bar directly to the chassis. Scrape off paint to ensure a solid connection. Attach all connectors firmly.
- Use heat shrink tubing to protect connections.
- Avoid using only electrical tape—it can come loose.
7. Testing
Before finishing up, test the system:
- Turn on the switch. The light bar should power up.
- Check for flickering, dimness, or overheating wires.
- Use a multimeter to check voltage at the light bar.
- If anything isn’t right, recheck all connections.
Practical Tips And Common Mistakes
Expert Tips
- Use a relay even with small light bars. This keeps the system safe and reliable.
- Upgrade to waterproof connectors. They last longer, especially in mud and rain.
- Add a second fuse for extra protection. Put one on the switch wire.
Common Mistakes
- Skipping the relay: This overloads the switch and can cause fires.
- Wrong wire gauge: Thin wires overheat and melt.
- Poor ground connection: Causes flickering or no light.
- Loose connectors: Lead to intermittent failures.
- No fuse: Risk of fire in case of a short.
Here’s a quick summary of mistakes and solutions:
| Mistake | Result | Solution |
|---|---|---|
| Wrong wire gauge | Overheating | Check wattage, use correct gauge |
| No relay | Switch failure | Always use a relay |
| Poor ground | Flickering lights | Scrape paint, use solid chassis bolt |
| No fuse | Fire risk | Install fuse near battery |
Real-world Example: Jeep Jk Light Bar Install
Let’s walk through a practical example. Suppose you have a 32-inch, 180W LED light bar.
- Mounting: Roof, above windshield
- Wire gauge: 14 AWG
- Fuse: 20A
- Relay: Standard automotive relay (40A)
Steps:
- Attach brackets to roof.
- Bolt light bar in place.
- Run harness down pillar to engine bay.
- Mount relay on firewall.
- Connect battery positive to relay (with fuse).
- Connect light bar positive to relay output.
- Ground light bar to chassis.
- Install switch on dashboard.
- Run switch wire through grommet to relay.
- Test system.
Most installers forget to check voltage at the light bar. If you notice a drop (less than 12V), upgrade your wire gauge or check for loose connectors.
Safety And Maintenance
Wiring a light bar isn’t just about getting it to work. Safety and durability matter too.
- Check all connections periodically. Off-roading shakes wires loose.
- Inspect for corrosion. Salt and mud can damage connectors.
- Clean light bar lens for maximum brightness.
- Replace fuses if blown. Never bypass a fuse.
If you plan to use your Jeep in deep water or mud, consider adding a waterproof relay box and silicone sealant on all connectors.

Legal Considerations
Some states have rules about auxiliary lighting. Make sure your light bar meets local laws. Many require covers on lights when driving on public roads. Check with the Department of Transportation or local authorities.
Frequently Asked Questions
How Do I Know What Wire Gauge To Use For My Light Bar?
Check the wattage of your light bar. Use the tables above. For most light bars under 120W, 14 or 16 AWG is fine. Bigger bars need thicker wire.
Can I Wire The Light Bar Directly To The Battery Without A Relay?
You can, but it’s unsafe. Without a relay, the switch must handle high current, which can melt or fail. Always use a relay for safety.
Should I Connect The Light Bar To High Beam Or Use A Separate Switch?
A separate switch is best for control. Some installers wire the light bar to the high beam circuit, but this can confuse the electrical system and is not always legal.
How Do I Make My Installation Waterproof?
Use heat shrink tubing, waterproof connectors, and a sealed relay box. Avoid regular electrical tape in wet areas.
What If My Light Bar Flickers Or Doesn’t Turn On?
Check all connections, especially the ground. Use a multimeter to test voltage. If the fuse is blown, replace it. Flickering often means loose or corroded connectors.
Wiring a light bar on your Jeep JK isn’t just about brighter nights—it’s about doing the job safely, reliably, and legally. With good planning, the right tools, and careful steps, you can upgrade your Jeep in a single afternoon. Remember to check local laws, inspect your installation regularly, and enjoy better visibility off-road. For more details on automotive wiring standards, visit Wikipedia.