If you own a Jeep Wrangler, you may want to upgrade your radio for better sound, more features, or modern connectivity like Bluetooth and Apple CarPlay. Removing the factory radio can seem intimidating, especially if you’re not used to working with car interiors. But with the right tools and steps, you can do it safely and confidently. This guide will walk you through every detail, so you can avoid surprises and costly mistakes.
What You Need Before You Start
Taking the radio out of your Jeep Wrangler isn’t just about unscrewing a few bolts. Preparation is crucial for a smooth process. Gather these essentials before you begin:
- Trim removal tool (plastic preferred to avoid scratches)
- Phillips screwdriver
- Socket wrench (usually 7mm or 10mm, check your Wrangler’s year)
- Small container (to hold screws)
- Clean cloth (to protect your dashboard)
- Owner’s manual (for reference)
It’s smart to disconnect your car battery before starting. This protects you from electrical shocks and prevents damage to your Wrangler’s electronics.
Step-by-step Guide: Removing The Radio
Let’s break down the process for most Jeep Wranglers from 2007 and newer (JK, JL, and Gladiator models). Older models have different dashboards, but the main ideas are similar.
1. Disconnect The Battery
Pop the hood and locate the negative battery terminal. Use a wrench to loosen the bolt and remove the cable. This step is about safety. Many beginners skip it, but a live wire can short electronics if touched by accident.
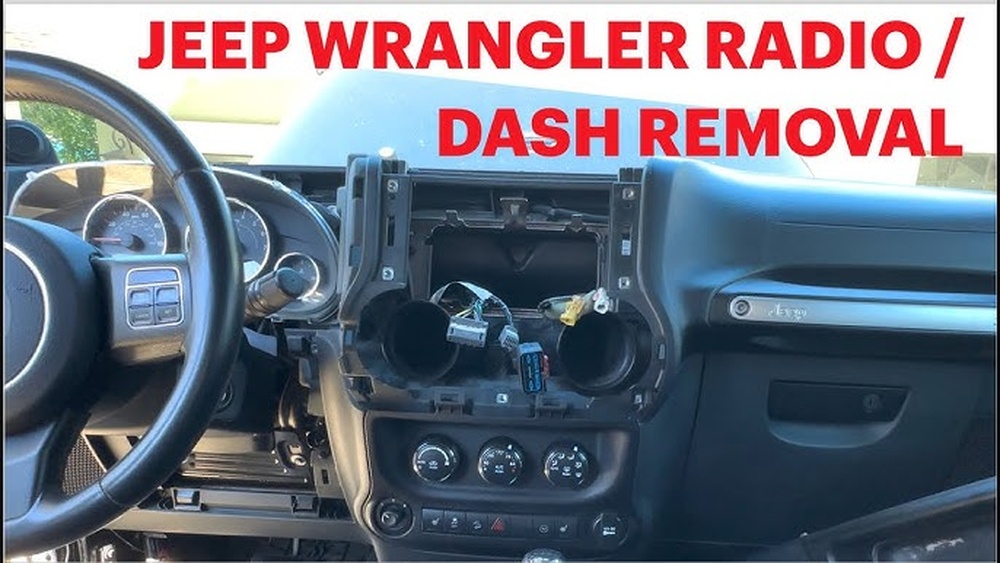
2. Remove The Dashboard Trim
Modern Wranglers have a radio surrounded by a plastic trim piece or “bezel.” To avoid cracks or scratches, use your plastic trim tool. Insert the tool between the trim and dashboard, then gently pry around the edges.
Work slowly. Some clips may be tight, and forcing them can break the plastic. Once the trim is loose, set it aside on a cloth.
3. Unscrew The Radio
With the trim gone, you’ll see the radio secured by four screws (sometimes more in older models). Use your socket wrench or screwdriver to remove them. Keep all screws in your container so you don’t lose any.
A common mistake is to use the wrong tool, which can strip the screws. Double-check your socket size before turning.
4. Slide Out The Radio
Grip both sides of the radio and pull it out gently. Don’t yank it—there are cables attached in the back.
5. Disconnect Wiring Harnesses
You’ll see several wiring harnesses and possibly an antenna cable. Most harnesses have a locking tab. Press the tab, then pull the connector out. If it feels stuck, wiggle gently—never force it. The antenna cable usually pulls out with a firm tug.
Here’s a comparison of common harness types you might see:
| Harness Type | Location | How to Disconnect |
|---|---|---|
| Main power/speaker plug | Back of radio | Press tab, pull out |
| Antenna cable | Usually on far side | Pull straight out |
| Aux/Bluetooth wire | Some models only | Press small tab, pull out |
6. Remove The Radio Completely
With all harnesses detached, you can take the radio out of the dashboard. Set it on a safe surface. If you plan to install a new radio, keep the old one in case you need parts or want to sell it.

What To Watch Out For
Removing the radio is usually straightforward, but some issues can trip up even experienced DIYers.
- Hidden screws: Some trims or dash pieces have extra screws. Check the glove box, vents, or under rubber mats.
- Delicate clips: Cold weather makes plastic more likely to break. If it’s chilly, warm your Jeep’s cabin before starting.
- Wire damage: Tugging too hard on harnesses can pull out pins. Always press the release tab first.
- Uconnect system: If your Wrangler has the Uconnect system, there may be extra connections for the touchscreen and backup camera.
Here’s a quick look at possible differences between JK (2007–2018) and JL (2018+) models:
| Model | Dash Removal Steps | Extra Connections |
|---|---|---|
| JK | Simple trim, 4 screws | Basic harnesses, antenna |
| JL | Extra trim pieces, hidden screws | Uconnect, camera, USB |
Installing A New Radio Or Reassembly
If you’re putting in a new radio, reverse the steps above. Plug in harnesses, slide the radio in, screw it down, snap the trim back, and reconnect the battery.
Two non-obvious tips:
- Test your new radio before reinstalling the trim. If there’s a wiring issue, it’s easier to fix with everything still exposed.
- Keep the old harnesses. Many aftermarket radios need adapters. Don’t throw anything away until your new system works.

Why People Upgrade Wrangler Radios
Most factory radios in older Jeeps lack modern features. Many owners upgrade to get:
- Bluetooth hands-free calling
- Navigation
- Touchscreen controls
- Better speakers and sound
Upgrading can also boost your Jeep’s resale value. For more details on the benefits of aftermarket radios, check this Crutchfield guide.
Safety And Legal Tips
- If your new radio has a screen, make sure it doesn’t block your view.
- Test all features, like backup cameras and steering wheel controls, before finishing.
- Some states have laws about watching videos while driving. Check local rules to avoid tickets.

Frequently Asked Questions
How Long Does It Take To Remove A Jeep Wrangler Radio?
For most people, it takes about 30–60 minutes. Beginners should plan for extra time, especially if you’ve never removed car trim before.
Do I Need Any Special Tools?
No, just a plastic trim tool, screwdriver or socket wrench, and patience. Specialty radio removal keys are not needed for most Wranglers.
Will Removing The Radio Affect My Jeep’s Warranty?
If your Jeep is still under warranty, removing the radio may affect coverage for the stereo system, but usually not the whole vehicle. Always check with your dealer first.
Can I Reuse The Factory Radio After Removal?
Yes, you can reinstall it later. Keep all screws and wiring harnesses safe. If selling your Jeep, some buyers prefer the original radio.
Premium systems like Alpine or Uconnect have extra wiring for amplifiers and cameras. Take photos of all connections before unplugging. Consider getting a professional install if you feel unsure.
Taking the radio out of your Jeep Wrangler is a rewarding DIY task that opens up many upgrade options. With the right tools, patience, and attention to detail, you can do it in under an hour—even as a first-timer. Just remember to keep track of all screws and wiring, and don’t rush the process.
Happy upgrading!