Removing the fuel tank from a Jeep TJ is a task many owners face, especially when dealing with fuel pump issues or rust. While it may seem complex, with the right tools and steps, you can do it safely at home. This guide walks you through each stage, highlights common problems, and shares practical tips to help you avoid mistakes. Even if you’re not a professional mechanic, you’ll finish confident in your understanding.
Before You Begin: Safety And Preparation
Working with fuel systems is risky. Gasoline is highly flammable and fumes can be harmful. Always work in a well-ventilated area and have a fire extinguisher nearby. Disconnect the vehicle’s battery to prevent accidental sparks.
Tools and Supplies Needed:

- Socket set (metric and standard)
- Screwdrivers (flat and Phillips)
- Jack and sturdy jack stands
- Fuel line disconnect tool
- Container for draining fuel (minimum 5 gallons)
- Shop towels
- Safety glasses and gloves
Extra Insight: Most beginners forget to check for remaining pressure in the fuel lines. Always relieve this pressure before disconnecting any hoses to avoid spray.
Step-by-step: Removing The Fuel Tank
1. Drain The Fuel
Lowering a full tank is dangerous and very heavy. There’s no official drain plug on the Jeep TJ tank, so you must siphon the fuel out or run the vehicle until nearly empty.
Siphon Method:
- Insert a siphon hose into the fuel filler neck.
- Use a hand pump to transfer gas to an approved container.
Pro Tip: Never use your mouth to start a siphon. Even a small amount of gasoline is toxic.
2. Lift And Support The Jeep
- Use a floor jack to lift the rear of the Jeep.
- Set jack stands under the frame, not the axle, for maximum stability.
- Double-check your supports before crawling under the vehicle.
Important: Many people use only one jack; always use two stands for safety.
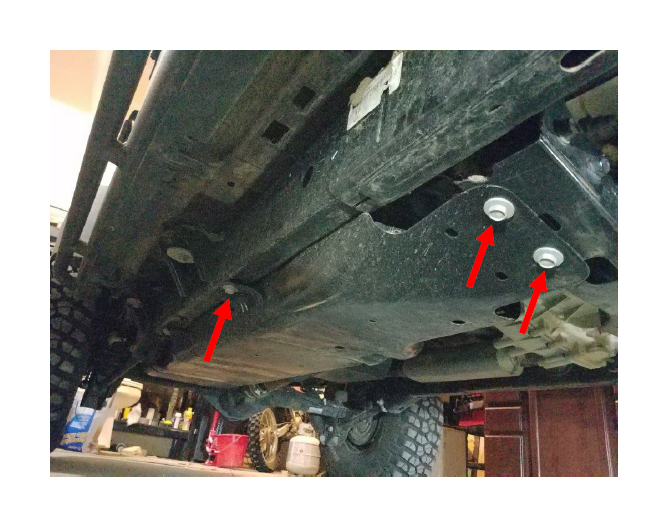
3. Remove The Skid Plate
Jeep TJ fuel tanks are protected by a skid plate that doubles as a tank support.
- Use a socket wrench to remove the six bolts holding the skid plate.
- Lower the plate slowly; the tank will come down with it.
- Support the tank with a jack as you remove the last bolts.
4. Disconnect Hoses And Wires
- Identify the fuel lines, vent hoses, and electrical connector for the fuel pump.
- Use a fuel line disconnect tool to separate the lines.
- Label each hose with tape for easier reinstallation.
- Unclip the wiring harness.
Beginner Mistake: Forgetting to disconnect the filler neck and vent hoses near the gas cap. These must be loosened from the body side.
5. Lower And Remove The Tank
- With all connections detached, slowly lower the jack holding the tank.
- Slide the tank and skid plate out from under the Jeep.
- If the tank is stuck, check for missed bolts or hoses.
Weight Comparison:
| Fuel Level | Approximate Weight (with Skid Plate) |
|---|---|
| Empty | 55 lbs |
| Half-Full | 90 lbs |
| Full | 125 lbs |
Insight: Even an “empty” tank has some gas left. Wear gloves to avoid skin contact with fuel.
Practical Tips For A Smooth Job
- Take photos of hose and wire routing before removal.
- Place bolts and small parts in labeled bags.
- Clean the skid plate and inspect for rust or cracks.
- Replace worn rubber hoses now to avoid future leaks.
Common Mistake: Rushing the process. Take time to double-check all connections before and after removal.
When To Replace Vs. Repair
Sometimes, you’ll discover rust holes or a damaged fuel pump. Should you replace or repair? Here’s a quick comparison:
| Situation | Repair | Replace |
|---|---|---|
| Small cracks in tank | Epoxy sealant | Not necessary |
| Rusty skid plate | Wire brush, repaint | New plate if severe |
| Failed fuel pump | Replace pump only | Tank usually fine |
| Major tank rust/holes | Temporary patch | Replace tank |
Pro Tip: OEM tanks last longer, but aftermarket options can be cheaper.

Reinstallation: What Changes?
Putting the tank back is the reverse of removal, but with a few important differences:
- Double-check all hose connections—a loose vent hose will cause a check engine light.
- Torque the skid plate bolts to factory specs (usually 19 ft-lbs).
- Add a small amount of fuel to test for leaks before fully lowering the Jeep.
Extra Insight: Many forget to reconnect the evap hose near the filler neck. Missing this can lead to fuel smells and failed emissions tests.
Cost And Time Estimates
On average, removing a Jeep TJ fuel tank takes 2–4 hours for a first-timer. Most shops charge $250–$450 for labor alone.
DIY Cost Breakdown:
| Item | Estimated Cost |
|---|---|
| Basic tool rental | $20–$40 |
| Replacement fuel pump | $90–$200 |
| New fuel tank (if needed) | $180–$350 |
| Shop labor (optional) | $250–$450 |
Saving on labor is a big reason to tackle this job yourself.

Final Thoughts
Removing the fuel tank on a Jeep TJ isn’t just about muscle—success comes from preparation and careful attention to detail. With patience and the right steps, you’ll avoid fuel spills, lost bolts, or check engine lights. Always work safely and consult your Jeep’s service manual for reference. For further details on fuel tank systems, you can visit Wikipedia.
Frequently Asked Questions
How Long Does It Take To Remove A Jeep Tj Fuel Tank?
Most first-timers finish in 2 to 4 hours. Experienced mechanics may need less than 2 hours.
Do I Need To Drop The Fuel Tank To Change The Fuel Pump?
Yes. On the Jeep TJ, the fuel pump is inside the tank, so you must remove the tank to access and replace it.
Can I Remove The Tank With Some Fuel Inside?
It’s possible but not recommended. A full tank is very heavy and more dangerous to move. Always try to empty the tank as much as possible.
What Size Are The Skid Plate Bolts?
The skid plate bolts are usually 15mm or 18mm, depending on the model year. Use a socket wrench to avoid stripping them.
Will Removing The Tank Trigger A Check Engine Light?
If all hoses and sensors are reconnected properly, you shouldn’t have a problem. Forgetting a vent hose or sensor is the most common cause of a check engine light after reinstallation.