If your 2010 Jeep JK’s driver tail light is cracked, foggy, or not working, replacing it yourself can save time and money. The process is easier than many think—no complex tools or advanced skills are needed. This guide will walk you through each step, share common mistakes, and offer practical tips for a safe, clean tail light removal.
Tools And Materials Needed
Before you start, gather the following:
- Phillips screwdriver (medium or large)
- Flathead screwdriver (optional, for extra leverage)
- Clean cloth or gloves (to keep fingerprints off the bulb)
- Safety glasses (recommended)
Having everything ready avoids last-minute searching and keeps the process smooth.
Preparing Your Jeep Jk
Park your Jeep on a flat surface and turn off the ignition. For extra safety, remove the key and set the parking brake.
Make sure the area around the tail light is clean dirt can fall inside when you remove the assembly.
Open the rear tailgate. This gives you access to the screws holding the tail light in place. On the 2010 Jeep JK, the driver and passenger side tail lights are mounted with two visible screws.
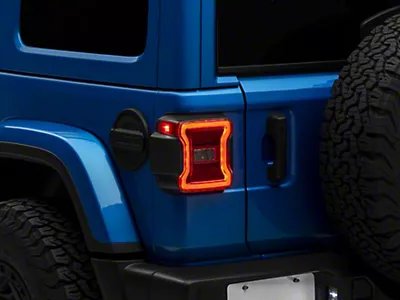
Removing The Driver Tail Light
Let’s break down the removal process into clear steps:
1. Locate The Screws:
Open the tailgate. On the inside edge of the tail light (facing the tailgate), you’ll see two Phillips head screws.
These secure the tail light housing to the Jeep.
2. Unscrew Carefully:
Using the Phillips screwdriver, remove the two screws. Place them in a safe spot they’re easy to lose.
*Pro tip:* Hold the tail light with one hand while unscrewing to prevent it from dropping.
3. Remove The Tail Light Housing:
Gently pull the housing straight out. The assembly is held by plastic alignment pins, so don’t twist or force it. If it feels stuck, wiggle gently.
*Common mistake:* Some people pull at an angle and snap the alignment pins. Always pull straight back.
4. Disconnect The Wiring Harness:
On the back, you’ll see a clip holding the wiring harness to the tail light. Press the locking tab and pull the connector out.
Do not yank the wires this can damage the harness.
5. Inspect The Area:
Check for dirt, corrosion, or broken parts inside the cavity. Wipe away any debris before installing a new light.
When Things Go Wrong
Sometimes, the screws are rusted or the tail light feels stuck. Here’s what you can do:
- For rusted screws, spray a little penetrating oil and wait a few minutes.
- For stuck assemblies, insert a flathead screwdriver gently behind the light (using a soft cloth to protect the paint) and pry gently.
- If the wiring clip won’t release, squeeze the tab harder or use a small flathead to press it down.

Comparing Aftermarket Vs Oem Tail Lights
If you’re replacing the tail light, you’ll find many options. Here’s how OEM (original equipment manufacturer) and aftermarket parts compare:
| Feature | OEM Tail Light | Aftermarket Tail Light |
|---|---|---|
| Fitment | Perfect match | May need adjustment |
| Warranty | Often included | Varies by brand |
| Cost | Higher | Lower |
| Appearance | Factory look | Custom options |
For daily drivers, OEM is safest. If you want a custom look, consider quality aftermarket brands.
Safety And Legal Considerations
A working tail light is not just for safety it’s required by law. Driving without one can lead to fines or accidents.
If you notice fogging, cracks, or dim light, replace or repair the tail light immediately.
Reinstalling The Tail Light
After inspecting or replacing the bulb or housing, you need to reinstall the assembly:
1. Reconnect The Wiring Harness:
Push the harness connector back onto the new or cleaned tail light until you hear a click. Double-check that it’s secure.
2. Align The Assembly:
Line up the alignment pins with the holes in the body. Push the housing straight in until it’s flush.
3. Replace The Screws:
Insert the screws you set aside and tighten them until snug. Do not overtighten this can crack the plastic.
4. Test The Light:
Turn on your Jeep and check that the tail light works both brake and turn signals. It’s easier to fix now than after you close up.
Common Mistakes To Avoid
Many beginners make small errors that can cause big problems later:
- Overtightening screws can crack the light housing.
- Forgetting to check the light before closing up saves time in the short term but leads to repeat work.
- Pulling on wires instead of the connector risks damaging the harness.
- Losing screws—use a small cup or magnetic tray to keep them safe.
Estimated Time And Difficulty
Removing the driver tail light takes about 10–20 minutes even for beginners. Most of the time is spent on careful unscrewing and gently pulling the assembly.
When To Seek Professional Help
If you see damaged wiring, water inside the body, or if the tail light doesn’t work after installation, consult a mechanic. Rare electrical issues can sometimes be more than just a bad bulb or cracked housing.
Cost Breakdown
Expect to pay:
- $30–$60 for a basic aftermarket assembly
- $80–$150 for OEM tail lights
- $0 if only cleaning or reseating the existing light
Labor at a shop can add another $50–$100.
For more on tail light laws and general guidance, check the official NHTSA lighting safety page.
Quick Troubleshooting Table
If your new tail light does not work, here’s a simple guide:
| Problem | Possible Cause | Solution |
|---|---|---|
| No light | Loose harness, blown fuse | Check connection, replace fuse |
| Dim light | Dirty contacts, old bulb | Clean contacts, replace bulb |
| Light flickers | Loose wire | Secure wire, check connector |
Frequently Asked Questions
What Size Screwdriver Do I Need To Remove The Driver Tail Light?
A medium Phillips screwdriver fits most screws on the 2010 Jeep JK tail light. If the screws are stripped, use a larger size for better grip.
Can I Reuse The Same Bulbs When Changing The Tail Light Housing?
Yes, you can reuse the bulbs if they are still working. Always check for dark spots or corrosion before reinstalling.
Do I Need To Disconnect The Battery Before Removing The Tail Light?
It’s not required for this job. Just make sure the ignition is off to avoid short circuits. If you’re nervous, disconnect the negative battery terminal.
Will Aftermarket Tail Lights Fit My 2010 Jeep Jk Without Modifications?
Most quality aftermarket lights are designed for direct fit, but some may need small adjustments. Read reviews and check for “plug and play” before buying.
Why Does My New Tail Light Still Not Work After Installation?
Check for a loose connector, blown fuse, or bad bulb. If all else fails, there could be a wiring issue deeper in the Jeep that needs a mechanic’s help.
Replacing the driver tail light on a 2010 Jeep JK is a simple DIY project that helps you stay safe and legal on the road. With the right tools and a careful approach, you’ll have your Jeep shining again in no time.


















