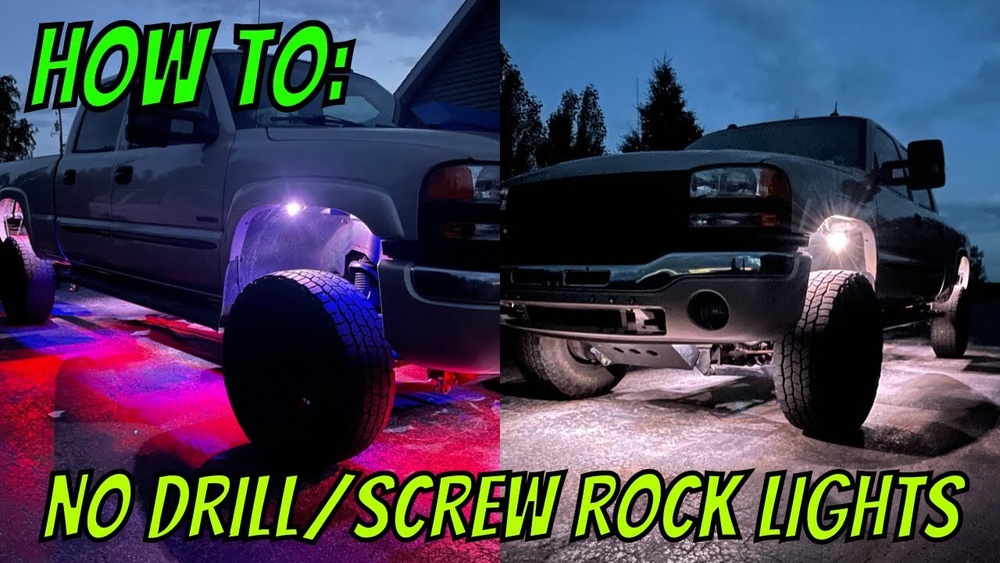
Installing rock lights on your vehicle can transform nighttime driving, off-roading, or camping. These lights help illuminate the ground under your car, making obstacles easier to spot and giving your ride a stylish glow. Many car owners worry about drilling holes, which can damage paint and reduce resale value. Luckily, you can install rock lights without drilling using simple tools and strong adhesives. This guide shows you how to achieve a professional look, avoid common mistakes, and keep your vehicle’s integrity intact.
What Are Rock Lights?
Rock lights are compact LED lights mounted under vehicles, mainly for off-road driving. They offer better visibility over rocks, mud, or trails at night. The most popular models use LED technology, which is energy-efficient and bright. Besides function, rock lights can also add a custom look with colors or patterns.
| Type | Brightness (lumens) | Energy Use (watts) |
|---|---|---|
| Standard LED | 800 | 10 |
| RGB Color LED | 500 | 12 |
| Halogen | 300 | 25 |
Tools And Materials You’ll Need
Before starting, gather these items:
- Rock lights kit (with wiring and remote if needed)
- Adhesive mounts (3M VHB tape or silicone adhesive)
- Zip ties or mounting brackets
- Wire connectors and electrical tape
- Alcohol wipes for cleaning surfaces
- Screwdriver (if needed for brackets)
- Measuring tape
Don’t substitute regular tape for VHB tape; it’s made for outdoor use and holds up under heat, cold, and wet conditions.

Step-by-step Installation Guide
Step 1: Plan Light Placement
Check under your vehicle for flat, clean surfaces near the wheel wells or frame. Place lights where they’ll shine on the ground but remain safe from mud or tire spray. Use your measuring tape to keep spacing even.
Step 2: Prepare Surfaces
Clean the mounting spots with alcohol wipes. Dirt or oil prevents adhesives from sticking. Let surfaces dry fully before moving on.
Step 3: Attach The Lights
Peel the backing from your VHB tape or apply silicone adhesive to the light’s base. Press the light firmly to the chosen spot for at least 30 seconds. For extra security, add zip ties through any available holes, but don’t overtighten.
Step 4: Route The Wiring
Run wires along the frame, using zip ties every few inches to keep them secure and away from moving parts or hot surfaces. Avoid areas near the exhaust or suspension. Connect wires to the battery or a fuse box, following your kit’s instructions.
| Mounting Method | Estimated Lifespan | Removal Difficulty |
|---|---|---|
| VHB Tape | 2-4 years | Easy |
| Silicone Adhesive | 4-6 years | Moderate |
| Zip Ties Only | 1-2 years | Easy |
Step 5: Test The Lights
Turn on the lights to check brightness and coverage. If you see shadows or uneven lighting, adjust the angle. Make sure all connections are tight and protected with electrical tape.
Comparison: Drilling Vs No-drill Installation
Some drivers still prefer drilling for permanent mounts. Here’s how it compares to adhesive methods:
| Method | Vehicle Damage Risk | Installation Time | Weather Resistance |
|---|---|---|---|
| Drilling | High | 60-90 min | Excellent |
| No-Drill (Adhesive) | None | 30-60 min | Good |
No-drill methods are safer for leased vehicles or new cars. You can remove the lights later without leaving holes.

Common Mistakes To Avoid
- Using weak adhesives: Standard double-sided tape won’t last through rain or mud.
- Ignoring surface prep: Even strong tape fails on dirty surfaces.
- Routing wires poorly: Wires left loose can snag or melt.
- Mounting near hot parts: Heat can weaken adhesives or damage LEDs.
- Not sealing connections: Moisture can cause shorts.
Many beginners forget to check their local laws. Some states restrict colored lights or brightness. Always review rules before installing.
Practical Tips For Long-lasting Installation
- Choose weatherproof rock lights for best durability.
- Use extra adhesive or a small bracket if mounting on uneven surfaces.
- Test each light before final mounting to catch defects early.
- Wrap wires with split loom tubing for extra protection.
- Keep your receipt and warranty info; quality kits usually last longer.
One insight many miss: 3M VHB tape needs time to cure. Wait at least 24 hours before off-roading. Also, adhesives work best above 50°F (10°C). Cold weather can make the tape brittle.

Frequently Asked Questions
Can I Use Hot Glue Instead Of Vhb Tape?
Hot glue is not recommended. It loses strength in heat or cold and does not bond well to metal or plastic surfaces found under cars.
Will Adhesive Mounts Last Through Heavy Rain And Mud?
Yes, if you use VHB tape or automotive silicone. These adhesives are designed for harsh conditions and can withstand water, mud, and temperature changes.
How Many Rock Lights Should I Install?
Most vehicles use 4 to 8 lights. Four is enough for basic coverage. Eight gives more even lighting and a custom look, especially for trucks or SUVs.
Is It Safe To Wire Rock Lights To The Battery?
It is safe if you use a fuse and follow your kit’s instructions. Always protect wires with electrical tape and keep them away from moving parts.
Can I Remove The Lights Without Damaging My Vehicle?
Yes. Adhesive mounts and zip ties can be removed by peeling or cutting. Clean leftover residue with alcohol wipes. This is safer for leased vehicles.
Installing rock lights without drilling is easy, safe, and preserves your vehicle’s value. With the right tools, strong adhesives, and careful planning, you get professional results without permanent changes. For more details on adhesive technology and mounting methods, visit 3M VHB Tape Official Site. Enjoy brighter nights and safer trails—no holes needed.


