Installing a wheel spacer can help you achieve a wider stance, improve handling, and give your vehicle a more aggressive look. But the process must be done carefully to ensure safety and performance. Many beginners worry about damaging their wheels or making mistakes that affect their car’s ride.
With a clear guide and the right tools, installing wheel spacers is a straightforward project you can do at home.
What Is A Wheel Spacer And Why Use It?
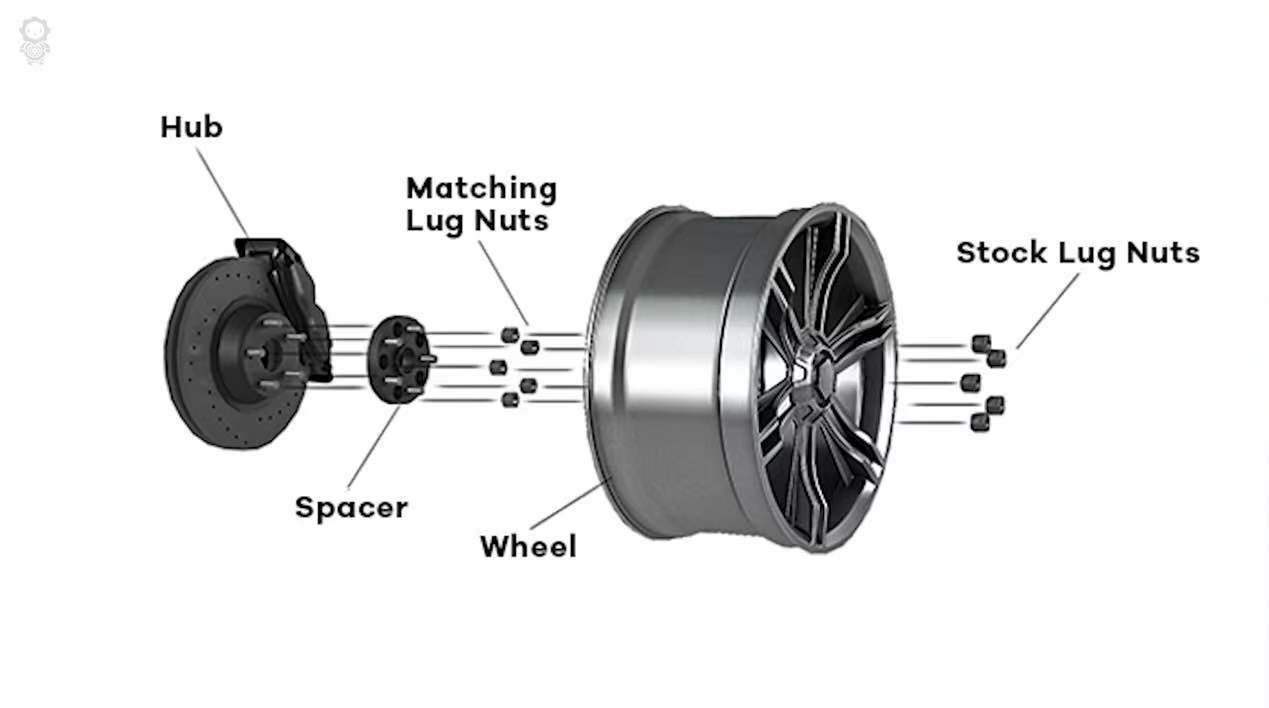
A wheel spacer is a metal disc that fits between your car’s wheel and hub. It pushes the wheel outward, increasing the distance from the suspension components. This extra space can help:
- Clear brake calipers or suspension parts
- Improve cornering stability
- Achieve a flush look with fender arches
Drivers often use wheel spacers when upgrading to larger brakes, wider tires, or aftermarket wheels that don’t fit perfectly.
| Purpose | Common Spacer Thickness | Typical User |
|---|---|---|
| Brake clearance | 5-10 mm | Performance car owner |
| Flush fender look | 15-25 mm | Car enthusiast |
| Handling improvement | 10-20 mm | Track racer |
Before You Begin: Preparation And Tools
Installing wheel spacers requires basic automotive tools. Gather these before starting:
- Wheel spacers (correct size and bolt pattern)
- Torque wrench
- Jack and jack stands
- Socket set
- Wire brush
- Anti-seize compound
Check your spacer’s thickness and bolt pattern. Using the wrong size can cause vibration or unsafe driving. Some spacers are hub-centric, which means they fit tightly onto the hub for better stability.
Non-obvious tip: Measure your vehicle’s hub size and wheel bore. If they don’t match, a hub-centric ring may be needed to avoid shaking at high speeds.

Step-by-step Guide To Installing Wheel Spacers
Follow these steps to install wheel spacers safely and correctly:
- Park on a flat surface and engage the parking brake. Safety is essential.
- Loosen the lug nuts on your wheel with a socket wrench, but don’t remove them yet.
- Lift your car using a jack and secure it with jack stands. Never rely on the jack alone.
- Remove the wheel from the hub.
- Clean the hub and wheel mating surfaces with a wire brush. Dirt and rust can prevent proper seating and cause vibration.
- Test-fit the spacer to check alignment with the hub and bolt holes.
- Apply anti-seize compound to the contact points. This helps prevent corrosion and makes future removal easier.
- Place the wheel spacer onto the hub, making sure it sits flush.
- Reinstall the wheel over the spacer.
- Hand-tighten the lug nuts in a star pattern. This ensures even pressure.
- Lower the car back to the ground.
- Torque the lug nuts to the manufacturer’s specification. Use a torque wrench for accuracy.
| Step | Common Mistake | How to Avoid |
|---|---|---|
| Cleaning surfaces | Leaving rust or dirt | Use wire brush, check visually |
| Spacer fitment | Wrong size or bolt pattern | Confirm hub size and bolt pattern before |
| Tightening lug nuts | Over-tightening or uneven torque | Use torque wrench, follow star pattern |
Beginner insight: Some spacers come with their own bolts or nuts. Always use the hardware provided, not your original lug nuts, unless the spacer instructions say otherwise.
After Installation: Checking And Maintenance
Once the spacers are installed, drive carefully for the first 50-100 miles. Then, recheck the torque on the lug nuts. This step is often skipped but is crucial because wheels can settle or loosen after installation.
Pay attention to any new vibrations, noises, or steering changes. These could signal a problem with the spacer fitment or hardware. If you notice anything unusual, remove the wheel and check everything again.
| Check | Frequency | Reason |
|---|---|---|
| Lug nut torque | After 50-100 miles | Settling after installation |
| Spacer condition | Every oil change | Check for cracks or corrosion |
| Wheel balance | If vibration occurs | Spacer may affect balance |
Non-obvious insight: If you plan to use spacers for track driving or heavy loads, check your wheel bearings regularly. Extra stress can cause wear over time.
Safety And Legal Considerations
Wheel spacers change your vehicle’s geometry and, in rare cases, can affect safety. Always choose high-quality spacers made from strong materials like aircraft-grade aluminum. Avoid cheap, unbranded spacers.
Check local laws regarding wheel spacers. Some regions have rules about how much your wheels can protrude from the fenders. For more details on regulations and safety, you can visit Wikipedia.
Frequently Asked Questions
Can I Use Wheel Spacers With Stock Wheels?
Yes, you can use wheel spacers with stock wheels, but check that the spacer thickness does not cause rubbing or unsafe wheel positioning.
Are Wheel Spacers Safe For Daily Driving?
Quality spacers installed correctly are safe for daily driving. Always use hub-centric spacers and torque the lug nuts properly.
Will Wheel Spacers Affect My Car’s Alignment?
Wheel spacers do not change wheel alignment directly, but they can affect suspension geometry. After installation, monitor tire wear and handling.
How Thick Should My Wheel Spacer Be?
Spacer thickness depends on your goal. For brake clearance, 5-10 mm is common. For a flush look, 15-25 mm works. Always measure before buying.
Do Wheel Spacers Cause Vibration?
Vibration usually happens if spacers are not hub-centric or if surfaces are dirty. Cleaning and proper fitment solve most problems.
Installing wheel spacers is a practical upgrade for many vehicles. By following these steps, using the right tools, and checking your work, you’ll enjoy better looks and performance without risking safety. Always choose quality spacers, follow torque specs, and stay aware of local laws.
With care, your project will deliver lasting results.