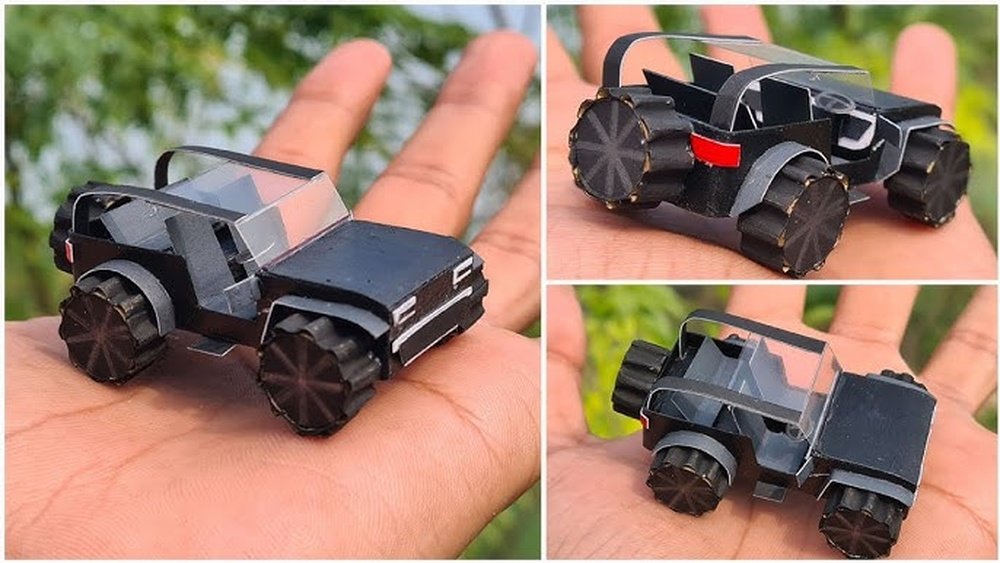
Making your own paper Jeep is a fun and creative project. Whether you’re a student, a parent looking for a craft activity, or a hobbyist, this guide will help you build a realistic paper Jeep using simple materials. You’ll learn not just to fold paper, but also to craft wheels, axles, and even add small details. This makes your model more lifelike and enjoyable to display. Many people find paper craft relaxing and a good way to improve fine motor skills and patience. Let’s dive into this step-by-step guide to making a paper Jeep from scratch.
Materials You Will Need
Before starting, gather all your materials. Using the right supplies makes the process smoother and your Jeep sturdier.
| Material | Purpose | Recommended Quantity |
|---|---|---|
| Thick paper/cardstock | Main body | 2-3 sheets |
| Scissors | Cutting pieces | 1 pair |
| Glue stick or white glue | Assembly | 1 |
| Ruler | Measuring | 1 |
| Pencil | Marking lines | 1 |
| Color markers or pencils | Details | Optional |
If you want to add moving wheels, you’ll also need four small round beads and two wooden sticks or toothpicks for axles.
Creating The Main Body
Start with the main body, which forms the base structure of your paper Jeep.
- Use a piece of thick paper or cardstock, about 8 x 11 inches.
- With your ruler and pencil, draw a rectangle 6 inches long and 3 inches wide.
- Cut out the rectangle. This is your base.
- For the sides, cut two strips of paper, each 6 inches long and 1.5 inches wide.
- Fold each strip along the long side to make a 90-degree angle. These will become the Jeep’s side walls.
- Glue each wall to the long sides of your base, holding them for a few seconds to let the glue set.
For the front and back, repeat the process with two pieces, each 3 inches by 1.5 inches. Attach these to the short sides. Now you have a sturdy box shape—the main body of your Jeep.
Adding The Hood And Roof
The hood and roof make your Jeep look more realistic. They also add structural strength.
- Cut another rectangle, 3 inches by 2 inches, for the hood.
- Fold it gently in the middle to give a slight curve, mimicking a real Jeep’s hood.
- Glue the hood to the front top of the main body, overlapping by about 0.5 inches.
- For the roof, cut a piece 3 inches by 2.5 inches.
- Attach the roof at the back, leaving some space at the front for the windshield.
To make the windshield, cut a triangle of clear plastic from packaging or use thin white paper. Attach it between the hood and the roof.
Crafting The Wheels And Axles
If you want moving wheels, follow these steps. This is where many beginners make mistakes—don’t rush, and measure carefully.
| Wheel Material | Durability | Ease of Crafting |
|---|---|---|
| Paper | Low | Easy |
| Cardboard | Medium | Moderate |
| Bottle Caps | High | Easy |
- Draw four circles on thick paper or cardboard, each about 1 inch in diameter.
- Cut out the circles. If using bottle caps, skip this step.
- Pierce a small hole in the center of each wheel.
- Cut two toothpicks or wooden sticks to the width of your Jeep’s underside.
- Slide one wheel onto each end of the sticks, securing with a small drop of glue if needed.
- Attach the axles to the underside of your Jeep. Make sure the wheels can spin freely.
A common mistake is gluing the wheels directly to the body—they won’t turn this way. Always use axles for real movement.
Adding Details And Customization
The best paper Jeeps stand out because of their details. Here are ways to make yours unique:
- Draw or glue paper headlights and a front grille.
- Use color markers for windows, doors, or side stripes.
- Add a spare tire at the back using an extra paper wheel.
- Fold a small rectangle of paper for side mirrors.
For advanced crafters, try making a simple fold-down windshield or even a removable roof.
Displaying And Preserving Your Paper Jeep
Paper models are delicate. Here’s how to keep your Jeep looking good for a long time:
| Action | Effect | Frequency |
|---|---|---|
| Keep away from water | Prevents warping | Always |
| Dust gently | Maintains appearance | Weekly |
| Store in a box | Protects from damage | When not displayed |
You can also spray your Jeep lightly with clear acrylic sealer for extra strength, but test it on a scrap piece first.

Common Mistakes And How To Avoid Them
Many beginners run into the same problems:
- Using thin paper: Your Jeep might collapse. Always choose thick paper or cardstock.
- Over-gluing: Too much glue can warp the paper. Use small amounts and let each section dry before moving on.
- Rushing wheel placement: If the axles are uneven, your Jeep won’t roll straight. Measure carefully.
- Ignoring small details: Little touches make your model stand out.
Take your time and check each step before moving on.
Frequently Asked Questions
What Type Of Paper Works Best For Making A Jeep?
Cardstock or construction paper is ideal. It’s thick enough to hold shape but easy to cut and fold. Regular printer paper is too flimsy for most parts.
Can I Paint My Paper Jeep?
Yes, you can use water-based paints or markers. Avoid heavy acrylics or watercolors, as they can soak and warp the paper.
How Can I Make The Wheels Move Smoothly?
Use round toothpicks or wooden sticks for axles, and make sure the holes in the wheels are slightly larger than the axle. Don’t glue the wheels directly to the Jeep’s body.
How Long Does It Take To Make A Paper Jeep?
For a basic model, it usually takes 1-2 hours. Adding extra details or making moving wheels can add another 30 minutes.
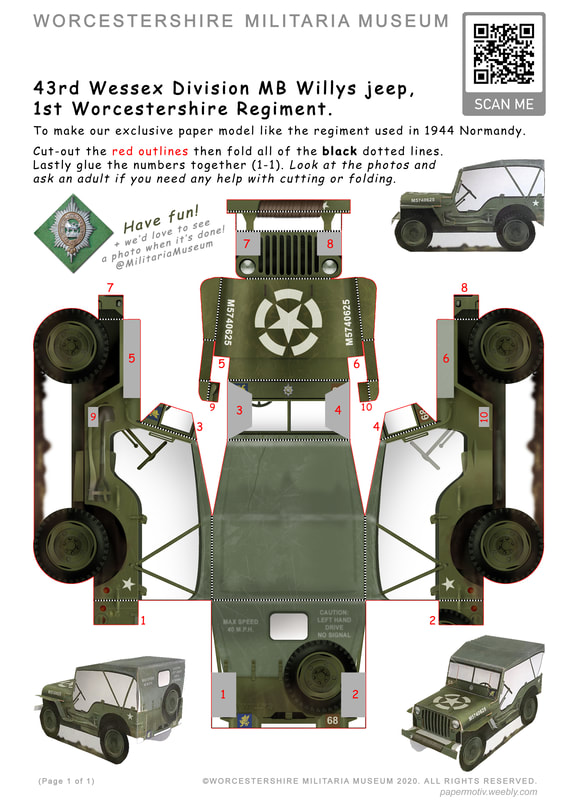
Are There Templates Or Patterns Available Online?
Yes, many websites offer free printable templates. Check sites like Origami Resource Center for patterns and inspiration.
Crafting a paper Jeep is more than just folding and gluing—it’s a chance to be creative and practice patience. With the right materials and careful steps, you can make a Jeep that looks great on any shelf. Start simple, add your own details, and enjoy the process.
Your finished paper Jeep might just inspire your next craft adventure!


