Getting a flat tire or needing to lift your Jeep Wrangler can happen when you least expect it. For many owners, the first step is figuring out how to take the jack out of its storage spot. This process can be confusing if you haven’t done it before. Whether you’re new to Jeeps or just want a refresher, this guide will walk you through each step safely and clearly.
Understanding Your Jeep Wrangler’s Jack Location
The stock jack in a Jeep Wrangler is usually tucked away, making it less obvious for first-timers. For most recent Wrangler models (such as JK and JL), the jack is stored under the rear cargo area, inside a compartment. Older models may have it mounted elsewhere.
Here’s a quick look at common jack locations for different Wrangler generations:
| Wrangler Model | Jack Location |
|---|---|
| YJ (1987–1995) | Under front seat or rear cargo |
| TJ (1997–2006) | Rear cargo compartment |
| JK (2007–2018) | Below rear cargo floor |
| JL (2018–present) | Compartment behind rear seats |
Always check your owner’s manual if you’re unsure, but the process is very similar for most models.
Tools Needed Before You Start
You don’t need special tools to remove the jack, but having work gloves can help protect your hands. If you plan to use the jack, make sure you also have:
- Wheel chocks (to prevent the Jeep from rolling)
- Jack handle and extension (usually stored with the jack)
Some Wranglers may have a small bolt or latch holding the jack in place, so a basic socket wrench might help, but it’s rarely needed.
Step-by-step: How To Take The Jack Out
Follow these steps to safely remove the jack from your Jeep Wrangler:
1. Open The Rear Door Or Tailgate
Start by opening the rear door or tailgate to access the cargo area. Remove any floor mat covering the compartment.
2. Locate The Jack Compartment
Find the access panel or compartment where the jack is stored. In JK and JL models, this is usually under the cargo floor or in a side panel.
3. Remove The Lid Or Cover
Lift or unscrew the cover to reveal the jack and tools. Some covers snap open, while others have a twist lock.
4. Release Any Restraints
The jack is often held by a wing nut or plastic bolt. Unscrew this by hand. If it’s tight, use pliers or a wrench.
5. Lift Out The Jack And Tools
Carefully take out the jack and any handles or extensions. The tools may be nested together, so separate them gently.
6. Check For All Accessories
Make sure you also remove the jack handle and extension if you plan to use the jack. These are stored nearby in the same compartment.
Here’s a quick reference for the typical parts you’ll find:
| Part | Function |
|---|---|
| Jack | Lifts the vehicle |
| Handle | Turns the jack mechanism |
| Extension | Helps reach the jack from outside |
| Retaining bolt/wing nut | Secures jack in place |
Tips For First-time Jeep Owners
- Practice removal at home before you actually need the jack. This saves time and stress during a roadside emergency.
- If the wing nut is stuck, use a drop of lubricant (like WD-40) and wait a few minutes.
- Don’t force the jack out. If it’s wedged, check for hidden clips or bolts.
- Keep the jack compartment clean and dry to avoid rust or damage.
Important Safety Reminders
Using a jack always comes with risks. Here’s what many new Wrangler owners miss:
- Never use the jack on a slope. Flat, stable ground is essential.
- Chock your wheels before lifting. This prevents your Jeep from rolling.
- Do not crawl under the vehicle when only the jack is supporting it.
- Check the weight rating of your stock jack. It’s designed for the Jeep’s weight, but not for lifting the whole vehicle.
A surprising fact: The stock Jeep jack is made for emergency use, not for frequent tire rotations or repairs. If you go off-road often, consider upgrading to a heavy-duty jack.
When To Replace Or Upgrade Your Jack
The factory jack works well for on-road use and standard tires. However, if you’ve installed larger tires or a lift kit, the stock jack may not reach or support your Jeep properly.
Here’s a quick comparison:
| Jack Type | Max Height | Best For |
|---|---|---|
| Stock scissor jack | 12-15 inches | Factory tires, emergency use |
| Bottle jack | 18-20 inches | Larger tires, off-road |
| Hi-lift jack | Up to 48 inches | Heavily lifted Jeeps |
If you’re unsure which jack is right for you, visit the official Jeep website for specifications.
Putting The Jack Back In Place
Once you’re finished, return the jack and tools to their compartment. Make sure:
- All tools are securely fastened
- The cover or panel is properly closed
- Nothing is rattling or loose
Many owners forget to secure the jack after use, leading to noise or damage while driving.
Frequently Asked Questions
Where Is The Jack Located In A Jeep Wrangler?
The jack is usually in a compartment under the rear cargo floor or behind the rear seats, depending on your Jeep’s model year.
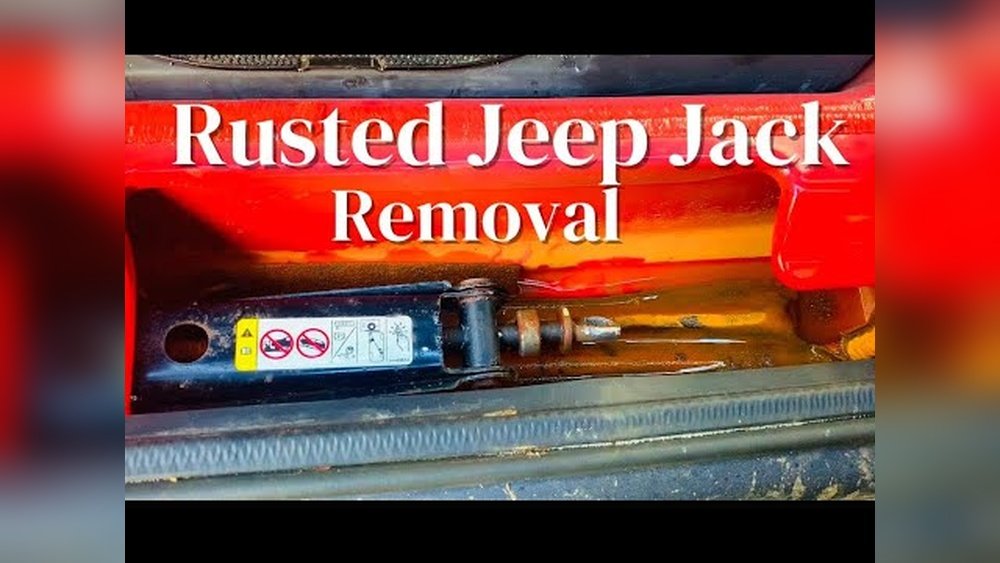
What If The Jack Is Stuck And Won’t Come Out?
First, check for extra clips or a tight wing nut. Use a little lubricant if it’s rusted or stuck. Never force it—look for hidden fasteners.
Can I Use A Different Jack With My Jeep Wrangler?
Yes, you can use a bottle jack or hi-lift jack if you have larger tires or go off-road often. Make sure any jack you use supports your Jeep’s weight.
Is It Safe To Use The Stock Jack For Tire Changes?
The stock jack is safe for emergency tire changes on flat ground. Do not use it for heavy repairs or off-road lifting.
How Do I Store The Jack So It Doesn’t Rattle?
Always tighten the retaining bolt or wing nut after placing the jack back. Store all parts as designed to prevent movement.
Taking the jack out of your Jeep Wrangler is simple if you know where to look and what to do. Practicing removal at home means you’ll be ready when you need it most. With the right steps and a few safety tips, you can handle this basic Jeep skill with confidence.