Jeep Wrangler Double Din Install Kit: Your Easy Stereo Upgrade Guide
Upgrading your Jeep Wrangler’s stereo system can transform your driving experience. A double din stereo offers more features than the original single din unit, like larger touchscreens, better sound quality, and advanced connectivity.
However, the dashboard of a Jeep Wrangler isn't designed for a standard double din unit. This is where a Jeep Wrangler double din install kit becomes essential.
These kits are specifically designed to adapt your Wrangler’s dash to fit a double din stereo, making the upgrade process much smoother and giving your interior a clean, factory-like look.
Many Wrangler owners dream of a modern infotainment system, but the thought of complex wiring and dashboard modifications can be daunting. Fortunately, with the right kit and a bit of patience, installing a double din stereo in your Jeep Wrangler is a very achievable DIY project. This guide will walk you through everything you need to know, from choosing the right kit to the installation steps, ensuring you get a professional-looking result.
Understanding The Double Din Upgrade
Before diving into the installation, it’s important to understand why a double din upgrade is desirable and what it entails. A single din stereo is the standard, smaller size, while a double din is essentially two single din units stacked vertically.
This larger size allows for bigger screens, which means more functionality.
Why Upgrade To A Double Din Stereo?
The original stereo in many Jeep Wranglers, especially older models, is quite basic. Upgrading to a double din unit brings a host of benefits:
- Larger Touchscreen: This is the most obvious advantage. Larger screens make it easier to control navigation, music, and phone calls.
- Enhanced Navigation: Many double din stereos come with built-in GPS or support for smartphone navigation apps like Apple CarPlay and Android Auto, providing a much better navigation experience than small, outdated displays.
- Better Audio Quality: Aftermarket stereos often have more powerful amplifiers and better sound processing capabilities, leading to a richer audio experience.
- Smartphone Integration: Features like Apple CarPlay and Android Auto allow you to mirror your smartphone’s interface on the stereo screen, giving you access to calls, texts, music, and navigation safely.
- Backup Camera Support: Most double din units can display a feed from a backup camera, significantly improving visibility and safety when reversing.
- Modern Aesthetics: A sleek, modern double din stereo can significantly update the interior look of your Wrangler.
What Is A Double Din Install Kit?
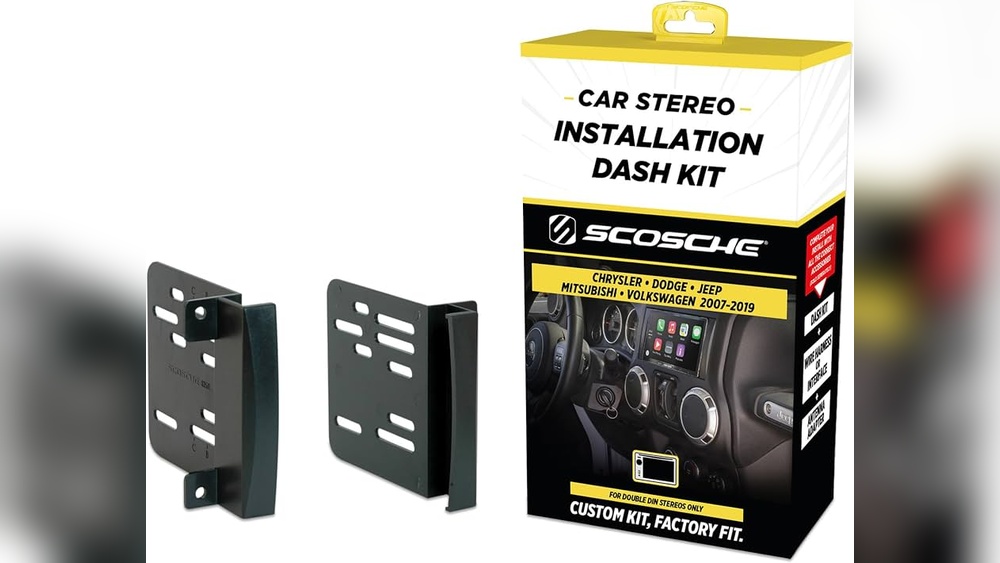
A double din install kit is a set of components that allow you to fit a standard double din aftermarket stereo into a dashboard designed for a single din unit. These kits typically include:
- Dash Mount/Bezel: This is the main piece that replaces your Wrangler’s original dash panel or surrounds the new stereo. It’s shaped to accommodate the double din unit and match the contours of your Wrangler’s dashboard.
- Mounting Brackets: These secure the stereo to the new dash bezel.
- Wiring Harness Adapter: This crucial component connects the new stereo’s wiring to your Wrangler’s factory wiring without cutting or splicing.
- Antenna Adapter: Ensures your new stereo can connect to the factory antenna.
- Trim Pieces: Sometimes included to fill any gaps and provide a clean finish.
The quality and completeness of these kits can vary, so choosing a reputable brand known for Jeep parts is important.

Choosing The Right Double Din Install Kit For Your Jeep Wrangler
Not all double din install kits are created equal, and the right one for you depends on your specific Jeep Wrangler model and year. Compatibility is key to a successful and clean installation.
Factors To Consider When Buying A Kit
- Vehicle Compatibility: This is the most critical factor. Ensure the kit is designed for your exact year, make, and model of Jeep Wrangler. For example, a kit for a JK Wrangler (2007-2018) will likely not fit a JL Wrangler (2018-present) or a TJ Wrangler (1997-2006). Always double-check the product description and any fitment guides.
- Kit Contents: A comprehensive kit will save you time and frustration. Look for kits that include all the necessary mounting hardware, a wiring harness adapter, and an antenna adapter. Some kits might not include a wiring harness, requiring you to purchase it separately.
- Brand Reputation: Stick with well-known brands in the car audio and automotive accessory market. Companies like Metra, Scosche, and PAC are reputable for producing quality installation kits. Reading reviews from other Wrangler owners can be very helpful.
- Dash Material and Color: While most kits are designed to match the factory dash color and texture, it’s worth noting. Some kits are made from durable ABS plastic, while others might have a slightly different finish.
- Specific Wrangler Features: Some Wranglers have unique features like steering wheel controls or premium sound systems. Ensure the kit (and any accompanying wiring harnesses) can retain these features if you wish. You might need additional adapters for steering wheel controls.
- Double Din Stereo Size: While “double din” refers to a standard size, some aftermarket stereos can be slightly larger or have unique mounting depths. Ensure the kit you choose will accommodate your specific stereo model.
Popular Brands And Types Of Kits
Several brands offer double din installation kits for Jeep Wranglers. Here are a few common ones:
- Metra: Metra is a very popular choice for car audio installation parts. They offer various kits for different Wrangler generations, often including everything needed for a complete installation. Their kits are known for good fitment.
- Scosche: Another well-regarded brand, Scosche provides reliable kits that aim for a factory-like fit and finish. They often focus on ease of installation.
- PAC Audio: While PAC is more known for its wiring interfaces and steering wheel control modules, they also offer dash mounting solutions or components that work with other brands’ kits.
When searching, you’ll typically find kits referred to by the Jeep Wrangler generation they are designed for (e.g., “Jeep JK double din kit,” “Jeep JL double din install kit”).
Preparing For The Installation
Before you start taking your dashboard apart, proper preparation is crucial. This involves gathering your tools, understanding the process, and ensuring you have all the necessary components.
Essential Tools And Materials
You’ll need a few tools to complete the double din installation smoothly. Having these ready will prevent delays and make the process easier.
- Panel Removal Tools: These plastic pry tools are essential for removing dashboard panels without scratching or damaging them. Metal tools like screwdrivers can easily mar your interior.
- Screwdriver Set: You’ll likely need Phillips head screwdrivers in various sizes. Some screws might be Torx head, so having a Torx screwdriver set is also a good idea, especially for Wranglers.
- Socket Wrench Set: Small sockets (like 7mm, 8mm, 10mm) are often needed for removing bolts holding the factory radio or dash components.
- Wire Strippers and Crimpers: If your wiring harness adapter requires any minor connections (though most are plug-and-play), these will be necessary.
- Electrical Tape or Heat Shrink Tubing: For insulating any wire connections if needed.
- Zip Ties: To neatly secure wiring behind the dash and prevent rattling.
- Gloves: To keep your hands clean and improve grip.
- A Small Container or Magnetic Tray: To keep track of all the small screws and bolts you remove. Losing them is easy!
- The Double Din Install Kit: As discussed, ensure it’s the correct one for your Wrangler.
- The New Double Din Stereo: Make sure you have the stereo itself.
- Wiring Harness Adapter: This connects your new stereo to your Jeep’s factory wiring. Get one specifically designed for your Wrangler and the aftermarket stereo brand.
- Antenna Adapter: To connect the factory antenna to your new stereo.
- Steering Wheel Control Interface (Optional): If your Wrangler has steering wheel audio controls and you want to retain them, you’ll need an adapter like the ASWC-1 from Axxess.
Disconnecting The Battery: A Crucial Safety Step
Warning: Always disconnect the negative terminal of your vehicle’s battery before starting any electrical work. This prevents short circuits, damage to your vehicle’s electrical system, and potential injury.
- Locate the Battery: It’s usually under the hood.
- Identify the Negative Terminal: It’s typically marked with a “-” symbol and often has a black cable.
- Loosen the Terminal Clamp: Use a wrench to loosen the nut on the negative terminal clamp.
- Remove the Cable: Gently twist and lift the negative cable off the battery post. Tuck it away so it cannot accidentally touch the terminal.
- Wait: It’s good practice to wait a few minutes after disconnecting the battery. This allows any residual power in the vehicle’s capacitors to dissipate.
Understanding Your Wrangler’s Dashboard Layout
Jeep Wranglers, particularly models from the JK generation onwards, have dashboards designed with modularity in mind, which aids in stereo replacement. However, the factory radio is typically a single din unit that occupies the top portion of the center console stack.
- Center Stack: This is the area between the driver and passenger seats, usually containing climate controls, air vents, and the radio.
- Factory Radio Removal: You’ll typically need to remove trim pieces around the radio to access the mounting screws or clips holding it in place. Panel removal tools are invaluable here.
- Space Behind the Dash: There is usually enough space behind the factory radio for a double din unit, but the dash opening itself needs to be enlarged or adapted using the install kit. The kit’s bezel will provide the correct opening and mounting points.
Step-by-step Double Din Installation Guide
This guide provides a general overview. Always refer to the specific instructions that come with your Jeep Wrangler double din install kit and your new stereo, as details can vary.
Step 1: Remove The Factory Stereo
This is often the most intimidating part for beginners, but it’s usually straightforward.
- Remove Trim Panels: Start by gently prying off the trim pieces surrounding the factory radio. These are usually held in by clips. Work slowly and use your plastic panel removal tools to avoid damage. For a JK Wrangler, you might need to remove the lower dash panel below the steering column first, then the panel surrounding the radio and climate controls.
- Unscrew the Factory Radio: Once the trim is off, you’ll see the screws holding the factory radio in place. Remove these screws.
- Pull Out the Radio: Gently pull the factory radio out of the dash.
- Disconnect Wiring and Antenna: Behind the radio, you’ll find a wiring harness connector and an antenna cable. There might also be other connectors for features like auxiliary inputs or USB ports. Press the release tabs on the connectors and carefully unplug them.
Step 2: Prepare The New Double Din Stereo And Install Kit
Now it’s time to get your new stereo and the install kit ready.
- Assemble the Install Kit: Follow the instructions provided with your double din install kit. This usually involves attaching mounting brackets to the new dash bezel.
- Mount the Stereo to the Kit: Most kits will have brackets or a sleeve that attaches to your new double din stereo. Slide the stereo into the sleeve or attach the brackets according to the kit’s instructions. Ensure it’s securely fastened.
- Connect the Wiring Harness Adapter: This is where you’ll connect your new stereo’s wiring harness to the wiring harness adapter that came with your kit.
- Matching Wires: The adapter will have wires that match the colors or labels on your new stereo’s harness. You’ll typically need to connect these using crimp connectors, butt connectors, or by soldering. Many adapter kits are plug-and-play, meaning they connect directly to your Jeep’s factory harness and your stereo’s harness without any wire cutting.
- Steering Wheel Controls: If you are retaining steering wheel controls, connect the steering wheel control interface (e.g., Axxess ASWC-1) to the appropriate wires on the adapter harness and your new stereo. Follow the specific instructions for your interface.
- Power, Ground, and Speakers: Connect the power (usually a red wire), ground (black wire), and speaker wires according to the diagrams provided with your stereo and the adapter.
- Other Connections: Connect any other wires for illumination, reverse cameras, auxiliary inputs, etc.
Pro Tip: Take your time with the wiring. Double-checking each connection before securing it can save you a lot of headaches later. If a connection feels loose, it’s not done correctly.
Step 3: Install The New Stereo And Kit Into The Dash
With the wiring complete and the stereo mounted in the kit’s bezel, it’s time to install it in your Wrangler.
- Connect the Wiring Harness and Antenna: Plug the wiring harness adapter (now connected to your stereo) into the factory wiring harness connector(s) in your dash. Also, plug in the antenna adapter and connect it to the factory antenna cable.
- Test the Stereo: Before pushing everything back, it’s wise to temporarily reconnect the battery and turn on your Jeep to test the new stereo.
- Power On: Does the stereo turn on?
- Sound: Check if you have sound from all speakers.
- Basic Functions: Test the radio, Bluetooth, and any other core functions.
- Steering Wheel Controls (if applicable): If you installed an interface, test if your steering wheel buttons work.
- Troubleshoot (if needed): If something isn’t working, disconnect the battery again and re-check your wiring connections. This is the easiest time to fix issues.
- Secure the New Unit: Once you’ve confirmed everything works, disconnect the battery again. Carefully slide the new double din stereo and its installed bezel into the dash opening. It should fit snugly.
- Attach the Bezel: Secure the new dash bezel using the provided clips or screws, following your kit’s instructions. In many cases, the bezel snaps into place.
- Reinstall Trim Panels: Reattach any trim pieces you removed earlier, working from the inside out. Ensure they snap securely into place.
Step 4: Final Touches And Reassembly
- Tidy Up Wiring: Use zip ties to neatly bundle and secure any loose wires behind the dash.