When your Jeep Liberty 4×4 starts making strange noises from the front, or if you notice a wobble or pulling sensation when driving, a wheel bearing issue might be the culprit. The wheel bearing is a critical component that allows your wheels to spin freely with minimal friction.
For a 4×4 vehicle like the Jeep Liberty, the front wheel bearings are especially important for handling and stability, particularly when engaging the four-wheel-drive system.
Understanding how these bearings work, the signs of their failure, and the process of replacement is essential for any Jeep Liberty owner. This guide will walk you through everything you need to know about the Jeep Liberty 4×4 front wheel bearing, from its function to its maintenance and replacement. We’ll cover the common symptoms of a failing bearing, the tools and parts you’ll need, and a step-by-step guide to help you tackle this repair, whether you’re a seasoned DIY mechanic or looking to understand what your mechanic is doing.
Understanding The Front Wheel Bearing In Your Jeep Liberty 4×4
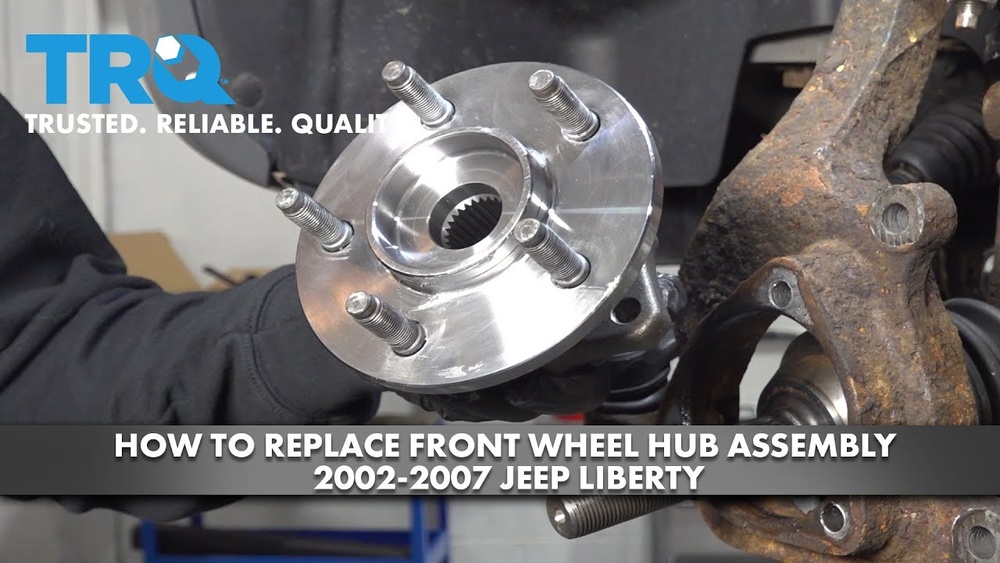
The wheel bearing assembly in your Jeep Liberty 4×4 is designed to reduce friction and support the weight of the vehicle. It’s a set of steel balls or rollers held in place by a metal ring, allowing the wheel hub to rotate smoothly around the axle.
In a 4×4 system, these front bearings are subjected to significant stress, not only from the vehicle’s weight and the forces of braking and acceleration but also from the added torque and strain when four-wheel drive is engaged, especially during off-road driving or in slippery conditions.
Unlike older vehicles with separate hub and bearing components, most modern vehicles, including the Jeep Liberty, use integrated wheel bearing and hub assemblies. This means that when the bearing fails, you typically replace the entire hub assembly. This design simplifies manufacturing and assembly but can make replacement a bit more involved, as you’re dealing with a more complex unit. The front hubs in a 4×4 Liberty also contain components related to the automatic locking hubs or the system that engages the front driveshaft when 4WD is selected, adding another layer of complexity to their function and potential failure points.
How A Wheel Bearing Works
At its core, a wheel bearing is a simple yet robust mechanism. It consists of an inner race, an outer race, and rolling elements (either balls or tapered rollers) sandwiched between them.
Grease or a similar lubricant is packed inside to ensure smooth operation and prevent wear.
The inner race is typically pressed onto the axle or spindle, while the outer race is pressed into the wheel hub. As the wheel turns, the rolling elements move between the two races, allowing the hub to rotate freely around the stationary axle component.
In the context of your Jeep Liberty’s 4×4 system, the front wheel bearings are part of the assembly that connects the wheels to the suspension and the drivetrain. They must be strong enough to handle lateral (side-to-side) and axial (front-to-back) forces, especially during turns and when the 4×4 system is engaged, which distributes power to the front wheels.
This means the bearings need to be precisely manufactured and robustly built to withstand these varied and often harsh conditions.
The Importance Of The 4×4 Front Wheel Bearing
For a Jeep Liberty equipped with 4×4, the front wheel bearings play a crucial role beyond just allowing the wheels to spin. They are integral to the transfer of power to the front wheels. When you engage 4WD, torque is sent through the transfer case to the front differential, and then to the front axles, which ultimately rotate the front hubs and, consequently, the wheels. The bearings must be able to handle this additional load and rotational force without seizing or failing.
A failing front wheel bearing in a 4×4 can lead to more than just noise; it can affect steering, braking, and the engagement of the 4WD system. In severe cases, a catastrophic bearing failure can cause the wheel to detach from the vehicle, which is an extremely dangerous situation.
Therefore, recognizing the early signs of wear and addressing them promptly is paramount for safety and maintaining the off-road capability of your Liberty.
Common Signs Of A Failing Jeep Liberty Front Wheel Bearing
When a front wheel bearing starts to go bad, it usually provides audible and tactile clues. These symptoms often become more pronounced as the bearing degrades further.
Ignoring these signs can lead to more extensive damage and potentially unsafe driving conditions.
Audible Symptoms
The most common sign of a failing wheel bearing is a humming, growling, or grinding noise that emanates from the front of the vehicle. This noise typically changes with speed and can be more noticeable when turning.
- Speed-Dependent Noise: As you accelerate, the noise will often increase in pitch and volume. It might disappear or lessen at certain speeds.
- Turning: Turning the steering wheel slightly left or right can often make the noise louder or softer, depending on which side the failing bearing is on. For example, if turning right makes the noise louder, the left front wheel bearing is likely the issue, as the weight shifts to the right, putting more pressure on the left side. Conversely, turning left and hearing a louder noise suggests the right front wheel bearing is failing.
- Constant Grinding: In advanced stages, the noise can turn into a continuous grinding sound, even when driving straight. This often indicates significant wear and potential imminent failure.
Tactile Symptoms
Besides noise, you might also feel symptoms through the steering wheel or the chassis of your Jeep Liberty.
- Wobble or Vibration: A worn bearing can cause a noticeable wobble or vibration in the steering wheel, especially at higher speeds. This might feel like the car is not tracking straight.
- Pulling: The vehicle might pull to one side, particularly when braking or accelerating. This can be due to uneven bearing wear or the bearing causing drag.
- Loose Steering: In severe cases, the steering might feel loose or imprecise, as the wheel has excessive play.
Other Indicators
There are a few other less common but still important indicators.
- ABS Light: Many Jeep Liberty models have an Anti-lock Braking System (ABS) that relies on sensors integrated into the wheel hub assembly. If the wheel bearing fails or becomes excessively loose, it can interfere with the ABS sensor’s ability to read the wheel speed, causing the ABS warning light to illuminate on your dashboard.
- Heat: After driving, if you carefully touch the wheel hub (avoiding the brake components which naturally get hot), and it feels abnormally hot compared to the other side, this can indicate excessive friction caused by a failing bearing.
- Physical Play: With the vehicle safely supported on jack stands, you can check for physical play in the wheel. Grab the tire at the 12 o’clock and 6 o’clock positions and try to rock it back and forth. Any significant clunking or looseness suggests a worn wheel bearing or other suspension components.

Diagnosing A Faulty Front Wheel Bearing
Accurate diagnosis is key to ensuring you’re addressing the correct problem. While the symptoms above are strong indicators, other issues can mimic wheel bearing failure.
The Rocking Test
This is a fundamental check for wheel bearing play.
- Lift the Vehicle: Safely lift the front of your Jeep Liberty using a jack and support it securely with jack stands under the frame or appropriate points. Ensure the parking brake is engaged and the wheels are chocked.
- Grip the Tire: Place your hands at the top and bottom of the tire (12 o’clock and 6 o’clock positions).
- Wiggle: Try to rock the tire back and forth. Listen for any clunking sounds and feel for play.
- Repeat: Do this for both front wheels. Any significant looseness or noise points towards a potential wheel bearing issue.
- Side-to-Side Check: You can also try gripping the tire at the 3 o’clock and 9 o’clock positions and rocking it to check for play related to steering components, but the top-and-bottom test is more specific to wheel bearings.
Listening For Noise Changes
The stethoscope method can be very effective.
- Engine Running: With the vehicle still safely on jack stands, start the engine.
- Engage Gear: Put the transmission in Drive (or the appropriate gear for 4WD if applicable and safe to do so on stands).
- Use a Stethoscope: Carefully use a mechanic’s stethoscope (or a long screwdriver held to your ear and touching various parts) to listen to the wheel hub assembly, the axle, and surrounding components.
- Identify Source: Try to pinpoint where the noise is loudest. As you rotate the wheel by hand (engine off after this step), you can often isolate the faulty bearing by the consistent sound.
Checking For Heat
A simple but effective method.
- Short Drive: Take your Jeep Liberty for a short drive, perhaps a mile or two, at moderate speeds.
- Careful Touch: After parking, carefully touch the center of each front wheel hub. Use caution as brakes and surrounding components can be very hot.
- Compare: If one hub is significantly hotter than the others, it’s a strong indicator of a bearing that is working harder due to friction.
Abs Light Consideration
If your ABS light is on, it's worth investigating the wheel speed sensors. These are often integrated into the hub assembly on modern vehicles like the Liberty.
A faulty sensor or a damaged reluctor ring (which the sensor reads) can cause the ABS light to come on, and sometimes this is mistaken for a wheel bearing issue, or vice-versa, as a failing bearing can damage the sensor or ring.
Jeep Liberty 4×4 Front Wheel Bearing Replacement: A Step-by-step Guide
Replacing a front wheel bearing on a Jeep Liberty 4×4 involves removing the wheel, brake components, and the entire hub assembly. It’s a moderately complex job that requires specific tools and a good understanding of automotive mechanics.
Tools And Parts You’ll Need
Before you start, gather all necessary tools and parts.
Parts:
- Front Wheel Hub and Bearing Assembly: Ensure you get the correct part for your specific Jeep Liberty model year and drivetrain (4×4). It’s often best to replace them in pairs (both left and right) as the other side may be close to failing.
- New Lug Nuts: Recommended, as old ones can be stretched or damaged.
- Brake Cleaner: For cleaning parts.
- High-Temperature Grease: For lubrication during reassembly.
- Threadlocker (Blue): For certain bolts.
Tools:
- Jack and Jack Stands: For safely lifting and supporting the vehicle.
- Lug Wrench or Impact Wrench: To remove lug nuts.
- Socket Set: Metric sizes, including deep sockets. Common sizes include 13mm, 15mm, 18mm, 21mm, and potentially larger ones for axle nuts.
- Wrench Set: For stubborn bolts.
- Torque Wrench: Crucial for tightening bolts to specification.
- Breaker Bar: For loosening tight bolts.
- Hammer: For persuasion.
- Pry Bar: To help separate components.
- Wire Brush: For cleaning rust and debris.
- C-Clamp or Ball Joint Separator: Might be needed for tie rod ends or ball joints.
- Mechanic’s Stethoscope: For diagnosis.
- Safety Glasses and Gloves: Essential for personal protection.
Removal Process
- Loosen Lug Nuts: Before lifting the vehicle, slightly loosen the lug nuts on the front wheel you’ll be working on.
- Lift and Support: Safely jack up the front of the Jeep Liberty and place jack stands securely under the frame. Remove the wheel.
- Remove Brake Caliper and Rotor:
- You’ll need to remove the brake caliper. This usually involves removing two bolts on the back of the caliper bracket. Let the caliper hang by a wire or bungee cord; do not let it hang by the brake line.
- Next, remove the brake rotor. It might be held on by a small retaining screw or simply slide off. If it’s stuck, a few taps with a hammer or a rotor puller might be needed.
- Disconnect Steering and Suspension Components: Depending on your Liberty’s exact setup, you may need to disconnect:
- Tie Rod End: Loosen the castle nut and use a tie rod puller or a pickle fork to separate it from the steering knuckle.
- Ball Joints: You might need to separate the lower ball joint or upper ball joint from the steering knuckle. This often requires a ball joint separator or a pickle fork.
- Sway Bar Link: Disconnect the sway bar end link from the control arm or knuckle.
- Remove Axle Nut: This is typically a large, staked nut. You’ll need a socket and a breaker bar to remove it. You may need to remove a stake or peen from the nut’s edge first with a chisel or punch.
- Remove Hub Assembly Bolts: The hub assembly is usually held to the steering knuckle by several large bolts (often 3 or 4). These can be very tight and may require significant force. Accessing them might require turning the steering wheel.
- Remove the Hub Assembly: Once all bolts are removed, the hub assembly should slide off the axle splines. You might need to pry it gently or tap it with a hammer. Be careful not to damage the axle shaft.
Installation Process
- Clean Mounting Surface: Thoroughly clean the mounting surface on the steering knuckle where the new hub assembly will attach. Remove any rust or debris with a wire brush and brake cleaner.
- Install New Hub Assembly: Slide the new hub assembly onto the axle splines. Ensure it seats flush against the knuckle.
- Install Hub Bolts: Install the new hub assembly mounting bolts. Tighten them by hand first, then torque them to the manufacturer’s specifications using a torque wrench. It’s often recommended to tighten these in a star pattern to ensure even seating. Use blue threadlocker on these bolts if specified.
- Install Axle Nut: Install the new axle nut and torque it to the manufacturer’s specified torque. This is a critical step, as overtightening or undertightening can lead to bearing failure or other issues. Some manufacturers specify a staking or peening procedure for the nut to prevent it from backing off.
- Reconnect Suspension Components: Reattach all the steering and suspension components you disconnected (tie rod end, ball joints, sway bar link). Torque all nuts and bolts