The Jeep Hurricane 24V is a popular ride-on toy for kids, offering a rugged and exciting experience. But for many parents and kids, the stock version is just the beginning.
The world of modified Power Wheels is vast and creative, allowing owners to push the limits of these electric vehicles. The Jeep Hurricane 24V, with its powerful dual motors and robust design, is a prime candidate for modifications.
This article will explore what makes the Jeep Hurricane 24V a great platform for customization, various popular modifications, the benefits they bring, and important considerations for anyone looking to upgrade their ride.
Understanding The Jeep Hurricane 24v
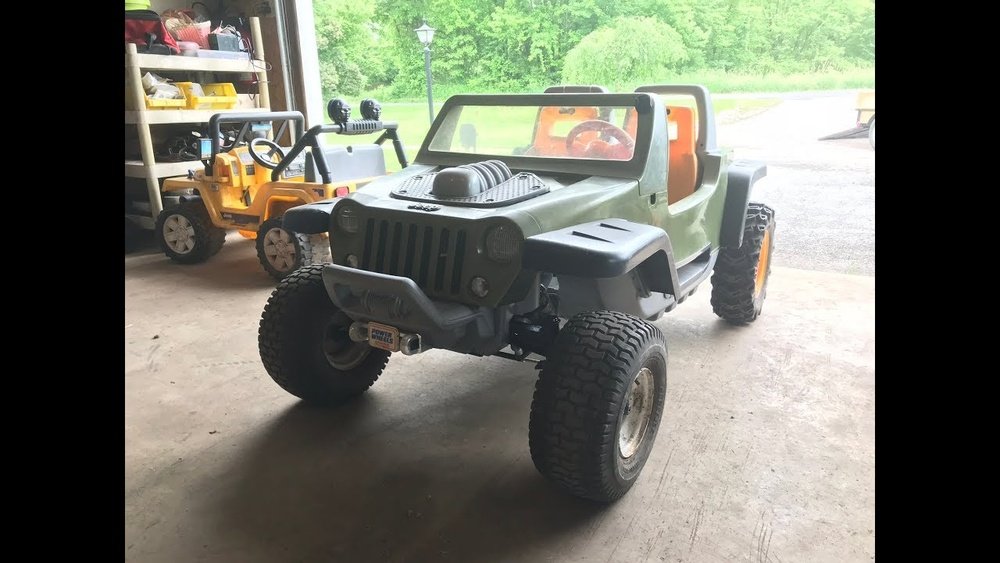
The standard Jeep Hurricane 24V is already an impressive ride-on toy. It’s designed for children, typically aged between 3 and 7 years old, and boasts a 24-volt battery system, which provides more power and longer run times compared to 12V models. Its features often include realistic Jeep styling, durable plastic construction, working headlights, a horn, and a top speed that’s safe for young children, usually around 5 mph. The dual motors, one for each rear wheel, offer better traction and control, especially on varied terrain like grass or gravel.
This inherent power and design make it a fantastic starting point for modifications. Unlike smaller 6V or 12V vehicles, the Hurricane 24V already has a stronger foundation.
This means that upgrades, whether for performance or aesthetics, are more likely to be successful and noticeable.
The 24V system provides ample power to handle the extra load of some modifications without immediately draining the battery.
Why Modify A Power Wheels Jeep Hurricane?
The reasons for modifying a Power Wheels Jeep Hurricane are as varied as the modifications themselves. For many, it’s about enhancing performance. This could mean increasing speed for older children or more adventurous riders, improving torque for tackling tougher hills or surfaces, or extending battery life for longer play sessions. The stock speed might be too slow for some children who have grown accustomed to faster toys or who have older siblings with faster ride-ons.
Another significant driver is durability and capability. Stock Power Wheels are built for relatively smooth surfaces. Modifications can make the Jeep Hurricane more resilient to rougher play, improve its ability to handle grass, dirt, or sand, and even allow it to traverse slightly more challenging obstacles. This opens up new areas for imaginative play and exploration.
Aesthetics and personalization are also major factors. Parents and children often want their ride-on to stand out. This can range from simple cosmetic changes like custom paint jobs and decals to more elaborate additions that make the Jeep look like a real, souped-up off-road vehicle. It’s a way to make the toy unique and reflect the child’s personality or interests.
Finally, for some, it’s a fun project and learning experience. Modifying a Power Wheels can be a rewarding DIY endeavor. It offers opportunities to learn about basic electronics, mechanics, and problem-solving, especially for parents working on the project with their children. It’s a chance to bond over a shared activity and teach valuable skills.

Popular Modifications For The Jeep Hurricane 24v
The modification community for Power Wheels is incredibly resourceful. Here are some of the most common and impactful upgrades for the Jeep Hurricane 24V:
Performance Enhancements
Increased Speed And Power
This is perhaps the most sought-after modification. The stock 24V system can be pushed further.
- Battery Upgrades: The easiest way to gain more power and run time is to upgrade the battery. This often involves replacing the stock 24V battery with a higher voltage battery (e.g., 36V or 48V) or using higher-capacity 24V batteries.
- Higher Voltage: Stepping up voltage (e.g., from 24V to 36V or 48V) is the most direct way to increase speed. This requires careful consideration of the motors, gearbox, and wiring, as they must be able to handle the increased voltage and current. Often, this involves using a higher voltage battery pack and potentially a new motor controller.
- Higher Capacity: Using 24V batteries with a higher Amp-hour (Ah) rating will increase the run time, not necessarily the speed. This is a good option if the primary goal is to play for longer periods.
- Example: Replacing a single 24V 10Ah battery with two 12V 18Ah batteries wired in series can provide a longer run time at the same voltage. For a speed boost, using a 36V battery pack (e.g., three 12V 12Ah batteries in series) is a common route.
- Motor Upgrades: While the stock motors are decent, upgrading to more powerful motors can significantly improve performance, especially when combined with higher voltage.
- Brushless Motors: These are more efficient and powerful than the standard brushed motors found in most Power Wheels. However, they require a brushless motor controller and a compatible battery system, making this a more complex and expensive upgrade.
- Larger Brushed Motors: Sometimes, larger, higher-RPM brushed motors designed for ride-on toys can be retrofitted. This is often simpler than going brushless but still requires ensuring compatibility with the gearbox and existing electrical system.
- Gearbox Enhancements: The plastic gearboxes in Power Wheels are often a weak point when increasing power.
- Metal Gearboxes: Replacing the stock plastic gearboxes with metal ones provides much greater durability and can handle higher torque and speeds without stripping or breaking. These are often available as aftermarket upgrades specifically designed for Power Wheels.
- Gear Ratios: Sometimes, changing the gear ratio within the gearbox can alter the balance between speed and torque. A lower gear ratio will result in higher speed but less torque (harder to climb hills), while a higher gear ratio offers more torque but lower top speed.
Improved Traction
Getting the power to the ground is crucial, especially on uneven surfaces.
- Larger, Grippier Tires: Replacing the stock plastic or thin rubber tires with larger, knobby tires designed for off-road use can dramatically improve traction on grass, dirt, and mud.
- Pneumatic Tires: Switching from solid plastic wheels to pneumatic (air-filled) tires provides better shock absorption and grip. These can sometimes be sourced from other ride-on toys or specialized suppliers.
- Tire Tread Patterns: Look for aggressive tread patterns that can dig into softer surfaces.
- All-Wheel Drive (AWD) Conversion: While the Hurricane 24V typically has two powered rear wheels, converting it to AWD (adding motors to the front wheels) can significantly improve traction and stability, allowing it to handle much rougher terrain. This is a more advanced modification involving adding a second motor, gearbox, and controller.
Durability And Structural Reinforcements
Stock Power Wheels can be prone to breaking, especially under stress from modifications or rough play.
- Frame Reinforcement: The plastic frame can be reinforced using various methods.
- Fiberglass or Bondo: For significant structural issues or to prepare for higher stresses, some builders reinforce the frame with fiberglass resin and matting or use Bondo body filler to add strength and smooth out repairs.
- Metal Brackets: Adding small metal brackets at stress points, like where the steering column connects to the frame or where the body mounts, can prevent cracking.
- Gearbox Protection: As mentioned, upgrading to metal gearboxes is key. Additionally, ensuring proper lubrication and avoiding overloading them will extend their life.
- Steering Upgrades: The plastic steering components can wear out or break.
- Metal Tie Rods: Replacing the plastic tie rods with stronger metal ones improves steering durability.
- Ball Joints: Upgrading to ball joints instead of simple pivot points can provide smoother and more robust steering.
Electrical System Upgrades
Beyond batteries and motors, other electrical components can be upgraded for better performance and safety.
- Heavy-Duty Wiring and Connectors: When increasing voltage or current draw, the stock wiring can overheat or melt. Upgrading to thicker gauge wire (e.g., 10 or 12 AWG) and using high-quality connectors (like Anderson Powerpole connectors) is essential for safety and reliability.
- Upgraded Foot Pedal Switch: The stock foot pedal switch can be a point of failure, especially with higher current draws. Replacing it with a heavy-duty switch designed for electric vehicles or robots can improve responsiveness and longevity.
- Fuses and Circuit Breakers: Adding appropriate fuses or circuit breakers protects the motors and electronics from damage due to short circuits or overloads. This is a critical safety upgrade.
- Voltage Meter: Installing a simple voltmeter allows the rider (or parent) to monitor the battery level, helping to prevent over-discharging the battery, which can shorten its lifespan.
Cosmetic And Functional Additions
Making the Jeep Hurricane 24V look and feel more authentic adds to the fun.
- Paint and Decals: A custom paint job can transform the look. Using automotive-grade paint for durability is recommended. Adding realistic decals, like racing stripes, Jeep logos, or off-road graphics, enhances the aesthetic.
- Lighting Upgrades:
- LED Headlights/Taillights: Replacing stock bulbs with brighter LEDs not only looks better but can improve visibility.
- Accent Lighting: Adding underglow LEDs, rock lights, or light bars can give the Jeep a custom off-road look and make it more visible. These often require a separate, smaller battery or a voltage reducer if powered from the main battery.
- Sound Systems: Adding a small waterproof Bluetooth speaker allows kids to listen to music or sound effects. Some enthusiasts even install small amplifiers and subwoofers, though this adds significant complexity and power draw.
- Functional Accessories:
- Working Winch: A small, functional electric winch can be added for imaginative play, powered by the main battery or a separate one.
- Roof Rack or Storage: Adding a small roof rack or a storage box can enhance the utilitarian look and provide a place to carry small items.
- Mirrors and Windshield Wipers: Small details like functional side mirrors or even non-functional windshield wipers add to the realism.
Planning Your Modification Project
Before diving into modifications, careful planning is essential.
Setting Realistic Goals
What do you want to achieve? More speed?
Better traction? A cooler look?
Prioritizing your goals will help you decide which modifications are most important and feasible. Trying to do everything at once can lead to a complex, expensive, and potentially unreliable project.
Budget Considerations
Modifications can range from a few dollars for basic wiring upgrades to hundreds or even thousands for advanced motor and battery systems. Determine your budget upfront.
Remember to factor in the cost of tools and potential mistakes.
Skill Assessment
Be honest about your technical skills. Some modifications, like battery upgrades and tire changes, are relatively simple.
Others, like motor swaps, AWD conversions, or complex electrical wiring, require a good understanding of electronics and mechanics. If you’re unsure, consider seeking help from online communities or experienced individuals.
Safety First
This is paramount. Power Wheels modifications involve electricity, and potentially higher voltages and currents.
- Battery Safety: Always use appropriate battery types and handle them with care. Lithium batteries, while offering advantages, require careful management to avoid fire hazards.
- Wiring: Ensure all connections are secure and properly insulated. Use appropriate gauge wire for the expected current. Overheating wires can melt plastic and cause fires.
- Fuses: Install fuses to protect components and prevent electrical fires in case of a short circuit.
- Speed Control: If significantly increasing speed, ensure the braking system (which relies on motor resistance) and steering can handle it. Consider adding a governor or a more controlled throttle system.
- Supervision: Any modified ride-on toy, especially one with increased speed or power, should always be used under adult supervision.

Step-by-step Guide To A Common Modification: Battery Upgrade (24v To 36v)
Let’s walk through a popular and impactful modification: upgrading the Jeep Hurricane 24V from its stock 24V system to a 36V system for increased speed.
Disclaimer: This modification increases the speed and power of the ride-on toy. It should only be performed by individuals comfortable with basic electronics and wiring. Always prioritize safety and ensure adult supervision during operation.
Materials Needed:
- Three 12V batteries (e.g., 12Ah or higher, sealed lead-acid (SLA) are common and relatively safe). Ensure they are the same type, brand, and age for optimal performance and longevity.
- Battery holder or secure mounting system for the three batteries.
- Appropriate gauge wiring (e.g., 10 or 12 AWG).
- Connectors (e.g., Anderson Powerpole connectors, spade connectors).
- Inline fuse holder and fuse (rated appropriately for your motors’ maximum current draw, often around 30-40A).
- Wire strippers, crimpers, screwdrivers, wrench set.
- Optional: Voltage meter.
Steps:
- Safety First: Disconnect any existing batteries and ensure the Power Wheels is turned off. Work in a well-lit area.
- Remove Stock Battery: Locate and remove the original 24V battery.
- Prepare Battery Placement: The Jeep Hurricane 24V likely has space for its single battery. You will need to find a way to securely mount three 12V batteries. This might involve modifying the existing battery compartment or creating a new mounting solution. Ensure the batteries are fixed and cannot move during operation.
- Wire the Batteries in Series: To create a 36V system from three 12V batteries, you need to wire them in series.
- Connect the positive (+) terminal of Battery 1 to the negative (-) terminal of Battery 2 using a short wire.
- Connect the positive (+) terminal of Battery 2 to the negative (-) terminal of Battery 3 using another short wire.
- You will now have a free negative (-) terminal on Battery 1 and a free positive (+) terminal on Battery 3. These will be your main power output leads for the 36V system.
Visual Aid:
Battery 1: [-] — (+)
Battery 2: [-] — (+)
Battery 3: [-] — (+)
Wiring: