The Jeep Grand Cherokee is a popular SUV known for its capability and comfort. When it comes to maintaining its performance, understanding specific torque specifications is crucial.
One such critical specification is the front wheel bearing torque. This might seem like a small detail, but getting it right is vital for safety, proper handling, and the longevity of your vehicle's components.
Wheel bearings are essential parts of your car’s suspension system. They allow your wheels to rotate smoothly with minimal friction.
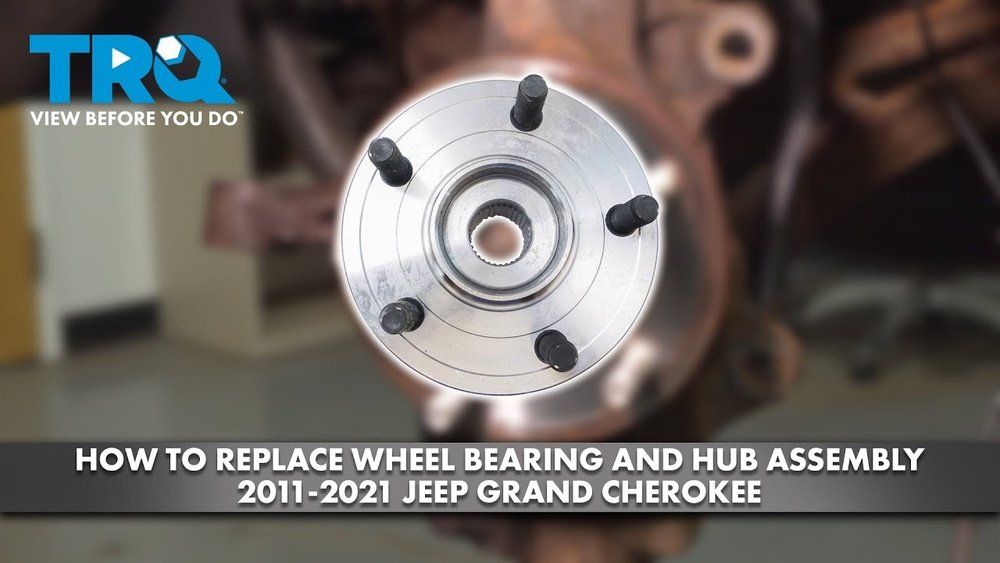
A properly torqued wheel bearing assembly ensures that the bearing is neither too tight nor too loose. Too tight, and it can overheat and fail prematurely, leading to costly repairs and potential safety hazards like wheel separation.
Too loose, and you’ll experience wobbly steering, noise, and excessive wear on other suspension parts.
This article will guide you through the importance of front wheel bearing torque for your Jeep Grand Cherokee, explain the typical torque specifications, and discuss why using a torque wrench is non-negotiable for this job. We’ll also touch upon the signs of a failing wheel bearing and the general process of replacement, emphasizing the critical role of precise torque.
Understanding Wheel Bearing Function And Torque
Wheel bearings are precision-engineered components that sit between the wheel hub and the axle. Their primary job is to reduce friction and allow the wheels to spin freely. They are typically made of hardened steel rings with rolling elements (balls or rollers) in between. These elements are lubricated to ensure smooth operation.
The way a wheel bearing is secured to the vehicle directly impacts its function. In many vehicles, including the Jeep Grand Cherokee, the wheel bearing is part of a hub assembly. This assembly is bolted to the steering knuckle. The hub nut (or spindle nut) is what tightens the bearing against the knuckle. This is where torque specifications become critical.
Torque is a measure of rotational force. It tells you how tightly a fastener should be tightened. For wheel bearings, the torque specification is not just about preventing a nut from loosening; it’s about precisely preloading the bearing. Preload is the amount of force applied to the bearing to keep it in place and ensure the rolling elements are properly seated.
Why Precise Torque Matters For Jeep Grand Cherokee Front Wheel Bearings
Getting the front wheel bearing torque right on your Jeep Grand Cherokee is paramount for several reasons:
- Safety: A wheel bearing that is too loose can lead to a wobbly wheel, poor steering control, and in extreme cases, the wheel could detach from the vehicle. This is a catastrophic failure that can cause serious accidents.
- Component Longevity: Over-tightening a wheel bearing can crush the seals, forcing out lubricant and allowing contaminants in. It also puts excessive stress on the rolling elements, leading to premature wear and failure. This can damage not only the bearing itself but also the hub, knuckle, and even the brake components.
- Performance and Handling: A properly torqued wheel bearing ensures smooth rotation. This contributes to better fuel efficiency, a quieter ride, and predictable handling. A loose or damaged bearing can cause vibrations, humming noises, and affect the vehicle’s stability, especially during cornering.
- Preventing Costly Repairs: While replacing a wheel bearing is a repair, replacing a bearing that failed due to incorrect torque might also mean replacing the hub, knuckle, or brake rotor if they have been damaged by the excessive heat or stress. Following the correct torque procedure saves money in the long run.
Typical Torque Specifications For Jeep Grand Cherokee Front Wheel Bearings
The exact torque specifications for a Jeep Grand Cherokee front wheel bearing can vary depending on the model year, trim level, and specific drivetrain configuration (e.g., 2WD vs. 4WD). It is *always* essential to consult your vehicle’s factory service manual (FSM) or a reliable repair database for the precise torque values for your specific Grand Cherokee.
However, generally speaking, the process involves tightening the hub nut to a specific torque, and then often backing it off slightly and re-tightening to a much lower torque, sometimes with a specific angle turn or a locking mechanism. This procedure ensures the correct preload.
Here’s a generalized idea of what you might encounter, but remember to verify these with your specific vehicle’s manual:
- Initial Tightening: Often, the hub nut is tightened to a high torque first. This could be in the range of 150-200 lb-ft (200-270 Nm). This step seats the bearing properly.
- Loosening: After the initial tightening, the nut is typically loosened completely.
- Final Tightening and Preload: The nut is then re-tightened to a much lower specification, often around 15-25 lb-ft (20-34 Nm).
- Locking Mechanism: Following the final tightening, a cotter pin or a locking tab washer is often installed to prevent the nut from backing off. In some designs, a specific degree of rotation might be required after reaching the final torque.
Example Scenario (Illustrative – Always Check Your Manual):
For a specific generation of Grand Cherokee, the procedure might look like this:
- Tighten the axle nut to 177 lb-ft (240 Nm).
- Loosen the axle nut completely.
- Re-tighten the axle nut to 25 lb-ft (34 Nm).
- Rotate the hub assembly clockwise approximately 90 degrees (or until the next available hole in the nut aligns with the hole in the spindle).
- Insert a new cotter pin through the aligned holes in the nut and spindle. If no hole aligns, loosen the nut slightly until the next hole lines up. Never back the nut off more than necessary to install the cotter pin.
Pro Tip: Always use a new cotter pin and new hub nut if your Grand Cherokee uses them. These are safety-critical components and are often single-use.
The Importance Of Using A Torque Wrench
When working on critical components like wheel bearings, using the correct tools is not just recommended; it’s essential. A torque wrench is indispensable for accurately setting the front wheel bearing torque on your Jeep Grand Cherokee.
Why A Standard Wrench Isn’t Enough
A standard wrench, even an adjustable one, relies on your estimation of tightness. This is highly subjective and prone to error.
- Under-tightening: As discussed, this can lead to noise, vibration, and eventual failure.
- Over-tightening: This is equally, if not more, damaging. It can strip threads, break fasteners, warp brake rotors, and critically, damage the wheel bearing itself by compressing it beyond its designed limits.
Types Of Torque Wrenches And Their Use
There are several types of torque wrenches, but for automotive work, the most common and effective are:
- Click-Type Torque Wrench: This is the most popular type for DIYers and many professional mechanics. You set the desired torque value on the handle. When you reach that torque, the wrench emits an audible “click” and often a slight physical break in the handle’s rotation.
- How to Use: Set the desired torque. Apply smooth, steady pressure until you hear and feel the click. Avoid jerky movements.
- Beam-Type Torque Wrench: This is a simpler, often less expensive type. It has a needle that moves along a scale as you apply force. The torque value is read directly from the scale.
- How to Use: Observe the needle as you apply force. Stop when the needle reaches the desired torque value. These can be harder to read accurately, especially in awkward positions.
- Digital Torque Wrench: These offer precise readings on a digital display. Many also provide audible or vibrating alerts when the set torque is reached. They are very accurate but can be more expensive.
- How to Use: Set the desired torque on the display. Apply force until the wrench signals that the torque has been reached.
When performing the wheel bearing torque procedure on your Grand Cherokee, a click-type or digital torque wrench is highly recommended for accuracy and ease of use.
Calibration And Accuracy
Torque wrenches, like any precision tool, can lose their accuracy over time or with improper use.
- Calibration: It’s good practice to have your torque wrench calibrated annually or bi-annually, especially if you use it frequently. Many professional shops do this regularly.
- Storage: Always store a click-type torque wrench at its lowest setting to relieve tension on the spring mechanism. Never use a torque wrench as a breaker bar to loosen stubborn fasteners; this can damage its internal mechanism.

Signs Of A Failing Front Wheel Bearing
Recognizing the symptoms of a failing wheel bearing is crucial for timely maintenance and preventing further damage or safety issues. The front wheel bearings on a Jeep Grand Cherokee can start to show signs of wear over time.
Here are the most common indicators:
- Audible Noises: This is often the first sign.
- Humming or Grinding: A humming, rumbling, or grinding noise that gets louder with speed is a classic symptom. It might sound like a tire is out of balance, but it often changes pitch or intensity when you turn the steering wheel.
- Clicking or Popping: A clicking or popping sound, especially when turning, can also indicate a worn bearing or a related suspension component.
- Vibrations: You might feel vibrations in the steering wheel or the floor of the vehicle, particularly at higher speeds. These vibrations can feel similar to driving over rough pavement or a misaligned wheel.
- Loose Steering: If the wheel bearing is significantly worn, you might notice a looseness or play in the steering. The steering wheel might feel less responsive, or the vehicle may drift slightly.
- ABS or Traction Control Warning Lights: Modern vehicles like the Grand Cherokee often have sensors that monitor wheel speed. A failing wheel bearing can sometimes interfere with these sensors, triggering the ABS (Anti-lock Braking System) or Traction Control warning lights on the dashboard.
- Uneven Tire Wear: A worn wheel bearing can cause the wheel to wobble slightly, leading to uneven or premature tire wear, such as cupping or feathering on the tire tread.
- Wobble or Play: With the vehicle safely supported on a jack stand, you can often check for play in the wheel. Grab the tire at the top and bottom and try to rock it. If you feel significant wobble or looseness, the wheel bearing is likely compromised.
Diagnosing A Failing Front Wheel Bearing
When you suspect a wheel bearing issue on your Grand Cherokee, a mechanic will typically perform a few tests:
- Road Test: To listen for noises and feel for vibrations.
- Wheel Play Test: As described above, checking for physical looseness.
- Spin Test: With the vehicle lifted, spinning the wheel by hand can sometimes reveal grinding or roughness in the bearing.
- ABS/Traction Control Scan: Using a diagnostic tool to check for codes related to wheel speed sensors.
Replacing A Jeep Grand Cherokee Front Wheel Bearing
Replacing a front wheel bearing on a Jeep Grand Cherokee is a moderately complex job that requires specific tools and knowledge. While it’s achievable for a skilled DIYer, it’s often best left to a professional mechanic if you’re not comfortable with suspension work. The critical part of this job, as we’ve emphasized, is the final torque specification.
Here’s a general overview of the replacement process:
Tools And Parts Needed
- New Wheel Bearing/Hub Assembly: Ensure it’s the correct part for your specific Grand Cherokee model.
- Torque Wrench: Essential for correct installation.
- Socket Set and Wrenches: Including deep sockets for lug nuts and axle nuts.
- Breaker Bar: For loosening stubborn nuts.
- Jack and Jack Stands: For safely supporting the vehicle.
- Pry Bar: May be needed to separate components.
- Hammer: For persuasion.
- Wire Brush: For cleaning mating surfaces.
- Penetrating Oil: To help loosen rusted bolts.
- New Axle Nut and Cotter Pin: Often recommended or required.
- Safety Glasses and Gloves.
Step-by-step Replacement Overview
- Safety First: Park the vehicle on a level surface. Engage the parking brake and block the rear wheels. Loosen the lug nuts slightly while the vehicle is still on the ground.
- Lift and Support: Jack up the front of the vehicle and support it securely on jack stands under the frame or appropriate suspension points. Remove the front wheel.
- Access the Hub Assembly: You’ll need to remove the brake caliper and rotor to access the hub assembly. This typically involves removing a few bolts holding the caliper bracket.
- Remove the Axle Nut: This is usually the most challenging nut to remove due to its high torque. Use a breaker bar and the correct size socket. You may need to use a pipe extension for leverage.
- Remove the Hub Assembly: The hub assembly is typically held to the steering knuckle by several large bolts (often 3 or 4). Remove these bolts. You might need to use a pry bar or hammer to gently persuade the hub assembly to separate from the knuckle.
- Clean Mating Surfaces: Thoroughly clean the mounting surface on the steering knuckle where the new hub will attach. Remove any rust, dirt, or old gasket material.
- Install the New Hub Assembly: Position the new hub assembly and align its bolt holes with those on the steering knuckle. Install the bolts finger-tight.
- Torque Hub Bolts: Tighten the hub assembly bolts to the manufacturer’s specified torque. Again, consult your service manual. These are typically very high torque values.
- Install New Axle Nut and Torque: Install the new axle nut. This is where the critical torque procedure comes in. Follow the steps outlined in your service manual precisely:
- Initial high-torque tightening.
- Loosening.
- Final low-torque tightening.
- Rotating to align for the cotter pin or locking mechanism.
- Installing the new cotter pin.
- Reassemble: Reinstall the brake rotor, caliper, and wheel.
- Final Checks: Lower the vehicle. Tighten the lug nuts to the specified torque in a star pattern. Double-check all fasteners.
Warning: Improper torque on the axle nut can lead to immediate or eventual failure of the new bearing, potentially causing an accident. If you are unsure about any step, especially the torque sequence, consult a