The Jeep Cherokee XJ is a legendary vehicle, celebrated for its ruggedness and off-road capability. A crucial component that enables this capability is its transfer case.
Over time, like any mechanical part, the transfer case can wear out or develop issues. When this happens, a Jeep XJ transfer case rebuild kit becomes essential for restoring its performance and ensuring your adventures continue without interruption.
This guide will walk you through what a rebuild kit entails, why you might need one, and how to approach the rebuild process.
Understanding The Jeep Xj Transfer Case
The transfer case in a Jeep XJ is a marvel of mechanical engineering. Its primary job is to distribute power from the transmission to the front and rear axles. This allows the Jeep to engage four-wheel drive (4WD) when needed, providing extra traction for challenging terrain, slippery roads, or steep inclines. The XJ models typically came with a few different transfer case options, with the NP231 Command-Trac being the most common. This system is a part-time 4WD system, meaning it’s primarily used in situations where extra traction is required, not for everyday driving on dry pavement.
Key Components Of The Transfer Case
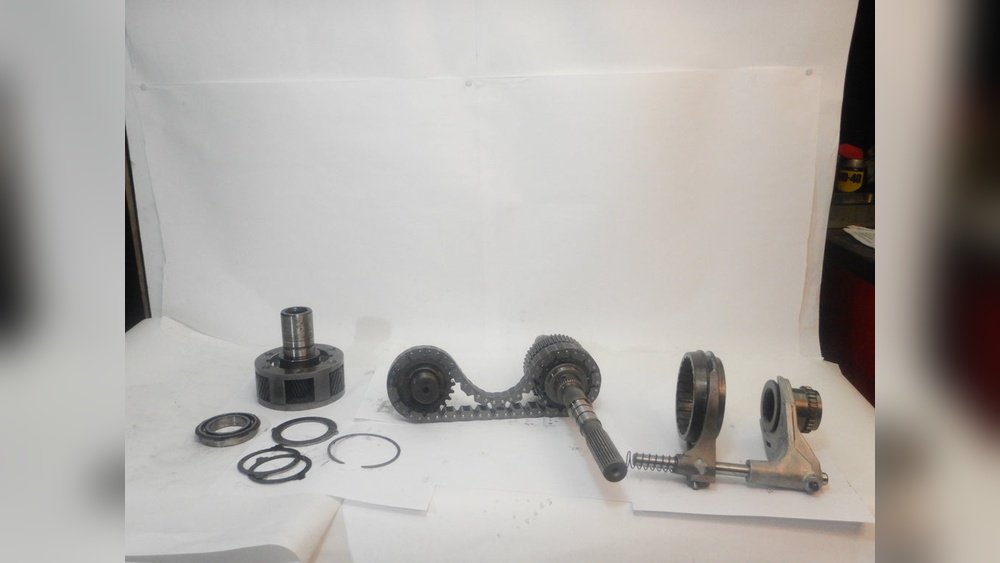
Within the transfer case housing, several critical parts work in harmony:
- Gears: These are responsible for changing the gear ratios and directing power.
- Chain: In many XJ transfer cases, a chain connects the input shaft to the output shafts, allowing for a quieter and smoother operation compared to older gear-driven systems.
- Bearings: These reduce friction between moving parts, allowing them to rotate smoothly.
- Seals and Gaskets: These prevent fluid leaks and keep contaminants out of the transfer case.
- Shift Forks and Linkages: These mechanisms engage and disengage the different drive modes (2WD High, 4WD High, 4WD Low, and Neutral).
The NP231 transfer case, in particular, is known for its reliability but also for specific wear points. Common issues include worn-out chain guides, stretched chains, and failing bearings. Understanding these common failure points is crucial when deciding if a rebuild is necessary and what to look for in a rebuild kit.
Signs You Need A Transfer Case Rebuild Kit
Several symptoms can indicate that your Jeep XJ transfer case is in need of attention. Ignoring these signs can lead to more significant damage and costly repairs down the line.
Common Symptoms
- Whining or Grinding Noises: A persistent whining noise, especially when accelerating or decelerating, can point to worn bearings or gears. A grinding sound might indicate more severe gear damage or a problem with the chain. These noises can sometimes change pitch or volume depending on the drive mode or speed.
- Slipping or Hesitation: If your Jeep feels like it’s hesitating to engage 4WD, or if the 4WD system seems to slip or disengage unexpectedly, it’s a strong sign of internal wear. This could be due to worn clutch packs (in some models, though less common in the NP231), stretched chains, or issues with the shift mechanism.
- Fluid Leaks: Oil or fluid leaking from the transfer case is a clear indication that seals or gaskets have failed. While a minor leak might seem insignificant, it can lead to low fluid levels, causing overheating and accelerated wear on internal components.
- Difficulty Shifting Modes: If you struggle to shift between 2WD High, 4WD High, or 4WD Low, it could be a sign of bent shift forks, worn linkage, or internal binding.
- Vibration: An unusual vibration felt through the drivetrain, particularly at certain speeds or during engagement of 4WD, can sometimes be linked to a worn or unbalanced transfer case component, like a damaged output shaft or a failing bearing.
When To Consider A Rebuild Vs. Replacement
Deciding between rebuilding your existing transfer case and replacing it with a used or remanufactured unit depends on several factors.
- Cost: A Jeep XJ transfer case rebuild kit is generally less expensive than purchasing a complete replacement unit. However, you must factor in the cost of specialized tools, your time, and potentially the cost of additional parts if significant damage is found.
- Damage Severity: If the transfer case has suffered catastrophic failure (e.g., a broken gear housing, severely damaged gears), rebuilding might not be feasible or cost-effective. In such cases, a replacement unit is often the better option.
- Availability: Finding a good quality used or remanufactured transfer case can sometimes be challenging, especially for older vehicles. A rebuild kit is readily available from various aftermarket suppliers.
- Knowledge and Tools: Rebuilding a transfer case requires mechanical knowledge, patience, and specific tools. If you lack these, paying a professional to rebuild it or buying a remanufactured unit might be wiser.

What’s Inside A Jeep Xj Transfer Case Rebuild Kit
A comprehensive Jeep XJ transfer case rebuild kit is designed to replace the most common wear items within the unit. While kits can vary slightly between manufacturers, they typically include the following essential components:
Essential Components Of A Rebuild Kit
- Bearings: This is often the most critical part of a kit. It will include all the necessary input shaft bearings, output shaft bearings, and countershaft bearings. These are precision components that ensure smooth rotation and must be replaced to eliminate whining noises and prevent further wear.
- Seals: A full set of input and output shaft seals, as well as housing seals, are crucial for preventing fluid leaks. Leaking seals are a common problem and a primary reason for transfer case failure due to low fluid.
- Gaskets: The kit will usually include front and rear output seal gaskets and the main housing gasket. These ensure a watertight seal between the different sections of the transfer case housing.
- O-rings: Various O-rings are used throughout the transfer case assembly, particularly around the shift rails and vacuum (if applicable) seals.
- Bushings: Some kits may include shift lever bushings or other small bushings that can wear out over time, leading to sloppy shifter feel or engagement issues.
Optional But Recommended Additional Parts
While a standard kit covers the basics, some issues require additional parts not always included. It’s wise to inspect your transfer case thoroughly during the rebuild and consider purchasing these items if needed:
- Chain: The timing chain that connects the input and output shafts can stretch over time. A stretched chain can cause a rattling noise, particularly on deceleration, and can eventually lead to jumping teeth or complete failure. Some advanced rebuild kits include a new chain and sprockets.
- Washers and Clips: Small but vital items like snap rings, thrust washers, and thrust bearings can be damaged or lost during disassembly. It’s good practice to have spares.
- Shift Forks: If your shifting problems are severe, the shift forks themselves might be bent or worn. These are typically not included in standard kits.
- Speedometer Gear: If your speedometer is inaccurate, the plastic speedometer drive gear or driven gear might be worn or damaged.
- Updated Components: Some kits might offer upgraded components, such as heavy-duty chain guides or reinforced bearing races, which can enhance durability.
Pro Tip: Before ordering a kit, confirm the exact transfer case model in your Jeep XJ. The most common is the NP231, but variations exist, and using the wrong kit will cause significant problems. You can usually find the model number on a tag on the transfer case itself.
The Rebuild Process: A Step-by-step Overview
Rebuilding a transfer case is a moderately difficult DIY project. It requires patience, attention to detail, and the right tools.
If you are not comfortable with complex mechanical work, it’s best to seek professional help.
Preparation And Disassembly
- Gather Tools and Supplies: You will need a good set of metric and standard wrenches and sockets, torque wrenches, a breaker bar, a pry bar, a seal puller, a bearing separator, a clean work area, a large drain pan, shop rags, and a service manual for your specific XJ model.
- Drain the Fluid: Place a drain pan under the transfer case and remove the drain plug (if equipped) or simply tip the unit once it’s out to drain the old fluid.
- Remove the Transfer Case: This typically involves disconnecting the driveshafts (mark them for proper reinstallation), shifter linkage, speedometer cable, vent hose, and electrical connectors. Then, support the transmission with a jack and remove the crossmember and bolts holding the transfer case to the transmission. Carefully lower the transfer case.
- Disassemble the Housing: Once the transfer case is out, you’ll need to remove the rear output housing and then split the main housing. This is where you’ll encounter the chain, gears, and bearings. Note the position of all parts, especially the shift forks and selector rings. Take pictures as you go.
Replacing Wear Items
- Remove Old Bearings and Seals: Use a bearing separator and press or a suitable slide hammer to remove the old bearings. Use a seal puller for the seals. Be careful not to damage the housing.
- Install New Bearings: Press in the new bearings using a bearing press or a socket of the correct size. Ensure they are seated squarely.
- Replace Seals and Gaskets: Install the new seals and gaskets, ensuring they are clean and properly lubricated with a suitable grease or assembly lube.
- Inspect Other Components: While the case is apart, inspect the chain, sprockets, gears, and shift forks for any signs of excessive wear, cracks, or damage. Replace them if necessary. If you are replacing the chain, ensure the new one is the correct length and the sprockets are in good condition.
Reassembly And Installation
- Reassemble the Housing: Carefully reassemble the transfer case, ensuring all parts are correctly aligned. Pay close attention to the torque specifications for all bolts.
- Install the Transfer Case: Reverse the removal process. Reinstall the transfer case to the transmission, attach the crossmember, and reconnect all external components.
- Refill with Fluid: Fill the transfer case with the correct type and amount of fluid specified in your owner’s manual. For many NP231 transfer cases, this is ATF+4 transmission fluid, but always verify.
- Test Drive: After installation, test drive the vehicle carefully. Check for proper engagement of all 4WD modes, listen for unusual noises, and check for leaks.

Common Issues And How A Rebuild Kit Addresses Them
Each component in a rebuild kit is designed to tackle specific failure points that commonly plague the Jeep XJ transfer case. Understanding how each part contributes to fixing these problems is key.
Addressing Specific Problems
- Worn Bearings: This is perhaps the most common reason for a rebuild. Old bearings develop play, leading to whining sounds and increased friction. The new bearings in the kit restore smooth operation and eliminate noise.
- Leaking Seals and Gaskets: Deteriorated rubber seals and compressed gaskets allow fluid to escape. The new seals and gaskets in the kit create a tight seal, preventing leaks and ensuring proper lubrication levels are maintained.
- Stretched Chain (if included or replaced): A worn chain can cause rattling, especially when letting off the accelerator. Replacing the chain and sprockets ensures proper timing and tension, eliminating noise and preventing it from jumping teeth.
- Worn Bushings: Sloppy shifter feel or difficulty engaging gears can sometimes be attributed to worn bushings in the shifter mechanism. New bushings restore a precise feel.
Here’s a look at typical wear items and their impact:
| Wear Item | Common Symptom | How Rebuild Kit Fixes It |
|---|---|---|
| **Input Bearing** | Whining noise that changes with engine RPM | New bearing provides smooth rotation, eliminating noise. |
| **Output Bearings** | Clunking or grinding noise during acceleration | New bearings ensure proper shaft alignment and smooth spin. |
| **Seals** | Fluid leaks from output shafts or housing | New seals prevent fluid loss and contamination. |
| **Gaskets** | Oil seepage at housing split or output flanges | New gaskets create a solid seal, preventing leaks. |
| **Chain** | Rattling noise on deceleration, slipping | New chain restores proper tension and synchronization. |
The Importance Of Quality Components
When selecting a Jeep XJ transfer case rebuild kit, opt for reputable brands. While cheaper kits might seem appealing, they often use lower-quality bearings or seals that may not last as long. Investing in a kit with Timken bearings, for example, can provide greater peace of mind and durability. Always check reviews and ask for recommendations from fellow Jeep enthusiasts.
Advanced Tips And Considerations
Beyond the basic steps, a few advanced tips can make your transfer case rebuild smoother and more successful.
Pro Tips For A Successful Rebuild
- Cleanliness is Paramount: Ensure your work area and all components are meticulously clean. Any dirt or debris introduced during the rebuild can cause premature wear. Use a good quality brake cleaner or parts washer.
- Use a Service Manual: A factory service manual or a reputable aftermarket manual (like Haynes or Chilton) is invaluable. It provides specific torque specifications, exploded diagrams, and detailed procedures unique to your XJ.
- Mark Everything: Before disassembly, use a paint marker to mark the relationship of driveshaft flanges to their respective yokes, and any mating surfaces of the transfer case housing. This ensures proper reassembly and balance.
- Inspect the Chain and Sprockets: Even if your kit doesn’t include a new chain, thoroughly inspect the existing one for wear. Measure its length and check for any signs of stretching or damage. Similarly, check the sprockets for worn teeth. A worn chain on new sprockets (or vice-versa) will lead to premature failure.
- Consider Upgrades: For those who frequently use their XJ for demanding off-roading, consider aftermarket upgrades. This could include a heavy-duty chain, upgraded bearing supports, or even a different transfer case model known for greater strength, though this goes beyond a simple rebuild kit.
- Fluid Choice: Always use the fluid recommended by Jeep or the transfer case manufacturer. Using the wrong fluid can lead to shifting problems and premature wear. For the NP231, ATF+4 is common, but always double-check.
Common Mistakes To Avoid
- Not Marking Driveshafts: Reinstalling driveshafts out of phase can cause vibrations. Always mark them before removal.
- Forcing Components: Never force bearings