When you lift your Jeep XJ, especially for serious 4WD adventures, you quickly realize that the stock brake lines aren't going to cut it. They stretch, they can get damaged, and most importantly, they might not provide enough slack for your suspension to articulate freely.
This is where extended brake lines become a crucial upgrade. Installing them correctly is vital for your safety and the performance of your lifted Jeep.
This guide will walk you through the process, from understanding why you need them to the step-by-step installation.
Why Extended Brake Lines Are Essential For Lifted Jeeps
Your Jeep XJ’s braking system relies on hydraulic fluid moving through brake lines to apply pressure to the calipers, which then squeeze the brake pads against the rotors. When you lift your Jeep, the axles move further away from the frame.
The original brake lines are designed for the stock ride height. If they are too short, they can become taut when the suspension droops (extends downwards) during articulation or even under normal driving conditions.
This tension can lead to several problems. Firstly, it can restrict suspension travel.
If your brake line is pulling tight, your suspension can't move as freely as it should, especially when off-roading. This limits your ability to navigate uneven terrain effectively.
Secondly, a stretched brake line is more susceptible to damage. On the trail, it can snag on rocks, branches, or other obstacles, leading to a rupture.
A ruptured brake line means a complete loss of braking power, a terrifying and dangerous situation.
Finally, and most critically, a brake line that is too short can put constant stress on the connection points. Over time, this can cause fittings to loosen or even fail, leading to leaks and, again, brake failure. Extended brake lines are specifically designed with extra length to accommodate the increased travel of a lifted suspension, ensuring safe operation and allowing your suspension to work as intended. For a Jeep XJ lifted more than 2-3 inches, upgrading your brake lines is not just recommended; it’s a necessity for safety and performance.
Understanding Your Brake System And Line Types
Before diving into the installation, it’s important to understand the components involved. Your Jeep XJ’s braking system typically consists of:
- Brake Pedal: The input you provide to initiate braking.
- Master Cylinder: Converts pedal force into hydraulic pressure.
- Brake Booster: Uses vacuum to amplify your pedal force.
- Brake Lines: Metal hard lines and flexible rubber or braided stainless steel hoses that carry the hydraulic fluid.
- Calipers: House the brake pads and pistons, which apply pressure to the rotors.
- Brake Rotors: The spinning discs that the pads clamp onto.
- Brake Fluid: The hydraulic fluid that transmits pressure.
When lifting your Jeep, the main concern is the flexible brake hoses. These are the parts that connect the hard lines on the chassis to the calipers on the axle. They need to be long enough to allow the axle to move up and down without becoming strained.
Types Of Extended Brake Lines
You’ll primarily find two types of extended brake lines for lifted Jeeps:
- Rubber Hoses: These are similar to stock lines but are manufactured with extra length. They are the most budget-friendly option. However, rubber hoses can expand under pressure, leading to a slightly softer brake pedal feel. They are also more prone to damage from road debris or abrasion compared to braided lines.
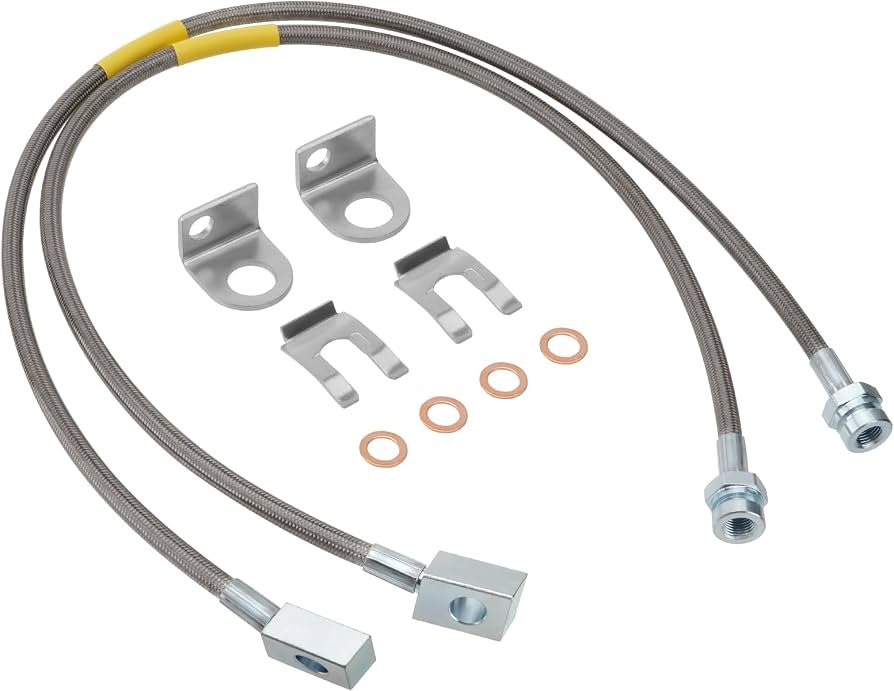
- Braided Stainless Steel Hoses: These are a significant upgrade. They feature a stainless steel braided exterior wrapped around a Teflon (PTFE) inner liner. The stainless steel braiding prevents the hose from expanding under pressure, resulting in a firmer, more responsive brake pedal. It also offers superior protection against abrasion, impacts, and corrosion. While more expensive, braided stainless steel lines are generally considered the superior choice for performance and durability, especially for off-road use.
When choosing extended brake lines, ensure they are specifically designed for your Jeep XJ model and the amount of lift you have. Manufacturers usually specify the recommended lift height for their lines.
For example, a 3-inch lift might require lines that are 3-6 inches longer than stock, while a 4.
5-inch lift might need lines that are 6-9 inches longer. Always check the manufacturer’s recommendations.
Tools And Materials You’ll Need
A successful brake line installation requires the right tools and materials. Having everything ready before you start will make the job smoother and safer.
Essential Tools:
- Jack and Jack Stands: Crucial for safely lifting and supporting the Jeep. Never work under a vehicle supported only by a jack.
- Socket Set and Wrenches: You’ll need various sizes, especially for brake line fittings and caliper bolts. Metric sizes are common for Jeeps.
- Brake Line Wrench (Flare Nut Wrench): This is a special type of wrench that grips more sides of a fitting than a standard open-end wrench. It’s essential to prevent rounding off the soft brass fittings on brake lines.
- Pliers: Standard and possibly needle-nose pliers.
- Brake Bleeder Wrench: A small wrench specifically designed to turn the bleeder screws on the calipers.
- Torque Wrench: For tightening caliper bolts to the manufacturer’s specifications.
- Container for Brake Fluid: To catch old fluid during bleeding.
- Rags and Shop Towels: For cleaning up spills.
- Safety Glasses: Absolutely essential to protect your eyes from brake fluid and debris.
- Gloves: Brake fluid is harsh on skin.
- Wire Brush: For cleaning threads and mating surfaces.
- Penetrating Oil (like PB Blaster or WD-40): To help loosen stubborn bolts and fittings.
- Brake Cleaner: For cleaning components.
Materials:
- Extended Brake Lines: The correct length and type for your Jeep XJ and lift height. Ensure they come with new crush washers if required.
- New Brake Fluid: The correct type specified for your Jeep (usually DOT 3). Check your owner’s manual.
- Brake Bleeder Kit (Optional but Recommended): This can be a simple vacuum bleeder, a pressure bleeder, or even a one-person bleeder kit that uses gravity and a check valve. It makes the bleeding process much easier.
- Zip Ties or Brake Line Mounting Hardware: To secure the new lines properly.
Safety First: Pre-installation Checks
Before you even think about touching a wrench, safety is paramount.
- Park on a Level Surface: Ensure your Jeep is on a flat, stable surface.
- Engage Parking Brake: Set the parking brake firmly.
- Chock the Wheels: Place wheel chocks behind the rear wheels if you’re working on the front, or in front of the front wheels if working on the rear, to prevent rolling.
- Disconnect Battery (Optional but Recommended): For extra safety, you can disconnect the negative terminal of your battery, especially if working near electrical components.
- Wear Safety Gear: Always wear safety glasses and gloves. Brake fluid can cause severe eye damage and is a skin irritant.
Step-by-step Installation Guide
Installing extended brake lines is a moderately difficult DIY job. It requires patience and attention to detail.
This guide covers the typical process for the front brake lines. The rear installation is similar but may involve different mounting points.
Step 1: Prepare The Vehicle
- Loosen Lug Nuts: Before lifting the Jeep, slightly loosen the lug nuts on the wheels you’ll be working on. This is much easier when the wheel is on the ground.
- Jack Up the Jeep: Using your jack, lift the front of the Jeep and securely place jack stands under the frame rails or designated support points. Lower the Jeep onto the jack stands.
- Remove the Wheel: Finish unscrewing the lug nuts and remove the wheel.
Step 2: Locate And Inspect Old Brake Lines
- Identify the Brake Line: Follow the existing brake line from the hard line on the chassis down to the caliper on the axle. You’ll see where it connects to the caliper and where it’s typically secured to the frame or suspension components.
- Inspect for Damage: Look closely at the old line for any signs of wear, cracking, bulging, or abrasion. This is a good time to confirm if an upgrade was truly necessary.
Step 3: Disconnect The Old Brake Line
This is where you need to be careful, as brake fluid will leak out.
- Support the Caliper: If the caliper is hanging freely, you might want to support it with a piece of wire or a bungee cord to prevent stress on the brake hose.
- Loosen the Caliper Bolts: If necessary, remove the bolts holding the caliper to the steering knuckle. You might be able to leave the caliper attached and let it hang or carefully rest it on a sturdy part of the suspension.
- Disconnect from Hard Line: At the point where the flexible hose meets the hard brake line (usually near the frame rail or unibody rail), you’ll find a fitting. Use your brake line wrench (flare nut wrench) to hold the hard line fitting steady while using another wrench or socket to loosen and remove the nut connecting the flexible hose. Be prepared for brake fluid to drip out. Have your catch container ready.
- Disconnect from Caliper (if not done already): If the hose is still attached to the caliper, use your brake line wrench to loosen and remove the fitting from the caliper. Again, expect fluid.
Step 4: Mount The New Extended Brake Line
- Position the New Line: Carefully route the new extended brake line. Ensure it has enough slack to allow full suspension travel without being pinched or rubbing against any moving parts like the driveshaft, control arms, or springs.
- Connect to Caliper: Attach the new line to the caliper. Use new crush washers if supplied, and tighten the fitting securely with your brake line wrench. Do not overtighten, as this can damage the caliper threads.
- Connect to Hard Line: Connect the other end of the new line to the hard brake line. Again, use new crush washers if supplied and tighten the fitting snugly. Ensure the hard line fitting is held steady with a wrench while you tighten the nut.
- Secure the Line: Use zip ties or the provided mounting hardware to secure the new line to the chassis or suspension components. Make sure it’s routed safely and won’t snag on anything. The goal is to keep it tidy and protected, but with enough freedom to move with the suspension.
Step 5: Repeat For The Other Side
Follow steps 1-4 for the other front wheel. It’s crucial to replace brake lines in pairs (both front or both rear) to ensure even braking performance.
Step 6: Bleed The Brake System
This is a critical step. Air in the brake lines will make your brakes feel spongy and ineffective.
- Top Off Master Cylinder: Open the hood and locate the brake fluid reservoir. Ensure it is filled to the MAX line with fresh, correct-spec brake fluid. Keep an eye on the level throughout the bleeding process; if it drops too low, you’ll introduce more air.
- Bleeding Procedure (Two-Person Method):
- One person sits in the driver’s seat and pumps the brake pedal several times, then holds firm pressure on the pedal.
- The other person goes to the caliper, attaches a clear tube to the bleeder screw, and places the other end in a clear container partially filled with brake fluid.
- With the pedal held down, the person at the caliper carefully opens the bleeder screw. Fluid and air bubbles will flow out.
- As fluid flow slows, close the bleeder screw before the person inside releases the brake pedal.
- Repeat this pump-and-hold, open-and-close process until no air bubbles are seen in the fluid coming out of the bleeder screw and the fluid runs clear.
- Bleeding Procedure (One-Person Bleeder Kit):
- Follow the instructions for your specific bleeder kit. Typically, you’ll connect the kit to the bleeder screw, pressurize it (if it’s a pressure bleeder) or create a vacuum (if it’s a vacuum bleeder), and then open the bleeder screw.
- Fluid and air will be drawn out into the collection reservoir.
- Monitor the master cylinder reservoir and keep it topped up.
- Once no air bubbles are seen, close the bleeder screw and disconnect the kit.
- Repeat for All Wheels: If you replaced rear lines as well, you’ll need to bleed them too. Bleeding order is typically furthest from the master cylinder first (e.g., right rear, left rear, right front, left front), but for most Jeeps, bleeding just the front lines after replacement is sufficient if the rear lines were not touched. However, if you want to be absolutely sure or if you replaced all four, follow the correct sequence.
Step 7: Final Checks
- Tighten Lug Nuts: With the wheel back on, tighten the lug nuts in a star pattern.
- Lower the Jeep: Carefully jack up the Jeep slightly, remove the jack stands, and lower the vehicle completely.
- Torque Lug Nuts: Use your torque wrench to tighten the lug nuts to the manufacturer’s specified torque value in a star pattern.
- Check Pedal Feel: Get into the Jeep and pump the brake pedal several times. It should feel firm and not spongy. If it feels soft, there’s likely still air in the system, and you need to bleed again.
- Inspect for Leaks: Carefully examine all the connections you worked on for any signs of brake fluid leaks. Check the lines themselves for any damage.
- Test Drive: Drive the Jeep slowly in a safe area. Test the brakes gently at first, then more firmly. Ensure they respond correctly and don’t make unusual noises. Listen for any rubbing or pinging sounds from the suspension.
Common Mistakes And How To Avoid Them
Even with a good guide, DIY installations can encounter snags. Here are some common mistakes people make when installing extended brake lines and how to steer clear of them.
Mistake 1: Not Using A Flare Nut Wrench
Why it’s a problem: Standard open-end wrenches have a U-shaped opening that grips only two sides of a bolt or nut. Brake line fittings are often made of softer brass or aluminum and are notoriously prone to rounding off. Once a fitting is rounded, it becomes incredibly difficult, if not impossible, to loosen or tighten without damaging the line.
How to avoid it: Always use a flare nut wrench (also called a