Jeep Xj Bar Pin Eliminator: An Easy Upgrade For Shock Mounts
The Jeep Cherokee XJ is a beloved vehicle, known for its ruggedness and off-road capability. However, like any vehicle that spends time on challenging terrain, its components can experience wear and tear.
One common point of failure, especially on modified XJs, is the rear shock mount. Over time, the original mounting system, which uses a "bar pin" that goes through the shock's eyelet and into a bracket, can become a weak link.
This can lead to broken mounts, rattling noises, and compromised shock performance. Fortunately, there's a simple and effective upgrade to address this: the Jeep XJ bar pin eliminator.
This guide will walk you through what bar pin eliminators are, why they are a crucial upgrade for your XJ, and how to install them. We'll cover the benefits, the different types available, and the tools you'll need.
By the end, you'll understand why this seemingly small modification can make a big difference in your Jeep's ride quality and durability.
Understanding The Stock Xj Rear Shock Mount
Before diving into the upgrade, it’s helpful to understand the factory setup. On most Jeep XJs, the rear shocks are mounted using a system where a metal pin, known as a bar pin, passes through the rubber bushings in the shock absorber’s eyelet.
This bar pin then slides into a U-shaped bracket welded to the Jeep’s axle housing. A bolt passes through the U-shaped bracket and the bar pin to secure it.
While this system works adequately for stock setups and light off-roading, it has several inherent weaknesses:
- Flexibility: The bar pin itself can flex under stress, especially with larger tires or aggressive articulation.
- Wear: The constant movement and vibration can cause the bar pin to wear down the inside of the shock bushings. It can also wear the U-shaped bracket over time.
- Breakage: Under extreme conditions, the bar pin can snap, or the bracket can crack or break off the axle. This is a common issue when lifting an XJ and installing longer or stiffer shocks.
- Rattling: A worn or loose bar pin can lead to annoying rattling sounds from the rear of the vehicle.
When you lift your Jeep or install aftermarket shocks, you often need longer shock absorbers. These longer shocks can place more leverage on the stock mounting points, accelerating wear and increasing the risk of failure.
This is where bar pin eliminators come into play.
What Are Bar Pin Eliminators?
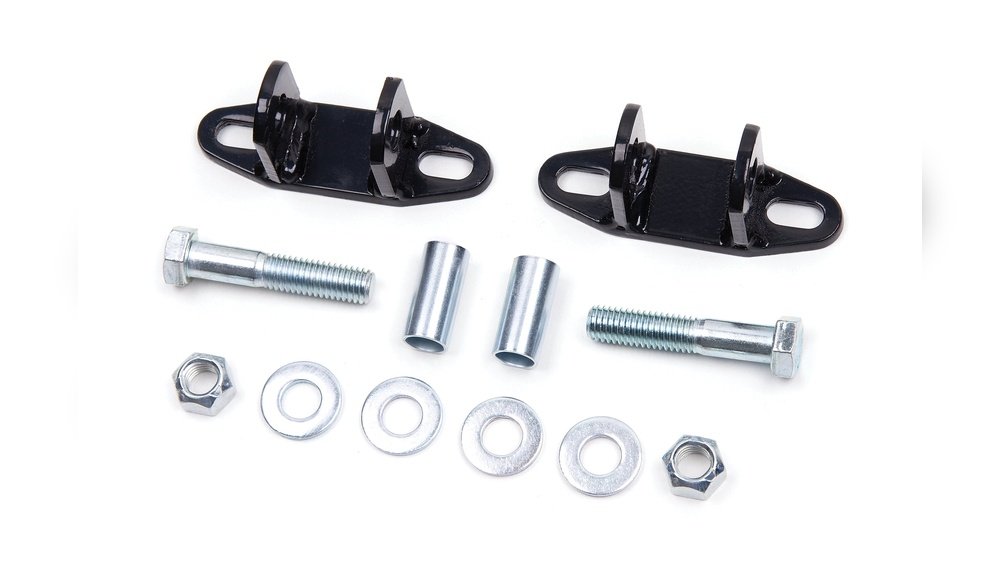
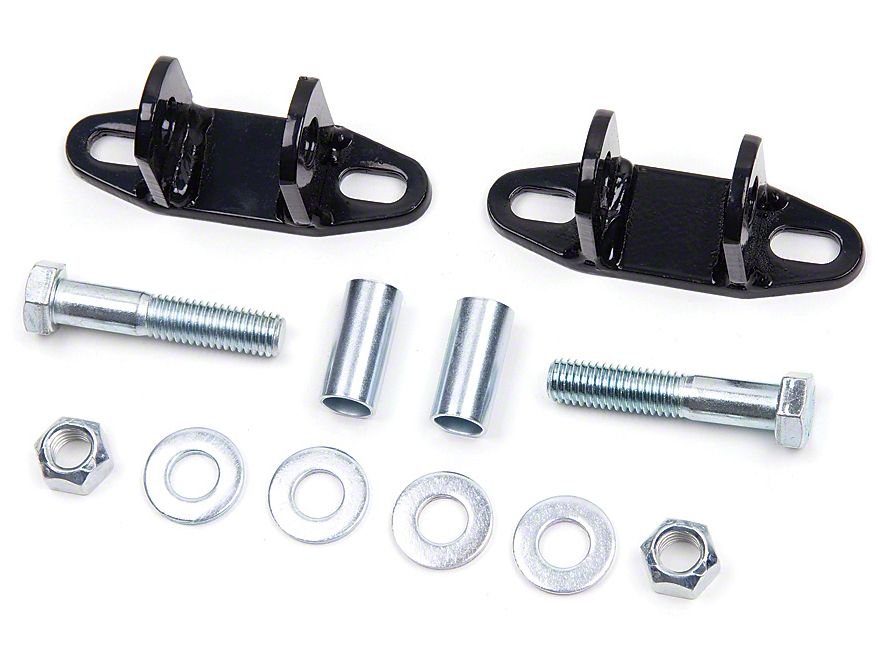
A bar pin eliminator (often abbreviated as BPE) is a replacement for the factory bar pin and U-shaped bracket system. Instead of a single, flexible pin, a bar pin eliminator typically consists of two main components:
- A Bushing Sleeve: This is a metal sleeve that fits snugly inside the shock absorber’s eyelet, replacing the need for the bar pin to go through.
- A Mounting Bolt and Nut: A robust bolt, usually a grade 8 or higher, passes through the mounting bracket on the axle and through the bushing sleeve in the shock. A corresponding nut secures everything.
The core idea is to replace the flexible, wear-prone bar pin with a solid, direct connection. The new bolt passes directly through the shock’s mounting ear and the bracket on the axle, with the sleeve acting as a spacer and bearing surface.
This creates a much stronger, more rigid mounting point.
Why Upgrade To Bar Pin Eliminators?
Upgrading to bar pin eliminators offers several significant advantages for your Jeep XJ:
- Increased Strength and Durability: This is the primary benefit. The solid bolt and sleeve design eliminates the flex and potential breaking points of the factory bar pin. This is especially important for Jeeps that see regular off-road use, have larger tires, or are equipped with heavier-duty suspension components.
- Reduced Wear: By providing a solid connection, BPEs minimize the wear on the shock bushings and the axle mounting bracket. This leads to a longer lifespan for your shocks and a quieter ride.
- Improved Shock Performance: A rigid mounting point ensures that your shocks can perform at their best. Less flex means the shock can control suspension movement more effectively, leading to better handling and a more stable ride.
- Eliminates Rattling: Worn bar pins are a common source of rear-end rattles. Installing BPEs can often resolve these annoying noises.
- Compatibility with Aftermarket Shocks: Many aftermarket shocks are designed with a standard eyelet that accepts a bolt directly, or they come with their own hardware that might not work well with the factory bar pin setup. BPEs ensure compatibility and proper installation.
- Ease of Installation: While it requires some basic mechanical skill, installing bar pin eliminators is a relatively straightforward upgrade. It’s a project many DIYers can tackle in their garage.
Pro Tip: When choosing new shocks for a lifted XJ, pay close attention to their mounting dimensions. Many aftermarket shocks are designed to work with BPEs, simplifying the installation process.
Types Of Bar Pin Eliminators
Bar pin eliminators come in a few variations, primarily differing in their design and the hardware included. Understanding these differences can help you choose the best option for your needs.
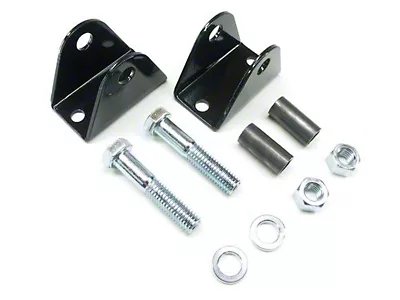
1. Standard Bolt-on Kits
These are the most common type of bar pin eliminator. They typically include:
- Machined Sleeves: These are precisely sized metal sleeves that fit inside the shock absorber’s eyelet. They are usually made from steel or aluminum.
- High-Strength Bolts: Grade 8 bolts are standard, providing excellent tensile strength and resistance to stretching or breaking.
- Washers and Nuts: Appropriate washers (often hardened) and locking nuts (like nylock nuts) are included to ensure a secure fit.
These kits are designed to directly replace the factory bar pin and bracket assembly. You’ll remove the old bar pin, bolt, and nut, and then install the new sleeve and bolt through the shock eyelet and the axle bracket.
2. Integrated Mounts
Some aftermarket suspension components, like certain control arm relocation brackets or shock relocation brackets, might incorporate their own bar pin eliminator system directly into their design. These are less common as a standalone upgrade and are usually part of a larger suspension kit.
3. Custom Solutions
While not recommended for most users, some experienced fabricators might create custom bar pin eliminator setups. This usually involves welding new mounting tabs or modifying existing ones.
For the vast majority of Jeep XJ owners, purchasing a pre-made kit is the most practical and reliable solution.
What To Look For When Buying Bar Pin Eliminators
When purchasing a bar pin eliminator kit for your Jeep XJ, consider these factors:
- Material: Most sleeves are made from steel for strength and durability. Some might be aluminum, which is lighter but can be less robust. For rear shock mounts, steel is generally preferred.
- Sleeve Diameter and Length: The sleeve needs to fit snugly inside your shock absorber’s eyelet. Most kits are designed for standard shock eyelet widths, but it’s always good to double-check the specifications against your specific shocks. The length of the sleeve should also match the width of the mounting bracket on your axle.
- Bolt Grade: Always opt for Grade 8 bolts or higher. This ensures they can withstand the stresses of off-road driving.
- Hardware Included: Ensure the kit comes with all necessary washers and a locking nut. A nylock nut is preferred as it resists loosening from vibration.
- Brand Reputation: Stick with reputable off-road parts manufacturers. They often have products designed and tested specifically for vehicles like the Jeep XJ.
Tools And Materials Needed For Installation
Before you begin, gather the necessary tools and materials. This will make the installation process smoother and faster.
- Safety Gear: Safety glasses and gloves are essential.
- Jack and Jack Stands: You’ll need to safely lift and support the rear of your Jeep.
- Wrench Set: You’ll need wrenches to remove the old hardware and install the new bolts and nuts. Common sizes include 9/16″, 5/8″, and possibly 3/4″ depending on the kit.
- Socket Set and Ratchet: Useful for faster removal and installation.
- Penetrating Oil (e.g., WD-40 or PB Blaster): This is crucial for loosening rusty bolts and nuts.
- Wire Brush: To clean threads and mounting surfaces after removing old hardware.
- Torque Wrench: To ensure the new bolts are tightened to the manufacturer’s specifications.
- Hammer: May be needed to tap out stubborn bar pins or to seat the new components.
- Pry Bar (optional): Can help manipulate components if they are tight.
- New Bar Pin Eliminator Kit: The star of the show!
Example: When I first installed longer shocks on my XJ, I found the original bar pins were already showing signs of wear. I decided to upgrade to BPEs preventatively, and the installation was straightforward with just a basic socket set and some patience for the rusty factory hardware.
Step-by-step Installation Guide
Installing Jeep XJ bar pin eliminators is a manageable DIY project. Here’s a detailed breakdown of the process:
Step 1: Prepare The Vehicle
- Park on a Level Surface: Ensure your Jeep is parked on a flat, stable surface.
- Engage Parking Brake: Firmly set the parking brake.
- Chock the Wheels: Place wheel chocks behind the front wheels for extra safety.
- Loosen Lug Nuts: Slightly loosen the lug nuts on the rear wheels. You’ll remove the wheels later.
- Jack Up the Rear: Using your jack, lift the rear of the Jeep until the rear axle is comfortably off the ground.
- Secure with Jack Stands: Place jack stands securely under the frame rails or axle tubes. Never work under a vehicle supported only by a jack. Lower the Jeep slowly onto the jack stands.
- Remove Rear Wheels: Finish removing the lug nuts and take off the rear wheels. This will give you clear access to the rear shock absorbers and mounting brackets.
Step 2: Remove The Old Shock Mount Hardware
- Locate the Rear Shocks: Identify the rear shock absorbers attached to the axle housing.
- Apply Penetrating Oil: Spray penetrating oil generously on the bolt and nut holding the bottom of the shock absorber to the axle bracket. Let it soak for at least 15-30 minutes, or longer if the hardware is heavily rusted. Reapply if necessary.
- Remove the Nut: Using the appropriate size wrench or socket, remove the nut from the bolt securing the shock to the bracket.
- Remove the Bolt: Once the nut is off, try to pull the bolt out. If it’s stuck, you may need to use a hammer to tap it out. Be careful not to damage the threads on the bracket if you plan to reuse it (though with BPEs, you won’t be reusing the bar pin).
- Remove the Old Bar Pin: With the bolt removed, the shock absorber should be loose. You can now slide the old bar pin out of the U-shaped bracket on the axle. Sometimes, the bar pin is integrated into the bracket or is very tight. You might need to use a pry bar or hammer to gently persuade it out. Clean the U-shaped bracket with a wire brush to remove any rust or debris.
Step 3: Install The Bar Pin Eliminator Kit
- Prepare the New Hardware: Lay out your new bar pin eliminator kit. You should have the sleeve, the bolt, and any washers and nuts.
- Insert the Sleeve: Slide the new metal sleeve into the eyelet of the shock absorber. It should fit snugly. If it’s loose, the kit might not be the correct size for your shocks.
- Position the Shock: With the sleeve in place, position the shock absorber so that its eyelet (with the sleeve inside) aligns with the mounting bracket on the axle.
- Insert the New Bolt: Take the new, high-strength bolt and slide it through the mounting bracket on the axle and then through the sleeve inside the shock absorber’s eyelet. Ensure the bolt passes cleanly through both components.
- Install the Washer and Nut: Slide a washer onto the bolt on the other side of the bracket, followed by the nylock nut.
- Tighten the Hardware: Hand-tighten the nut first. Then, using your wrench or socket, snug it up.
Step 4: Torque The New Hardware
- Find Torque Specifications: Consult your bar pin eliminator kit’s instructions or a reliable Jeep XJ service manual for the correct torque specification for the shock mounting bolt. If specific instructions aren’t available, a common torque value for Grade 8 hardware in this application is around 50-70 ft-lbs, but always verify.
- Torque the Bolt: Use your torque wrench to tighten the bolt to the specified value. This ensures the hardware is secure without being overtightened, which could damage the shock or bracket.
Step 5: Reassemble And Lower The Vehicle
- Repeat for the Other Side: Follow the same steps for the other rear shock absorber.
- Inspect Your Work: Double-check that all hardware is installed correctly and tightened.
- Reinstall Wheels: Place the rear wheels back onto the hubs and hand-tighten the lug nuts.
- Lower the Vehicle: Carefully jack up the rear of the Jeep slightly to remove the jack stands, then slowly lower the vehicle to the ground.
- Torque Lug Nuts: Using your torque wrench, tighten the lug nuts in a star pattern to the manufacturer’s recommended torque specification (typically around 100-120 ft-lbs for XJs).
Step 6: Test Drive
- Initial Check: Before driving, give the rear suspension a good push up and down. Listen for any unusual noises.
- Short Test Drive: Take your Jeep for a short, slow test drive around the block. Pay attention to how the rear suspension feels and listen for any new rattles or clunks.
- Road Test: Gradually increase speed and drive on different road surfaces. The ride should feel more stable and controlled.
Common Mistakes to Avoid:
- Not using penetrating oil: Fighting seized hardware is frustrating and can lead to stripped bolts or damaged components.
- Overtightening: This can strip threads, crack the shock eyelet, or damage the mounting bracket. Always use a torque wrench.
- Using the wrong size hardware: Ensure the sleeve fits the shock eyelet and