Installing Your Jeep Wrangler Unlimited Soft Top: A Step-by-step Guide
Getting a new soft top for your Jeep Wrangler Unlimited is an exciting upgrade. It can transform your driving experience, offering that classic open-air feel.
However, the installation process might seem a bit daunting at first. Don't worry, this guide will walk you through each step clearly.
We'll cover everything from unpacking your new top to securing it tightly. Following these instructions will help you achieve a professional-looking installation and enjoy your Jeep to its fullest.
Before You Begin: Preparation Is Key
Before you even think about touching your new soft top, take some time to prepare. This will make the entire process smoother and prevent frustration.
What You’ll Need
Gathering the right tools and materials beforehand is crucial. This ensures you don’t have to stop midway through the installation to search for something.
- Your New Soft Top Kit: Make sure all parts are present. Check the manufacturer’s list against what’s in the box. This usually includes the fabric top, bows (support bars), seals, and hardware.
- Phillips Head Screwdriver: For removing and installing some screws.
- Socket Wrench Set: You might need various socket sizes for bolts.
- Pliers: Useful for gripping and manipulating small parts.
- Utility Knife or Scissors: For opening the box and potentially trimming small things if needed (though usually not required).
- Soft Cloth or Towel: To protect your Jeep’s paint and interior surfaces from scratches.
- A Friend: Having an extra pair of hands is highly recommended, especially for lifting and positioning the top.
- Good Lighting: You’ll need to see what you’re doing, especially in tight areas.
- Owner’s Manual: Your Jeep’s manual can be helpful for locating specific bolts or trim pieces.
- Manufacturer’s Instructions: Always refer to the specific instructions that came with your soft top. This guide provides general steps, but variations exist between brands.
Inspecting Your New Soft Top
Once you have everything, carefully inspect the soft top itself.
- Check for Damage: Look for any rips, tears, or defects in the fabric. Ensure zippers work smoothly.
- Verify All Parts: Compare the contents of the box with the parts list provided by the manufacturer. Missing hardware can halt your installation.
- Read the Manufacturer’s Guide: Seriously, this is important. Different brands (like Bestop, Smittybilt, Rampage) have slightly different designs and installation quirks. Your kit’s manual is the definitive source for its specific parts.
Preparing Your Jeep
Your Jeep needs to be ready for the new top.
- Clean the Mounting Areas: The channels and edges where the soft top will attach need to be clean and free of debris. Use a damp cloth to wipe down the door surrounds, windshield channel, and rear corners.
- Remove the Old Top (if applicable): If you’re replacing an old soft top or hard top, remove it completely. Store the hard top safely to prevent damage.
- Lower Windows: For most installations, it’s best to have your Jeep’s windows down. This gives you more working room.
Step-by-step Installation Process
Now, let’s get to the actual installation. We’ll break this down into manageable sections. Remember, patience is key.
Step 1: Installing The Bows And Support System
The bows are the metal or plastic bars that give the soft top its shape and support.
- Identify the Bows: Your kit will have several bows, often labeled or shaped differently. Lay them out and identify them based on the manufacturer’s instructions.
- Assemble the Frame: Some tops require you to connect the bows to form a complete frame. This might involve sliding them into sleeves or connecting them with pins.
- Mount the Frame to Your Jeep:
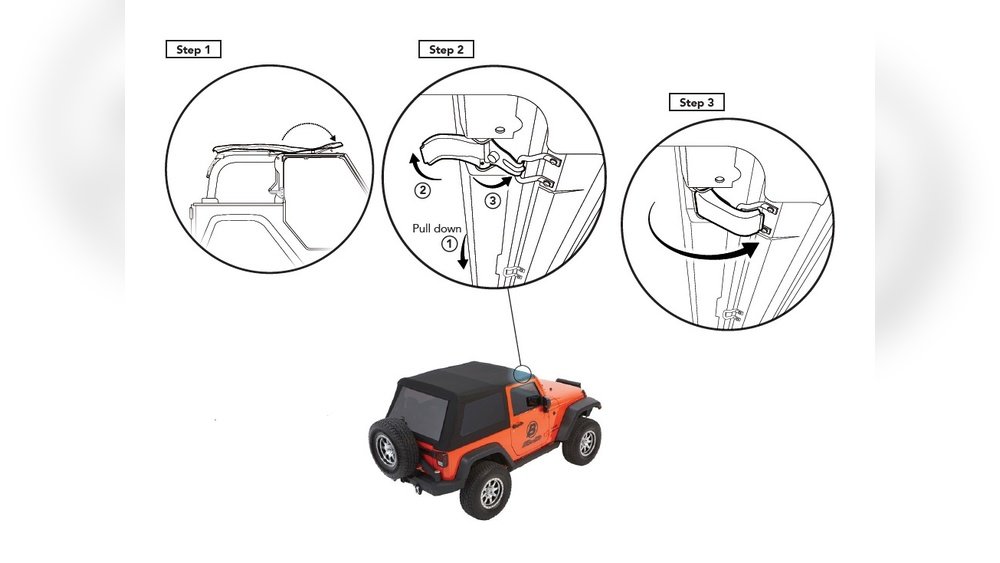
- Windshield Header: The front of the frame usually attaches to a header bar that clamps onto the top of your windshield frame. This often involves sliding the header bar into a channel and securing it with latches or screws. Make sure it’s seated firmly and evenly.
- Side and Rear Mounts: The rest of the bow assembly will then rest on or attach to specific points on your Jeep’s body. This can vary greatly. Some might hook into brackets, others might rest in specific slots. Do not force anything. If it doesn’t seem to fit, double-check the orientation and consult your instructions.
Step 2: Attaching The Fabric Top To The Frame
This is where the main part of the soft top comes into play.
- Drape the Fabric: Carefully drape the fabric top over the assembled bow system. Ensure it’s oriented correctly, the front should align with the windshield header, and the rear should extend over the back of the Jeep.
- Connect the Front:
- Windshield Channel: The front edge of the fabric typically has a flap or a bead that slides into the windshield header channel you installed earlier. Ensure this bead is fully and evenly seated in the channel. You might need to push firmly.
- Latches/Buckles: Many soft tops use latches or buckles at the front corners to secure the fabric to the windshield frame. Fasten these according to the instructions. Ensure they are snug but not overly tight at this stage.
Step 3: Securing The Sides And Rear
This is where you’ll get the top taut and ready for use.
- Door Surrounds: The fabric usually extends down the sides to meet the door surrounds.
- Tuck and Secure: You’ll need to tuck the fabric into the door surround channels. Some have a bead that slides in, while others might use Velcro or snaps. Work your way around the doors, ensuring the fabric is smooth and wrinkle-free.
- Check Door Clearance: As you secure the sides, periodically close the doors to check for interference. The fabric should not be pinched or strained by the door frame.
- Rear Tailgate Bar: The rear of the soft top typically attaches using a tailgate bar.
- Install the Bar: This bar usually slides into a pocket or sleeve at the bottom rear of the fabric.
- Secure to Body: The ends of the tailgate bar then clip or hook onto specific points on the Jeep’s tailgate or body. This is often the final securing point. Ensure it clicks securely into place.
Step 4: Adjusting And Tightening
Once the main components are in place, it’s time to make everything snug.
- Check for Slack: Go around the entire Jeep and look for any loose areas or wrinkles in the fabric.
- Tighten Buckles and Straps: Many soft tops have adjustable straps or buckles on the sides, rear, or even the top itself. Tighten these gradually and evenly. The goal is a drum-tight fit without putting excessive stress on any single point.
- Smooth Out Wrinkles: As you tighten, smooth out any remaining wrinkles. Warm weather can help the fabric stretch and conform.
- Zip Up Windows (if applicable): If your soft top comes with removable windows, zip them into place. Make sure the zippers operate smoothly. Sometimes, a bit of zipper lubricant (often included or recommended) can help.
Step 5: The Initial Break-in Period
Your new soft top isn’t quite finished after the installation. There’s a crucial break-in period.
- Let it Set: It’s often recommended to leave the soft top installed and latched for at least 24 hours, especially if the fabric is new and stiff. This allows the fabric to stretch and settle into its final shape.
- Avoid Driving at High Speeds: For the first few days, avoid driving at high speeds. This allows the fabric and seams to fully adjust under normal conditions.
- Re-tighten as Needed: After the break-in period, you may need to go around and re-tighten some of the straps or buckles. The fabric will likely have stretched slightly.
Common Issues And How To Fix Them
Even with careful installation, you might run into a few snags. Here are some common problems and their solutions.
Wrinkles And Sagging
- Problem: The fabric looks loose, has noticeable wrinkles, or sags in certain areas.
- Solution: This is often due to the fabric not being fully stretched or settled.
- Sunlight is Your Friend: Park your Jeep in direct sunlight on a warm day. The heat makes the fabric more pliable.
- Re-tighten: While the fabric is warm and soft, go around and re-tighten all the straps, buckles, and latches. Smooth out the wrinkles with your hands as you go.
- Check Bow Alignment: Ensure the bows are correctly seated and not bent or out of place.
- Patience: Sometimes, it just takes a few days of driving and exposure to the elements for the fabric to smooth out completely.
Leaks
- Problem: Water is leaking into the cabin, especially after rain or washing.
- Solution: Leaks are usually caused by improper sealing or gaps.
- Check Seals: Inspect all the rubber seals around the doors, windshield, and rear. Ensure they are properly seated and not pinched or damaged.
- Verify Fabric Seating: Double-check that the fabric bead is fully seated in the windshield channel and that the sides are tucked securely into the door surrounds.
- Tailgate Bar: Make sure the tailgate bar is correctly attached and creating a tight seal at the rear.
- Stitching: Examine the seams and stitching. If you notice a persistent leak along a seam, it might be a manufacturing defect.
- Zipper Issues: If leaks are coming from around the windows, ensure the zippers are fully closed and that the window seals are making good contact. A zipper lubricant can sometimes help create a better seal.
Difficulty Zipping Windows
- Problem: The zippers for the side or rear windows are sticking or difficult to close.
- Solution: This is a common issue with new zippers.
- Lubrication: Use a dedicated zipper lubricant (often a silicone-based spray or stick) or even a bit of wax (like a candle or bar soap) on the zipper teeth. Work the zipper back and forth gently to distribute the lubricant.
- Alignment: Ensure the fabric around the zipper is not bunched up or preventing the zipper from moving freely. Sometimes, gently pulling the fabric taut can help.
- Don’t Force It: Forcing a stuck zipper can break it. Be patient and use lubricant.
Wind Noise
- Problem: Your Jeep is noticeably louder with the soft top than with a hard top.
- Solution: Soft tops are inherently less soundproof than hard tops. However, excessive wind noise can often be reduced.
- Tightness is Key: Ensure the top is as tight and wrinkle-free as possible. Loose fabric flaps and creates noise.
- Check Seals: Gaps in the seals around the doors and windows are major culprits for wind noise. Ensure everything is seated correctly.
- Aftermarket Seals: Consider purchasing upgraded seals for the doors and windows if noise is a significant issue.
- Window Fitment: Make sure your windows are installed correctly and are not bulging or creating air gaps.
Maintaining Your Soft Top For Longevity
Proper care will help your soft top last for many years and keep it looking great.
Regular Cleaning
- Frequency: Clean your soft top regularly, especially after off-roading or exposure to harsh elements.
- Method: Use a soft brush or sponge with mild soap (like dish soap) and plenty of water. Avoid harsh chemicals or abrasive cleaners, which can damage the fabric and its protective coating.
- Rinsing: Rinse thoroughly to remove all soap residue. Leftover soap can attract dirt and degrade the fabric over time.
- Drying: Allow the top to air dry completely before putting windows back on or storing it.
Protecting The Fabric
- Fabric Protectant: Apply a fabric protectant spray specifically designed for automotive soft tops. This helps repel water, UV rays, and stains. Reapply according to the product’s instructions, usually once or twice a year.
- UV Protection: Direct sunlight can fade and degrade the fabric over time. While you can’t always avoid it, consider using a UV protectant spray and parking in shaded areas when possible.
Dealing With Mold And Mildew
- Prevention: The best way to prevent mold and mildew is to keep the top dry. If you frequently encounter wet conditions, try to dry the top thoroughly after each use.
- Treatment: If you do find mold or mildew, use a specialized soft top cleaner designed to kill these organisms without damaging the fabric. Follow the product instructions carefully. A mixture of white vinegar and water can also be effective for mild cases.
Storage (when Removing The Top)
- Clean and Dry: Always clean and thoroughly dry the soft top before storing it. Storing a damp top will almost guarantee mold and mildew growth.
- Folding: Fold the top neatly along its natural creases. Avoid sharp folds or crushing the fabric, which can cause permanent wrinkles or damage. Many manufacturers provide specific folding instructions.
- Protection: Store the folded top in a protective bag or cover, and place it in a dry, climate-controlled area (like a garage or storage unit). Avoid attics or sheds with extreme temperature fluctuations.
Understanding Different Soft Top Materials
Soft tops are typically made from different materials, each with its pros and cons. Knowing these can help you choose the right one and understand its care needs.
Sailcloth Vs. Vinyl
- Sailcloth: This is a premium material, often a multi-layer fabric.
- Pros: More durable, better insulation against heat and cold, quieter ride (less wind noise), looks more premium.
- Cons: More expensive, can be heavier, may require more effort to stretch initially.
- Care: Requires specific fabric cleaners and protectants.
- Vinyl: This is a more traditional and budget-friendly option.
- Pros: Less expensive, lighter, easier to clean with basic soap and water, easier to stretch.
- Cons: Can become brittle in cold weather, more prone to cracking and fading over time, generally noisier with more wind noise, less insulating.
- Care: Can be cleaned with mild soap. Avoid harsh chemicals that can degrade the vinyl.