Jeep Wrangler Tj Exhaust Manifold Install Guide For Ultimate Performance Upgrade
The Jeep Wrangler TJ is an icon. Its rugged design and go-anywhere capability have made it a favorite for off-road enthusiasts and casual drivers alike.
While the stock exhaust system serves its purpose, many TJ owners look for ways to squeeze more power and a better sound from their beloved Jeeps. One of the most effective ways to achieve this is by upgrading the exhaust manifold.
A well-designed aftermarket manifold can improve exhaust flow, reduce backpressure, and ultimately lead to a noticeable performance boost. This guide will walk you through the process of installing a new exhaust manifold on your Jeep Wrangler TJ, helping you unlock its hidden potential.
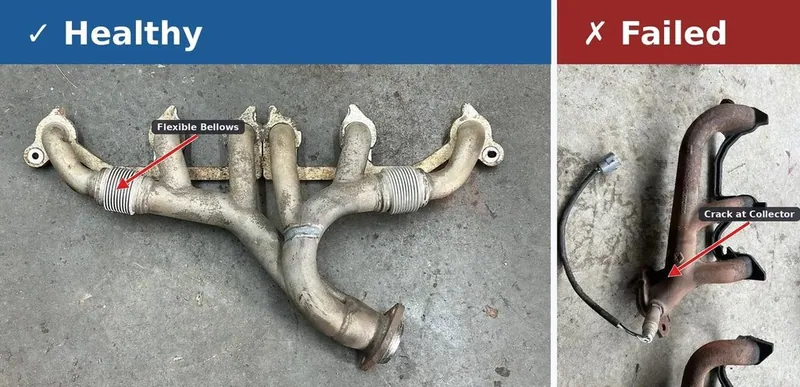
Installing an exhaust manifold might seem like a daunting task, but with the right tools, patience, and a clear understanding of the steps involved, it’s a project many DIYers can tackle. This upgrade isn’t just about raw power; it can also contribute to better fuel efficiency and a more aggressive, satisfying engine note.
We’ll cover everything from choosing the right manifold to the final tightening of bolts, ensuring you have the knowledge to complete the job successfully and safely.
Understanding The Role Of The Exhaust Manifold
Before diving into the installation, it’s crucial to understand what the exhaust manifold does and why upgrading it can be beneficial. The exhaust manifold is essentially a set of pipes that collect exhaust gases from each cylinder of your engine and funnel them into a single pipe, which then leads to the rest of the exhaust system.
In a typical internal combustion engine, like the ones found in a Jeep Wrangler TJ (the 4. 0L inline-six is a popular choice), the exhaust manifold is bolted directly to the cylinder head.
Its primary job is to efficiently route the hot, expanding gases away from the combustion chambers.
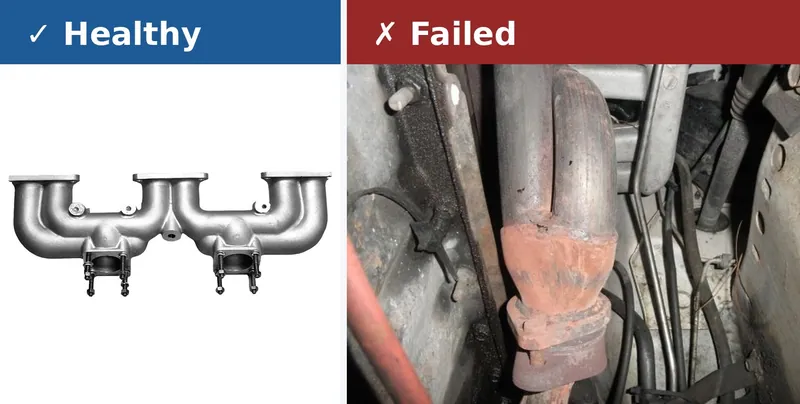
The stock manifolds, often made from cast iron, are designed for durability and cost-effectiveness rather than optimal performance. They can be restrictive, meaning they don’t allow exhaust gases to escape as freely as they could.
This restriction leads to several issues:
- Increased Backpressure: When exhaust gases can’t escape quickly, pressure builds up in the cylinders. This backpressure fights against the incoming air-fuel mixture during the intake stroke, reducing the engine’s ability to breathe.
- Reduced Power Output: Less air means less fuel can be burned efficiently, resulting in lower horsepower and torque.
- Higher Engine Temperatures: Trapped exhaust gases retain heat, which can increase overall engine temperature, potentially leading to performance degradation and increased wear.
An aftermarket exhaust manifold, often made from stainless steel or high-quality steel alloys, is designed with larger diameter pipes and smoother bends. This improved design allows exhaust gases to flow more freely, reducing backpressure and helping the engine expel waste gases more efficiently.
Benefits Of An Upgraded Exhaust Manifold
Upgrading your Jeep Wrangler TJ’s exhaust manifold can bring several tangible benefits:
- Increased Horsepower and Torque: By reducing backpressure and improving exhaust flow, the engine can breathe better. This allows for more efficient combustion, translating directly into more power. While gains vary depending on the specific manifold and other modifications, owners often report noticeable improvements, particularly in the mid-range RPMs, which is crucial for off-roading and towing.
- Improved Throttle Response: With less restriction, the engine can react more quickly to throttle inputs. This makes the Jeep feel more lively and responsive when you press the accelerator.
- Enhanced Exhaust Sound: Aftermarket manifolds, especially when paired with a cat-back exhaust system, can produce a deeper, more aggressive, and satisfying exhaust note. It’s a subtle change that many Jeep owners appreciate.
- Potential for Better Fuel Economy: While not the primary goal, a more efficient engine can sometimes lead to slight improvements in fuel economy, especially during steady cruising. When the engine doesn’t have to work as hard to expel exhaust, it can consume less fuel.
- Durability: Many aftermarket manifolds are constructed from stainless steel, which is more resistant to rust and corrosion than the cast iron used in stock manifolds. This can lead to a longer lifespan, especially in harsh off-road environments.
Choosing The Right Exhaust Manifold For Your Tj
Not all exhaust manifolds are created equal. When selecting an upgrade for your Jeep Wrangler TJ, consider these factors:
- Material:
- Cast Iron: Similar to stock, durable but heavy and prone to cracking under extreme heat cycles. Not typically an upgrade choice.
- Steel: Lighter than cast iron and generally more durable. Can be coated for corrosion resistance.
- Stainless Steel: The premium choice. Offers excellent corrosion resistance, durability, and often a polished look. It’s more expensive but typically lasts longer and performs better.
- Design:
- Equal-Length vs. Unequal-Length Headers: For performance, equal-length headers are generally preferred. They ensure that exhaust pulses from each cylinder arrive at the collector at the same time, creating a scavenging effect that pulls exhaust gases out more efficiently. Unequal-length designs are more common in stock configurations and can sometimes lead to uneven exhaust pulses.
- Primary Tube Diameter: Larger diameter tubes can improve flow at higher RPMs but might slightly reduce low-end torque if they are too large for the engine’s displacement. For the TJ’s 4.0L, a diameter around 1.5 to 1.75 inches is often optimal.
- Collector Design: The collector is where the primary tubes merge. A well-designed collector ensures smooth merging of exhaust gases.
- Brand Reputation and Reviews: Look for reputable brands known for producing quality Jeep parts. Reading reviews from other TJ owners can provide valuable insights into the performance, fitment, and durability of specific manifolds.
- Emissions Compliance: Ensure the manifold you choose is legal for use in your region. Some high-performance manifolds may not be CARB (California Air Resources Board) compliant, which could be an issue if you live in certain states.
- Fitment: Confirm that the manifold is designed specifically for your Jeep Wrangler TJ model year and engine. Fitment issues can turn a DIY project into a frustrating ordeal.
Pro Tip: For the Jeep Wrangler TJ, especially those with the 4.0L inline-six engine, a well-designed stainless steel header is often the top choice for performance and longevity. Brands like Banks Power, Rugged Ridge, and Borla are known for quality Jeep components.
Tools And Materials Needed
Before you begin the installation, gather all the necessary tools and materials. Having everything ready will make the process smoother and faster.
Tools:
- Socket Set: SAE sizes (10mm, 13mm, 14mm, 15mm, 17mm are common) and possibly some deep sockets.
- Wrench Set: Similar SAE sizes to the socket set.
- Ratchet: With various extension lengths.
- Torque Wrench: Essential for tightening bolts to the correct specifications to prevent leaks or damage.
- Pry Bar: To help maneuver parts.
- Breaker Bar: For loosening stubborn bolts.
- Penetrating Oil: Like PB Blaster or WD-40, to loosen rusted bolts.
- Wire Brush: For cleaning mating surfaces.
- Gasket Scraper: To remove old gasket material.
- Jack and Jack Stands: For safely lifting and supporting the Jeep.
- Wheel Chocks: For added safety.
- Safety Glasses: Always protect your eyes.
- Gloves: To protect your hands.
- Rags and Shop Towels: For cleaning.
- Anti-Seize Compound: To prevent future bolts from seizing.
- Optional: Oxygen Sensor Socket: If your manifold has O2 sensors that need to be transferred.
- Optional: Impact Wrench: Can speed up bolt removal, but use with caution.
Materials:
- New Exhaust Manifold: The upgraded unit you purchased.
- New Exhaust Manifold Gasket: Crucial for a proper seal. Always use a new gasket.
- New Exhaust Manifold Bolts/Studs (if applicable): Some aftermarket kits come with new hardware, others may require you to reuse or purchase separately. It’s often wise to replace old, rusted hardware.
- High-Temperature Thread Sealant (Optional): For O2 sensor bungs if you’re transferring them.
Step-by-step Installation Guide
This guide is for a typical Jeep Wrangler TJ 4. 0L engine.
Always refer to your specific vehicle's service manual and the instructions provided with your new exhaust manifold for any model-specific variations.
Safety First!
- Park on a Level Surface: Ensure your Jeep is parked on a flat, stable surface.
- Engage Parking Brake: Firmly set the parking brake.
- Chock Wheels: Place wheel chocks behind the rear wheels.
- Disconnect Battery: Disconnect the negative battery terminal to prevent electrical shorts.
- Lift and Support: Use a jack to lift the front of the Jeep and securely place jack stands under the frame rails or designated support points. Never work under a vehicle supported only by a jack.
Removing The Old Exhaust Manifold
- Locate the Exhaust Manifold: It’s bolted to the side of the engine, usually on the passenger side, with pipes leading towards the back of the Jeep.
- Identify and Disconnect Oxygen Sensors: If your manifold has oxygen sensors, carefully disconnect their electrical connectors. You may need a special oxygen sensor socket to remove the sensors themselves from the old manifold. If they are seized, apply penetrating oil and let it soak.
- Apply Penetrating Oil: Generously spray penetrating oil onto all the bolts and nuts connecting the exhaust manifold to the cylinder head, as well as the bolts connecting the manifold to the exhaust pipe. Let it soak for at least 15-30 minutes, or longer if possible. Reapply if needed.
- Remove Heat Shields: Many TJs have heat shields covering the manifold. These are usually held on by a few bolts. Remove them to gain better access to the manifold bolts.
- Loosen Manifold-to-Head Bolts: Using a socket wrench, breaker bar, and appropriate extensions, begin to loosen the bolts or nuts holding the exhaust manifold to the cylinder head. Work from the outside in, or in a crisscross pattern. If a bolt is particularly stubborn, apply more penetrating oil and gentle heat if you have the tools and expertise (be cautious of flammable materials).
- Disconnect Manifold from Downpipe: Once the manifold is loose from the head, you’ll need to separate it from the rest of the exhaust system (usually the downpipe). This connection is typically secured with bolts and a flange. Remove these bolts. You might need to gently pry the manifold away from the downpipe if it’s stuck.
- Remove the Exhaust Manifold: With all bolts to the head removed and the manifold separated from the downpipe, carefully maneuver the old manifold out of the engine bay. It might be heavy, so be prepared.
Preparing For The New Manifold Installation
- Clean Mating Surfaces: This is a critical step. Use a gasket scraper and a wire brush to thoroughly clean the mating surface on the cylinder head where the gasket sits. Ensure all old gasket material, carbon deposits, and rust are removed. A clean, flat surface is essential for a leak-free seal.
- Inspect Cylinder Head: While the manifold is off, inspect the cylinder head surface for any cracks or damage.
- Prepare New Manifold: If your new manifold requires it, install any included hardware (like studs) or transfer components like oxygen sensors. If transferring O2 sensors, clean the threads and apply a small amount of high-temperature thread sealant to prevent them from seizing in the new manifold. Be careful not to get sealant into the sensor element.
Installing The New Exhaust Manifold
- Position the New Manifold: Carefully place the new exhaust manifold into position. If it’s a header-style manifold, you might need to align the primary tubes with the ports on the cylinder head.
- Install the New Gasket: Place the new exhaust manifold gasket onto the cylinder head, aligning it with the bolt holes. Ensure it’s seated correctly.
- Install Manifold Bolts/Studs: Start threading the bolts or nuts by hand into the cylinder head. Do this for all of them to ensure proper alignment before tightening.
- Tighten Manifold Bolts/Nuts:
- Initial Tightening: Snug up all the bolts/nuts evenly.
- Torque Sequence: Consult your new manifold’s instructions or a service manual for the correct tightening sequence and torque specifications. Typically, you’ll tighten in a crisscross pattern, working from the center outwards.
- Torque Specifications: Use your torque wrench to tighten the bolts/nuts to the specified torque. This is crucial. Overtightening can warp the manifold or damage the threads, while undertightening can lead to leaks. It’s often done in stages (e.g., torque to 15 ft-lbs, then to 25 ft-lbs, then to the final spec).
- Reconnect Manifold to Downpipe: Align the new manifold with the downpipe and secure them together using new hardware if provided, or the original hardware if it’s in good condition. Tighten these bolts securely.
- Install Heat Shields: Reinstall any heat shields you removed earlier.
- Reconnect Oxygen Sensors: Reinstall the oxygen sensors into the new manifold (if removed) and reconnect their electrical connectors. Ensure they are plugged in securely.
- Final Check: Double-check that all bolts and connections are tight and that all components are properly seated.
Post-installation Procedures
- Reconnect Battery: Reconnect the negative battery terminal.
- Start the Engine: Start the Jeep and let it idle. Listen carefully for any exhaust leaks. Leaks often sound like a hissing or ticking noise, especially when the engine is cold.
- Check for Leaks: With the engine running, you can use a rag or a piece of hose to carefully feel around the manifold-to-head mating surface and the manifold-to-downpipe connection for any signs of escaping exhaust gases. Be extremely careful of hot engine components and moving parts.
- Warm-Up Drive: Take the Jeep for a short test drive. Pay attention to engine performance and listen for any unusual noises.
- Re-Torque (Optional but Recommended): Some manufacturers recommend re-torquing the manifold bolts after a heat cycle (after the engine has cooled down completely). Check your manifold’s instructions. This helps ensure a perfect seal as the materials