Jeep Wrangler Jk Coil Spring Spacer Install: Your Guide To A Smoother, Higher Ride
Many Jeep Wrangler JK owners dream of a lifted vehicle. A lift kit means bigger tires, better off-road capability, and that aggressive, iconic look.
But sometimes, a full suspension overhaul can feel like a big step, both in complexity and cost. What if you want a modest lift, improved ride height, and a bit more clearance without replacing your entire suspension system?
That's where coil spring spacers come in. These relatively simple components can offer a significant upgrade for your JK, providing that extra bit of height and improving your driving experience both on and off the pavement.
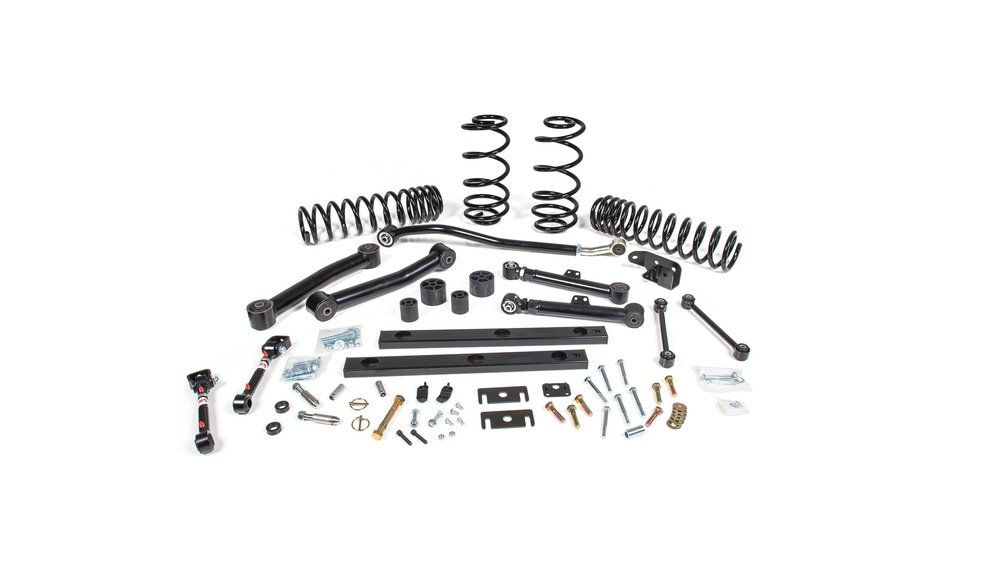
Installing coil spring spacers on your Jeep Wrangler JK is a popular and effective way to gain a few inches of lift. It’s a more budget-friendly and less labor-intensive option compared to a full suspension lift kit.
This guide will walk you through the process, explain what you need to know, and help you achieve that ultimate ride lift.
We’ll cover everything from understanding what spacers are and why you might want them, to the tools you’ll need, the step-by-step installation process, and some crucial tips for a successful job.
What Are Coil Spring Spacers?
Coil spring spacers, often called budget boost kits, are essentially pucks or blocks that are installed above or below your Jeep’s factory coil springs. They are designed to compress the spring slightly or take up space, effectively pushing the vehicle’s body higher off the axle. This results in an increase in ride height, commonly referred to as a lift.
These spacers are typically made from durable materials like polyurethane, rubber, or aluminum. The material choice can affect ride quality and longevity.
Polyurethane and rubber spacers tend to absorb some vibration, potentially leading to a slightly softer ride. Aluminum spacers are robust and durable but may transmit more road noise and vibration.
For a JK, spacers are usually designed to fit precisely into the spring seats, ensuring a secure fit.
The primary benefit of using coil spring spacers is the gain in ride height. This extra clearance is invaluable for several reasons:
- Larger Tires: A lifted Jeep can accommodate bigger tires. Bigger tires mean better traction, improved ground clearance over obstacles, and a more imposing look.
- Obstacle Clearance: Increased height helps your JK clear rocks, logs, and other trail hazards more easily, reducing the risk of damage to your undercarriage.
- Aesthetics: Many Jeep enthusiasts simply love the aggressive stance that a lifted vehicle provides.
- Cost-Effectiveness: Compared to a full suspension lift kit, which often involves new shocks, control arms, and sway bar links, spacers are a significantly more affordable option.
- Simpler Installation: While still requiring some mechanical skill, installing spacers is generally less complex and time-consuming than a full suspension replacement.
However, it's important to understand the limitations. Spacers primarily lift the body and do not typically change the suspension geometry.
This means they don't improve suspension travel or articulation in the same way a well-designed long-arm kit or even a complete short-arm lift kit might.
They are best suited for those looking for a moderate lift, often in the 1-3 inch range.
Types Of Coil Spring Spacers For The Jk
When you look for coil spring spacers for your Jeep Wrangler JK, you’ll primarily encounter two main types based on where they are installed:
- Top Mount Spacers: These spacers are installed on top of the factory coil springs, between the spring and the spring perch on the chassis. They are very common and often the easiest to install.
- Bottom Mount Spacers: These spacers are installed below the coil springs, between the spring and the axle’s spring seat.
There are also variations based on material and design:
- Polyurethane Spacers: These are very popular due to their durability and ability to absorb some shock and vibration, potentially offering a slightly more comfortable ride than harder materials. They are also resistant to corrosion.
- Aluminum Spacers: Known for their strength and longevity, aluminum spacers are a solid choice. However, they can sometimes contribute to a firmer ride and may be more prone to corrosion in certain environments if not properly coated.
- Steel Spacers: Less common for JK coil spacers but available, steel offers maximum strength but also adds significant weight and can transmit more harshness.
The amount of lift you get from a spacer depends on its thickness. Manufacturers usually specify the lift amount achievable with their specific spacer.
A 1-inch spacer might give you around 1 inch of lift, but due to the leverage of the suspension, a 2-inch spacer might yield closer to 2.
5 inches of lift. Always check the manufacturer’s specifications for the exact lift amount you can expect.
What You’ll Need: Tools And Parts
Before you start, gather all the necessary tools and parts. Having everything ready will make the installation process much smoother and safer.
Essential Tools:
- Safety Glasses: Absolutely crucial for eye protection.
- Gloves: To protect your hands.
- Jack and Jack Stands: A reliable floor jack and at least two sturdy jack stands are essential for safely lifting and supporting the vehicle. Never work under a vehicle supported only by a jack.
- Lug Wrench: To remove the wheels.
- Socket Set: You’ll need a range of metric sockets, likely including 13mm, 15mm, 17mm, 18mm, 19mm, and possibly larger sizes. A breaker bar will be very helpful for stubborn bolts.
- Wrenches: A set of metric wrenches, including combination wrenches.
- Torque Wrench: Essential for tightening bolts to the manufacturer’s specifications. This is critical for safety.
- Pry Bar or Lever: To help manipulate suspension components and position the spacers.
- Wire Brush: To clean rust and debris from bolt threads and mounting surfaces.
- Penetrating Oil (e.g., WD-40): To loosen rusted bolts.
- Spring Compressor (Optional but Recommended for Safety): While not always strictly necessary for spacer installation if done carefully, a spring compressor can help safely decompress and compress the coil spring if needed, especially if you are replacing shocks simultaneously or dealing with very tight springs. Use with extreme caution.
- C-Clamps (Heavy Duty): Can sometimes be used to help compress springs slightly if a compressor isn’t available, but this is a less safe method.
- Hose Clamp Pliers: For removing and reinstalling any hose clamps that might be in the way.
- Wire Ties or Bungee Cords: To secure brake lines or other components out of the way.
Parts:
- Coil Spring Spacers: Ensure you have the correct spacers for your Jeep Wrangler JK (2-door or 4-door) and the desired lift amount. Most kits are designed for 2-3 inches of lift.
- New Hardware (Optional but Recommended): Some kits come with new bolts, nuts, and washers. If yours doesn’t, it’s a good idea to have some high-strength hardware on hand, especially if your old bolts are rusted.
- Shocks (Optional Upgrade): While not strictly required for a spacer lift, if you are lifting your JK 2 inches or more, your factory shocks might be too short and could be over-extended, leading to a harsh ride or even damage. Many people opt for longer-travel shocks when installing spacers.
Step-by-step Installation Guide
Installing coil spring spacers on a Jeep Wrangler JK is a manageable DIY project. However, it requires patience, attention to detail, and a strong emphasis on safety. Here’s a detailed breakdown of the process:
Preparation And Safety First
- Park on a Level Surface: Ensure your JK is parked on a flat, stable surface.
- Engage Parking Brake: Set the parking brake firmly.
- Chock Wheels: Place wheel chocks behind the rear wheels if you’re working on the front, or in front of the front wheels if working on the rear.
- Loosen Lug Nuts: Before lifting the vehicle, slightly loosen the lug nuts on the wheels you’ll be removing. Just break them free; don’t remove them yet.
- Lift the Vehicle: Using your floor jack, lift the front or rear of the Jeep (depending on which axle you’re working on) until the wheels are completely off the ground.
- Secure with Jack Stands: Place jack stands securely under the frame or designated support points. Lower the vehicle onto the jack stands. Never rely solely on the jack.
Front Coil Spring Spacer Installation
The front installation typically involves working with the steering and potentially the sway bar links.
- Remove Front Wheel: Finish removing the lug nuts and take off the front wheel.
- Disconnect Sway Bar Link (if necessary): For lifts of 2 inches or more, you might need to disconnect the sway bar end link from the control arm or the sway bar itself. This usually involves removing a nut and bolt. This allows the axle to drop further.
- Support the Axle: Place a jack stand or a block of wood under the front differential or a strong point on the lower control arm to support the weight of the axle. This prevents it from dropping too far and straining brake lines or other components.
- Remove Lower Shock Bolt (if necessary): You may need to remove the bolt that secures the bottom of the front shock absorber to the axle bracket. This will give you more freedom to maneuver the spring.
- Remove Brake Line Bracket (if necessary): Sometimes, the brake line bracket attached to the frame or suspension needs to be unbolted to allow enough slack for the axle to drop. Be careful not to stretch or damage the brake line itself.
- Compress the Coil Spring: This is where things can get tricky. As the axle droops, the coil spring will start to extend. You want to create enough space to insert the spacer.
- If you have a spring compressor, use it according to its instructions to compress the spring slightly.
- Alternatively, with the axle supported, the spring might be loose enough to remove by hand or with a pry bar. You may need to push down on the lower control arm to release tension.
- Pro Tip: If the spring is still very tight, you might need to unbolt the upper control arm mount or the track bar, but this adds complexity and is usually not needed for simple spacer lifts.
- Insert the Coil Spring Spacer: Once you have enough clearance, insert the coil spring spacer into the top spring seat, between the coil spring and the frame perch. Ensure it sits flat and securely.
- Reassemble:
- If you compressed the spring, carefully release the spring compressor, allowing the spring to seat against the spacer and the lower seat.
- If you removed the spring, place it back into its seat, ensuring the ends are correctly positioned. Then, carefully lower the axle (or lift the spring) until the spring is compressed enough to allow you to reinstall the shock bolt and sway bar link.
- Reconnect the shock absorber, sway bar link, and any brackets you removed.
- Tighten all bolts to their specified torque values. Consult your Jeep’s service manual or the spacer kit’s instructions for torque specs.
Rear Coil Spring Spacer Installation
The rear installation is generally simpler as there’s no steering involved.
- Remove Rear Wheel: Loosen lug nuts, jack up the rear of the Jeep, and place it securely on jack stands. Remove the wheel.
- Support the Axle: Place a jack stand or block under the rear differential to support the axle’s weight.
- Remove Lower Shock Bolt (if necessary): You may need to remove the bottom shock bolt to allow the axle to droop further.
- Remove Brake Line Bracket (if necessary): Similar to the front, you might need to unbolt the brake line bracket to provide extra slack.
- Compress the Coil Spring: As the axle droops, the rear coil spring will become looser.
- You might be able to simply pull the spring out once the axle droops enough.
- If it’s still tight, you may need to use a pry bar to leverage the axle down further or slightly compress the spring.
- Insert the Coil Spring Spacer: Place the rear coil spring spacer on top of the coil spring, between the spring and the frame’s upper spring seat.
- Reassemble:
- Position the spring correctly. You might need to use the jack under the differential to slightly raise the axle to compress the spring enough to reinstall the shock bolt and any brackets.
- Reconnect the shock absorber and any brackets.
- Tighten all bolts to the correct torque specifications.
Final Checks And Torqueing
- Double-Check All Bolts: Go back over every bolt and nut you touched. Ensure they are present, properly seated, and tightened.
- Torque Everything: Use your torque wrench to tighten all suspension components, shocks, and sway bar links to the manufacturer’s recommended torque values. This is a critical safety step.
- Reinstall Wheels: Put the wheels back on and hand-tighten the lug nuts.
- Lower the Vehicle: Carefully remove the jack stands and lower the Jeep to the ground.
- Final Torque: With the vehicle’s weight on the wheels, torque the lug nuts in a star pattern to the manufacturer’s specification.
- Test Drive: Take a slow, careful test drive. Listen for any unusual noises (clunks, rattles). Check that the steering feels normal.
- Re-Torque After Driving: It is highly recommended to re-torque all suspension bolts and lug nuts after driving about 50-100 miles. Suspension components can settle, and bolts can loosen slightly.
Important Considerations And Potential Issues
While installing coil spring spacers is relatively straightforward, there are several important factors and potential issues to be aware of:
Ride Quality Changes
- Stiffer Ride: Adding spacers, especially thicker ones, can sometimes lead to a slightly stiffer ride. This is because the spring is pre-loaded more, and the shock absorbers might be operating outside their optimal range if they are still factory units.
- Shock Length: If you lift your JK 2 inches or more, your factory shocks might be too short. When the suspension droops, the shock can reach its full extension, causing a harsh ride and potentially damaging the shock. Many people pair spacer lifts with longer-travel shocks to compensate.
- Material Impact: As mentioned, the material of the spacer can influence ride