Understanding the Jeep TJ serpentine belt diagram is crucial for any owner who wants to maintain their vehicle's performance and prevent unexpected breakdowns. This belt, often called a drive belt or accessory belt, powers essential components like the alternator, power steering pump, and air conditioning compressor.
Knowing its path and how to inspect it can save you time and money on repairs. This guide will provide a detailed look at the serpentine belt system for Jeep TJ models, helping you identify parts, understand common issues, and know when replacement is necessary.
The serpentine belt is a single, continuous rubber belt that snakes around various pulleys on the engine. Its primary function is to transfer rotational energy from the crankshaft to other engine accessories.
Without a properly functioning serpentine belt, these accessories will not work, leading to a range of problems, from a dead battery to a loss of power steering.
For Jeep TJ owners, especially those who enjoy off-roading or live in areas with extreme weather, ensuring this belt is in good condition is a non-negotiable part of regular maintenance. This article aims to demystify the serpentine belt system, offering clear explanations and practical advice to keep your Jeep TJ running smoothly.
Understanding The Serpentine Belt System In A Jeep Tj
The serpentine belt system in a Jeep TJ is a relatively straightforward yet vital part of the engine’s operation. It’s a clever design that uses one belt to drive multiple accessories, simplifying the engine bay and reducing the number of parts compared to older V-belt systems.
The belt’s path is specific, dictated by the placement of the pulleys it must engage. Any deviation or issue with the belt or its associated pulleys can lead to significant problems.
Key Components Of The Serpentine Belt System
To properly understand the Jeep TJ serpentine belt diagram, it’s essential to identify the main components involved. Each part plays a specific role in ensuring the belt functions correctly and drives the necessary accessories.
- Crankshaft Pulley: This is the largest pulley and is directly connected to the engine’s crankshaft. It’s the source of rotational power that the serpentine belt transfers. The crankshaft pulley’s rotation is the primary driver for the entire system.
- Alternator Pulley: The alternator is responsible for generating electrical power to charge the battery and run the vehicle’s electrical systems. The alternator pulley spins the alternator’s internal rotor, creating electricity.
- Power Steering Pump Pulley: This pulley drives the power steering pump, which assists the driver in turning the steering wheel, especially at low speeds. Without this, steering can become very difficult.
- Water Pump Pulley: The water pump circulates coolant through the engine to prevent overheating. Its pulley is driven by the serpentine belt, ensuring the coolant flows continuously.
- Air Conditioning (A/C) Compressor Pulley: If your Jeep TJ is equipped with air conditioning, this pulley drives the A/C compressor. The compressor is responsible for circulating refrigerant to cool the cabin.
- Idler Pulley: The idler pulley is typically a smooth pulley that doesn’t drive an accessory. Its purpose is to maintain tension on the serpentine belt and guide it around obstacles, ensuring it stays in contact with the other pulleys and maintains proper tension. Some systems might have more than one idler pulley.
- Tensioner Pulley: This is perhaps one of the most critical components. The tensioner pulley is spring-loaded or hydraulic and applies constant pressure to the serpentine belt. This ensures the belt remains tight and doesn’t slip on the pulleys. A worn or weak tensioner can lead to belt slippage, noise, and premature belt wear.
How The Serpentine Belt Routes
The specific routing of the serpentine belt is determined by the engine configuration. For most Jeep TJ models (typically with the 4.0L inline-6 engine, though some might have the 2.5L 4-cylinder), the belt wraps around these pulleys in a precise pattern. This pattern is what a Jeep TJ serpentine belt diagram illustrates. The belt must engage with each pulley correctly to ensure all accessories receive power.
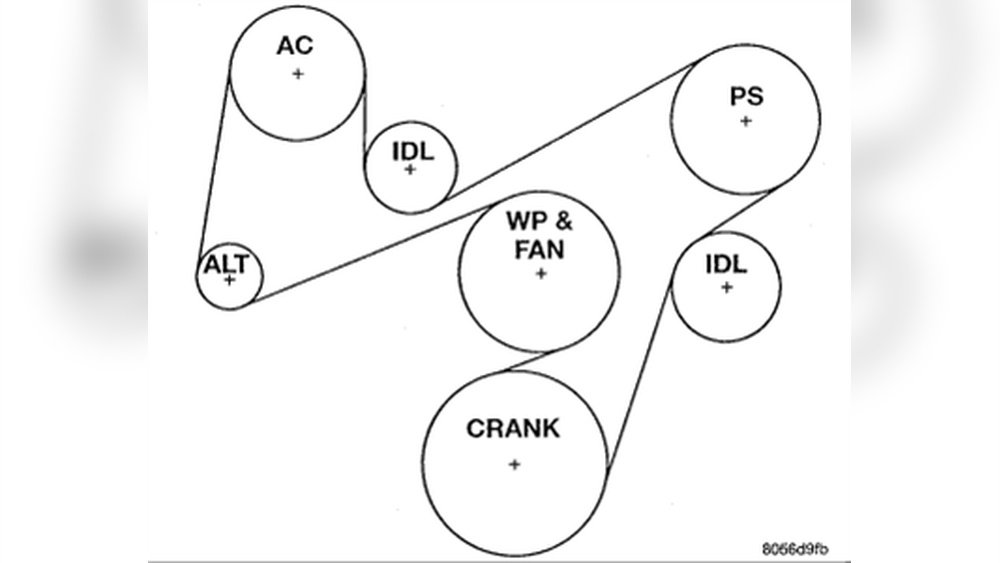
A common routing pattern might look something like this: the belt leaves the crankshaft pulley, wraps around the water pump, then goes up to the alternator, across to the power steering pump, down to the A/C compressor (if equipped), and then around an idler pulley before returning to the tensioner and finally back to the crankshaft pulley. The tensioner pulley is usually positioned so that it applies pressure to the longest, slackest section of the belt.
Importance Of Proper Belt Tension
Belt tension is paramount. If the belt is too loose, it will slip on the pulleys. This slippage can cause squealing noises, especially when starting the engine or under load (like when turning the steering wheel sharply or turning on the A/C). More importantly, slippage means the accessories are not being driven effectively. The alternator might not charge the battery properly, the water pump might not circulate coolant efficiently, and the power steering assist could be reduced. In severe cases, a loose belt can jump off its pulleys entirely, rendering all those accessories useless.
Conversely, a belt that is too tight can put excessive strain on the bearings of the pulleys it drives, including the alternator, power steering pump, and water pump. This can lead to premature bearing failure and costly repairs.
The automatic tensioner is designed to maintain the correct tension automatically, but it can wear out over time, or the belt itself can stretch, requiring replacement.
Locating And Understanding Your Jeep Tj Serpentine Belt Diagram
A Jeep TJ serpentine belt diagram is your visual guide to the correct routing of the drive belt. These diagrams are essential because the routing is not always intuitive, and getting it wrong can prevent your engine accessories from working or even damage components. Fortunately, Jeep often places these diagrams in accessible locations on the vehicle itself or provides them in the owner’s manual.
Where To Find The Diagram On Your Jeep Tj
The most convenient place to find a serpentine belt diagram is usually on a sticker located in the engine bay. Many manufacturers, including Jeep, will affix a decal to the radiator support, under the hood, or on a strut tower.
This sticker will graphically show the path the belt should take around the pulleys. This is incredibly useful for quick reference, especially if you’re performing a belt replacement on the side of the road or in a remote location.
If you cannot find a sticker, your Jeep TJ owner’s manual is the next best place to look. The manual contains detailed information about your vehicle’s maintenance, including diagrams for belt routing for different engine options. Always ensure you are looking at the diagram specific to your Jeep TJ’s engine size (e.g., 2.5L or 4.0L).
If both the sticker and the owner’s manual are missing, don’t despair. Numerous online resources, automotive forums, and repair websites provide accurate Jeep TJ serpentine belt routing diagrams for various model years. A quick search using terms like “Jeep TJ 4.0 serpentine belt diagram” will yield many results. However, always cross-reference information from multiple sources to ensure accuracy.
Interpreting The Diagram
A typical serpentine belt diagram will show an overhead view or a slightly angled view of the engine's front accessory drive. The pulleys will be represented by circles, often with labels indicating which accessory they drive (e.
g. , ALT for alternator, PS for power steering, WP for water pump, AC for A/C).
The path of the belt is shown as a line, usually a different color or thicker than the pulley outlines, snaking around the various components.
Pay close attention to:
- The starting point: Where the belt first engages.
- The direction of rotation: While not always explicitly shown, the belt should wrap smoothly around each pulley’s circumference.
- The tensioner: The diagram will show how the belt routes around the tensioner pulley. This is often the last pulley the belt engages with before returning to the crankshaft.
- Idler pulleys: If your TJ has an idler pulley, its position and how the belt interacts with it will be clearly marked.
Common Variations In Diagrams
While the core components are the same, there might be slight variations in serpentine belt routing between different model years of the Jeep TJ, or between the 4-cylinder and 6-cylinder engines. For instance, the presence or absence of an A/C system will alter the belt path, as the A/C compressor pulley will either be in use or bypassed by the belt.
Some models might use an automatic tensioner, while others might have a manual tensioner requiring adjustment. Always consult the diagram that matches your specific vehicle’s configuration.

Credit: collinsbrosjeep.com
Symptoms Of A Failing Serpentine Belt
A failing serpentine belt can manifest in several ways, often starting with subtle signs before becoming more serious. Recognizing these symptoms early can prevent you from being stranded and avoid more extensive damage.
Audible Clues
One of the most common indicators of a failing serpentine belt is noise.
- Squealing: A high-pitched squealing sound, especially noticeable when you first start the engine, accelerate, or turn the steering wheel, often points to a slipping belt. This can be due to the belt being loose, worn out, or contaminated with fluids like oil or coolant.
- Chirping: A persistent chirping sound can also indicate a worn belt or a pulley that is not spinning freely.
Visible Signs Of Wear
Regular visual inspection is key to catching belt issues before they become critical. Look for the following:
- Cracks: Small cracks on the belt’s surface are normal as it ages. However, deep or numerous cracks, especially running across the belt’s width (ribs), indicate the belt is becoming brittle and is close to failing.
- Fraying: If the edges of the belt appear worn, frayed, or are separating, it’s a clear sign of wear and potential imminent failure.
- Glazing: A shiny, smooth appearance on the belt’s ribs is called glazing. This happens when the belt slips excessively, hardening the rubber and reducing its grip on the pulleys. A glazed belt will likely continue to slip even if tension is correct.
- Contamination: Oil, coolant, or power steering fluid leaks can contaminate the belt. These fluids degrade the rubber, causing it to swell, soften, and lose its grip. If a belt is contaminated, it should be replaced, and the source of the leak must be addressed.
Performance Issues
A worn or damaged serpentine belt can lead to noticeable performance problems:
- Dimming Headlights/Dashboard Lights: If the alternator is not being driven effectively due to belt slippage or a worn belt, the battery may not be charging properly. This can cause dashboard warning lights to illuminate or lights to dim, especially at idle or when electrical loads are high.
- Loss of Power Steering: When the belt slips, the power steering pump doesn’t spin fast enough. This results in heavy steering, particularly at low speeds or when making sharp turns.
- Overheating: If the water pump pulley is not being driven sufficiently, coolant circulation will be impaired, potentially leading to engine overheating. The temperature gauge might rise into the red zone.
- A/C Not Working: If the A/C compressor pulley is not being driven, the air conditioning system will not cool.
Belt Jumping Off Pulleys
In severe cases, a worn belt, misaligned pulley, or failed tensioner can cause the serpentine belt to jump off one or more pulleys. If this happens, all accessories driven by the belt will immediately stop working.
This is a critical failure that requires immediate attention.
Replacing The Serpentine Belt On Your Jeep Tj
Replacing the serpentine belt on a Jeep TJ is a task that many DIY enthusiasts can handle with basic tools and a clear understanding of the process. The key is to have the correct Jeep TJ serpentine belt diagram and to follow the steps carefully.
Tools And Materials Needed
Before you begin, gather the necessary tools and parts:
- New Serpentine Belt: Ensure you purchase the correct belt for your specific Jeep TJ model year and engine (2.5L or 4.0L, with or without A/C).
- Socket Wrench Set: You’ll need sockets of various sizes, particularly one that fits the bolt on the tensioner pulley.
- Breaker Bar or Long-Handled Ratchet: This provides leverage to move the tensioner pulley.
- Safety Glasses: Protect your eyes from debris.
- Gloves: To protect your hands.
- Flashlight: For better visibility in the engine bay.
- The Serpentine Belt Diagram: Essential for correct routing.
Step-by-step Replacement Guide
- Locate the Tensioner Pulley: Find the automatic belt tensioner. It’s usually a spring-loaded assembly with a pulley on the end. There will be a bolt head on the tensioner housing that you can use to pivot it.
- Release Belt Tension: Attach the appropriate socket to the bolt head on the tensioner pulley. Use a breaker bar or a long-handled ratchet to rotate the tensioner pulley, which will move the entire tensioner assembly. This action loosens the belt.
- Remove the Old Belt: While holding the tensioner in the loosened position, carefully slip the old serpentine belt off one of the pulleys. A common strategy is to remove it from the highest or most accessible pulley first. Once it’s off one pulley, you can release the tensioner and remove the belt completely from the other pulleys.
- Route the New Belt: Refer to your Jeep TJ serpentine belt diagram. Begin routing the new belt around the pulleys according to the diagram. It’s often easiest to start with the crankshaft pulley (the lowest and largest) and then work your way around the other pulleys, leaving the tensioner pulley as the last one to engage.
- Apply Tension to the New Belt: Once the belt is routed around all pulleys except the tensioner, carefully maneuver it onto the tensioner pulley. You may need to use the breaker bar again to pivot the tensioner to create enough slack to get the belt onto its pulley.
- Release Tensioner and Check Routing: Slowly release the tension on the tensioner pulley. The tensioner should automatically take up the slack and apply the correct tension to the new belt. Double-check that the belt is seated correctly in the grooves of all pulleys. Ensure no part of the belt is riding on the edge of a pulley or is misaligned.
- Start the Engine and Inspect: Start the engine and let it run for a minute or two. Listen for any unusual noises like squealing or chirping. Visually inspect the belt while the engine is running to confirm it’s tracking straight on all pulleys and that the tensioner is operating smoothly. Turn off the engine.
Pro Tip: Inspect Pulleys During Replacement
While you have the serpentine belt off, it's an excellent opportunity to inspect the condition of all the pulleys. Spin each pulley by hand.
They should rotate smoothly and quietly. If you feel any roughness, hear grinding noises, or detect any wobble,