When your Jeep Rubicon, a vehicle built for serious off-roading, gets stuck in 4-wheel drive, it can be a puzzling and potentially frustrating situation. Unlike a typical car that might simply lose traction, a 4×4 system has more complex components.
Knowing why this happens and how to fix it can save you time, money, and a lot of hassle. This guide will explore the common reasons your Rubicon might be stuck in 4WD and provide clear, actionable solutions.
We'll cover everything from simple user errors to mechanical issues, ensuring you have the knowledge to get your Jeep back on the road or trail.
Understanding Jeep Rubicon’s 4wd System
Jeep’s 4×4 systems, especially in the Rubicon model, are designed for maximum capability. The Rubicon trim comes standard with the Rock-Trac® 4×4 system, which is a step up from the standard Command-Trac® system found on other Wranglers. Rock-Trac® features a 4:1 low-gear ratio, allowing for extremely slow crawling speeds, essential for tackling difficult terrain. It also includes electronic locking differentials (Tru-Lok®) front and rear, and a disconnecting front sway bar.
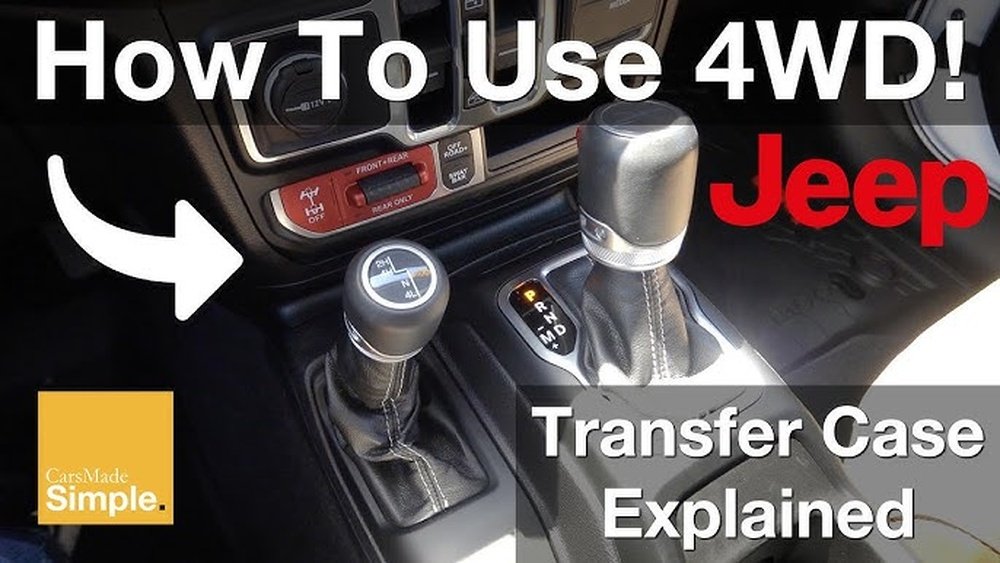
The transfer case is the heart of the 4WD system. In a Jeep Wrangler, the transfer case lever (or electronic button on newer models) allows you to select different modes:
- 2H (Two-Wheel Drive High): This is for normal driving on paved roads. Power is sent only to the rear wheels.
- 4H Auto (Four-Wheel Drive Auto): Available on some models, this mode automatically engages 4WD when wheel slip is detected.
- 4H (Four-Wheel Drive High): This mode engages all four wheels for increased traction on slippery surfaces like snow, ice, or mud. It’s generally used for speeds up to highway speeds.
- 4L (Four-Wheel Drive Low): This mode provides the most torque and is used for extreme off-roading, steep inclines, and crawling over obstacles at very low speeds. It multiplies engine torque by 4:1 (in the Rock-Trac® system).
When a Jeep Rubicon is “stuck” in 4WD, it means the vehicle is not disengaging from a 4WD mode (usually 4H or 4L) and returning to 2H, even when you try to shift it. This can manifest as a feeling of resistance when turning, a ‘clunking’ sound, or the 4WD indicator light staying on.
Common Reasons For Being Stuck In 4wd
Several factors can cause your Jeep Rubicon to remain engaged in 4WD. These range from simple user mistakes to more complex mechanical failures.
Understanding these reasons is the first step to diagnosing and resolving the issue.
1. Incorrect Shifting Procedure
The most common reason a Jeep might be stuck in 4WD is not following the correct procedure for engaging or disengaging it. Transfer cases, especially older manual ones, can be finicky if not operated correctly.
- Manual Transfer Case Lever: For Jeeps with a traditional transfer case lever (usually located next to the gear shifter), there are specific steps.
- To Engage 4H: You typically need to be moving slowly (around 5 mph or 8 km/h) and be in neutral. Push or pull the lever firmly into the desired position (4H or 4L). For 4L, you often need to be completely stopped, in neutral.
- To Disengage 4WD: The process is similar. You need to be moving slowly (around 5 mph or 8 km/h) and be in neutral. Pull the lever back to 2H.
- Electronic Transfer Case Buttons: Newer models use electronic buttons. While generally simpler, they still have requirements. You usually need to be in Park or Neutral, and the vehicle may need to be stationary or moving very slowly. The system often relies on sensors to confirm the correct gear selection.
What can go wrong:
- Trying to shift while moving too fast: Forcing the lever at speed can damage the transfer case or prevent it from shifting properly.
- Not being in Neutral: Many transfer cases will not shift if the transmission is in gear.
- Not moving at all (for 4H): Some systems require a slight rolling motion to allow the gears in the transfer case to mesh properly.
- Not waiting for confirmation: Electronic systems might require a moment for the actuators to engage or disengage the drive.
Pro Tip: Always consult your Jeep owner’s manual for the exact shifting procedure for your specific model year. The recommended speeds and conditions can vary.
2. Vacuum Leaks Or Actuator Issues
On some Jeep models, particularly older ones, vacuum lines are used to engage and disengage the front axle disconnect. If there’s a vacuum leak, the front axle might remain engaged even when you’ve shifted the transfer case back to 2H.
- How it works: When you shift into 2H, a vacuum actuator is supposed to disengage the front driveshaft from the front differential. If the vacuum system isn’t working due to a leak, a faulty actuator, or a disconnected hose, the front axle stays “locked” in.
- Symptoms: You’ll experience that tight, difficult-to-steer feeling, especially at lower speeds, and increased tire wear. The 4WD light might be off, but the vehicle will behave as if it’s in 4WD.
- Diagnosis: A mechanic can check for vacuum leaks using a smoke machine. They’ll also inspect the vacuum actuator on the front axle for damage or proper operation.
What can go wrong:
- Cracked or brittle vacuum hoses: Over time, rubber hoses can degrade and crack.
- Faulty vacuum actuator: The diaphragm inside the actuator can tear.
- Blocked vacuum lines: Debris can sometimes clog the lines.
3. Binding In The Drivetrain
This is a common issue, especially if you've been off-roading and engaged 4WD for extended periods on dry pavement. 4WD systems are designed for low-traction surfaces.
When used on high-traction surfaces like dry asphalt, the front and rear driveshafts are forced to turn at slightly different speeds.
This causes a buildup of rotational stress, or “binding,” in the drivetrain.
- Why it happens: In 4H or 4L, both driveshafts are mechanically locked together. On dry pavement, your tires are also locked to the road. When you turn, the front tires travel a greater distance than the rear tires. This difference in distance cannot be accommodated by a mechanically locked 4WD system, leading to stress.
- Symptoms: You’ll notice a tight, binding sensation, especially when making sharp turns at low speeds. The steering will feel heavy and resistant. You might hear popping or clunking noises from the drivetrain.
- How to fix it:
- Find a loose surface: Drive onto a gravel road, dirt path, or even a grassy area.
- Straighten the wheels: Drive straight for a short distance (10-20 feet).
- Shift to 2H: While moving slowly (around 5 mph) and in neutral, try shifting back to 2H. The loose surface allows the wheels to slip slightly, releasing the built-up tension and allowing the transfer case to disengage.
Pro Tip: Avoid using 4WD (especially 4H and 4L) on dry, paved surfaces unless absolutely necessary and for very short distances. It’s designed for snow, ice, mud, sand, and rocks.
4. Transfer Case Internal Issues
If the simpler solutions don’t work, the problem might lie within the transfer case itself. This is a more serious mechanical issue that will likely require professional attention.
- Worn or Damaged Components: Internal parts like synchronizers, gears, chains, or shift forks can wear out or break over time, especially after heavy use or improper shifting.
- Actuator Malfunction (Electronic Transfer Cases): Electronic transfer cases use electric motors and sensors to shift between modes. If the actuator motor fails, or if the sensors send incorrect data, it can get stuck in a particular mode.
- Low Transfer Case Fluid: While less likely to cause a “stuck” issue, extremely low fluid levels can lead to overheating and damage, potentially causing shifting problems.
What can go wrong:
- Shift fork breakage: A broken shift fork can prevent the internal components from moving to the correct position.
- Synchronizer failure: These help match the speed of gears for smooth shifting. If they fail, shifting can become difficult or impossible.
- Chain stretch or slippage: The chain that connects the gears in the transfer case can stretch over time, leading to poor performance and potential shifting issues.
- Electronic control module (ECM) problems: The computer that controls the electronic transfer case might malfunction.
Warning: Attempting to diagnose or repair internal transfer case issues without proper knowledge and tools can lead to further damage and costly repairs.

Diagnosing The Problem: Step-by-step
When you find yourself stuck in 4WD, don’t panic. Follow these steps to systematically diagnose the issue.
Step 1: Assess The Symptoms
First, pay close attention to what your Jeep is doing (or not doing).
- Is the 4WD indicator light on? If it’s on, the Jeep thinks it’s in 4WD. If it’s off, it might be a binding issue or a problem with the indicator light itself.
- How does the steering feel? Is it unusually heavy or stiff, especially at low speeds or during turns? This points towards a drivetrain binding issue or a stuck front axle engagement.
- Are there any unusual noises? Clunking, popping, or grinding sounds can indicate mechanical problems.
- Did this happen after off-roading or driving on pavement? This helps differentiate between binding and a mechanical fault.
Step 2: Check The Shifting Procedure
- If you have a manual lever:
- Find a safe, loose surface like dirt or gravel.
- Drive slowly (around 5 mph / 8 km/h).
- Shift the transmission into Neutral.
- Firmly move the transfer case lever back to the 2H position. You might need to wiggle the vehicle slightly or turn the steering wheel back and forth.
- If it shifts, drive straight for a bit to ensure all binding is released.
- If you have electronic buttons:
- Ensure the vehicle is stopped or moving very slowly.
- Select Neutral (if applicable, check your manual).
- Press the 2H button.
- Wait for the indicator light to confirm the change. If it doesn’t change, try shifting to Park, turning off the engine, waiting a minute, restarting, and trying again.
Step 3: Inspect Vacuum Lines (if Applicable)
If your Jeep is older and the above steps don’t work, and you suspect a vacuum issue:
- Visually inspect the vacuum hoses connected to the front axle disconnect actuator. Look for obvious cracks, breaks, or disconnections.
- If you’re comfortable, you can try to locate the vacuum source (often connected to the intake manifold) and trace the lines.
- Warning: If you’re not familiar with vacuum systems, it’s best to leave this to a mechanic. A misplaced hose can cause other issues.
Step 4: Listen For Drivetrain Binding
If you’re still in 4WD and can’t get out, and the steering feels tight:
- Drive onto a loose surface (gravel, dirt, grass).
- Drive straight for about 20-30 feet. This helps release tension.
- While moving slowly in neutral, attempt to shift to 2H again. The reduced traction on the loose surface should allow the system to release.
Step 5: Check Transfer Case Fluid
While low fluid is unlikely to cause a “stuck” situation directly, it’s good maintenance.
- Locate the transfer case fill plug (consult your manual).
- Ensure the fluid level is correct. It should typically be up to the bottom of the fill plug hole.
- If the fluid is very low or dirty, it might indicate a leak or internal wear.
Step 6: Consult A Professional
If none of the above steps resolve the issue, it's time to seek professional help. A qualified mechanic, especially one familiar with Jeeps and off-road vehicles, can diagnose more complex problems.
They have specialized tools to check sensors, actuators, and internal transfer case components.
Solutions And Fixes
The solution depends entirely on the cause of the problem.
Fixing Shifting Procedure Errors
- Action: Always follow the owner’s manual procedure precisely.
- Cost: Free (your time and patience).
- When it works: This is the most common fix and resolves the issue immediately.
Addressing Vacuum Leaks
- Action: Replace damaged vacuum hoses, repair or replace the vacuum actuator.
- Cost: $50 – $300, depending on the extent of the repair and parts needed. Hoses are cheap; actuators are more expensive.
- When it works: If the problem is specifically due to a faulty vacuum system engaging the front axle.
Releasing Drivetrain Binding
- Action: Drive on a loose surface, shift to 2H while moving slowly in neutral.
- Cost: Free.
- When it works: This is the solution for issues caused by using 4WD on dry pavement.
Repairing Transfer Case Issues
This is where costs can escalate significantly.
- Electronic Actuator Replacement:
- Action: Replace the electronic shift motor/actuator on the transfer case.
- Cost: $300 – $800 (parts and labor).
- Internal Transfer Case Repair/Rebuild:
- Action: Disassemble the transfer case, replace worn or broken parts (gears, chains, bearings, seals, shift forks).
- Cost: $1,000 – $3,000+, depending on the extent of damage and parts needed. A full rebuild is often the most reliable solution.
- Transfer Case Replacement:
- Action: Replace the entire transfer case unit with a new or remanufactured one.