The Jeep Cherokee XJ is a legend. For over 15 years, from 1984 to 2001, this compact SUV carved out a special place in the hearts of off-road enthusiasts and everyday drivers alike.
Its blend of rugged capability, practical size, and iconic styling made it incredibly popular. While the XJ is celebrated for its robust drivetrain and solid axles, like any vehicle that has spent decades on the road and trail, certain areas are prone to wear and tear.
Among these, the rocker panels are particularly crucial.
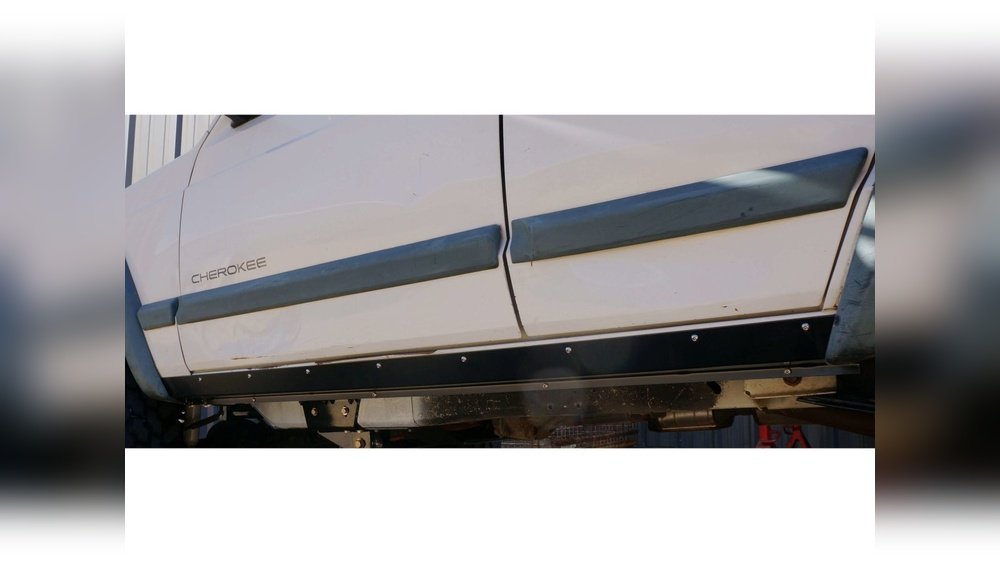
Rocker panels are the structural beams located on the lower sides of a vehicle’s body, between the front and rear wheels. They play a vital role in the structural integrity of the chassis, offering support and protecting the vehicle’s undercarriage from damage.
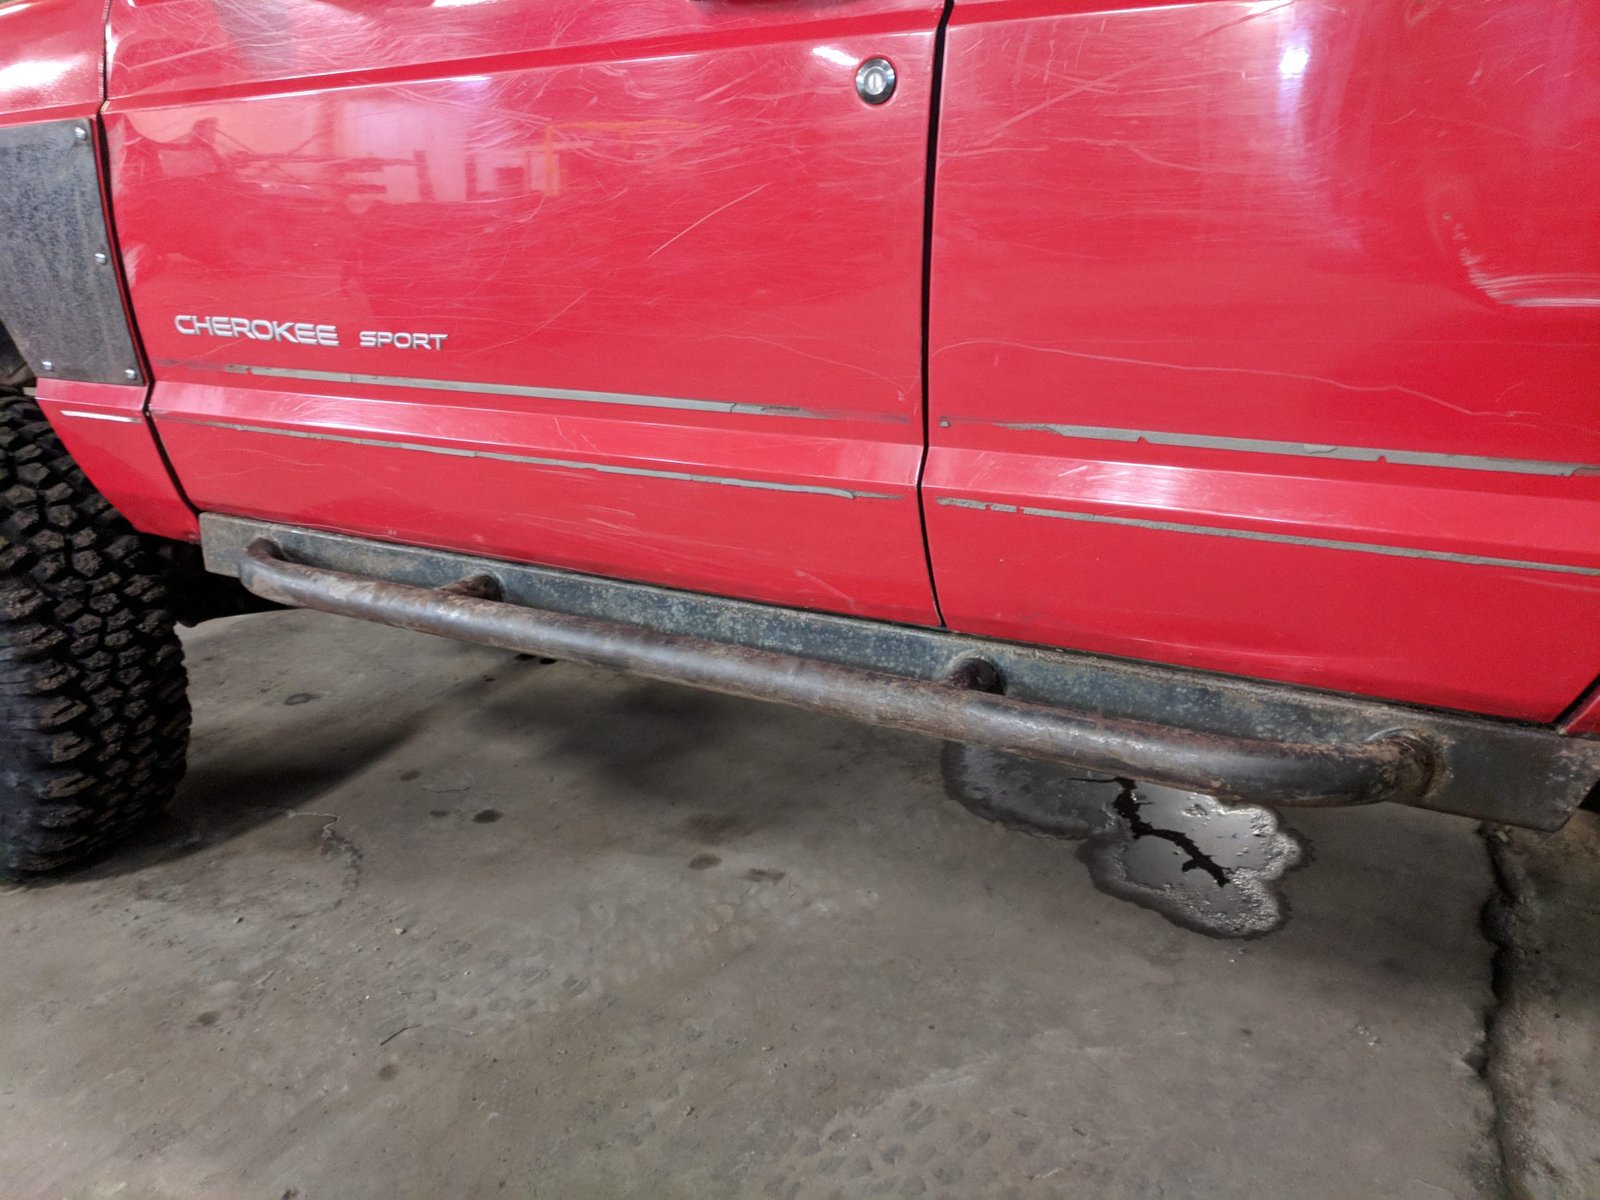
For the Jeep Cherokee XJ, these panels are not just about looks; they are essential for maintaining the vehicle’s strength, especially when subjected to the rigors of off-roading. Rust, impact damage from rocks, and general wear can all compromise these critical components.
Replacing or reinforcing them is a common and necessary task for many XJ owners looking to preserve their beloved Jeeps. This guide will explore everything you need to know about Jeep Cherokee XJ rocker panels, from their function and common issues to repair, replacement, and upgrade options.
Understanding The Role Of Rocker Panels On Your Jeep Cherokee Xj
The rocker panels on your Jeep Cherokee XJ are more than just decorative trim. They are a fundamental part of the vehicle’s unibody construction. Unlike body-on-frame vehicles, the XJ’s body and frame are integrated into a single structure. This means the rocker panels are integral to the overall structural rigidity and strength of the entire vehicle.
Structural Integrity And Support
Think of the rocker panels as the spine of your XJ’s lower body. They connect the front and rear sections of the vehicle, providing a strong base. When you take your Cherokee off-road, especially over uneven terrain, the chassis experiences significant flexing. The rocker panels help distribute these stresses, preventing the unibody from twisting or breaking. Without sound rocker panels, the entire structure of your Jeep can weaken, leading to potential issues with door alignment, window sealing, and even overall handling.
Protection From The Elements And Debris
Beyond their structural duties, rocker panels act as a shield. They protect the vulnerable undercarriage of your Jeep from rocks, branches, mud, and other debris encountered on trails. They also help to prevent road salt and moisture from reaching the inner body structure, which is a primary cause of rust in many vehicles. For an off-road-focused vehicle like the XJ, this protective function is paramount.
Aesthetics And Finish
While function is key, rocker panels also contribute to the overall visual appeal of the Jeep Cherokee XJ. Whether they are painted to match the body, feature a protective coating, or are part of a more aggressive off-road build, they frame the lower part of the vehicle. Damaged or rusted rocker panels can significantly detract from the appearance of even the most well-maintained XJ.
Common Problems Affecting Jeep Cherokee Xj Rocker Panels
Given their location and function, Jeep Cherokee XJ rocker panels are susceptible to several common issues, primarily related to corrosion and impact damage.
Rust And Corrosion
This is arguably the most prevalent problem for XJ rocker panels, especially for Jeeps that have lived in areas with harsh winters or high humidity. Moisture, salt, and dirt can get trapped in the seams and crevices of the rocker panels. Over time, this leads to surface rust that can quickly penetrate the metal, causing perforation and weakening the panel significantly.
The inner structure of the rocker panel, often referred to as the rocker box or reinforcement, is also a prime area for rust. This hidden area can be severely corroded without obvious outward signs until it’s too late. If left unaddressed, rust can spread to the floor pans and other structural components, leading to extensive and costly repairs.
Impact Damage
Off-roading, by its very nature, involves driving over obstacles. Rocks, stumps, and other trail hazards can strike the lower sides of your Jeep.
While the factory rocker panels offer some protection, they can be dented, bent, or even punctured by significant impacts.
This damage can compromise their structural integrity and also create areas where water and dirt can collect, accelerating rust.
Wear And Tear From Modifications
Many XJ owners modify their Jeeps for increased off-road capability. This can include adding rock sliders, which are heavy-duty protective bars designed to take the brunt of impacts. However, sometimes the original rocker panels are removed or modified to accommodate these sliders. Improper installation or the removal of necessary support can lead to issues. Also, some aftermarket rocker panel replacements might not offer the same level of structural reinforcement as the original design if not chosen carefully.
Repairing Your Jeep Cherokee Xj Rocker Panels
When your XJ’s rocker panels show signs of damage, you have a few options, ranging from minor repairs to complete replacement. The best approach depends on the extent of the damage.
Minor Rust Repair
For small areas of surface rust, a DIY repair might be feasible. This typically involves:
- Cleaning: Thoroughly clean the affected area to remove dirt, grease, and loose rust.
- Grinding: Use a wire brush attachment on a grinder or drill to remove all visible rust down to bare metal.
- Treating: Apply a rust converter or metal primer to the bare metal to prevent further corrosion.
- Filling: For minor pitting or small holes, use a body filler designed for automotive use. Sand it smooth once cured.
- Painting: Apply several coats of primer, followed by color-matched paint and a clear coat for protection and aesthetics.
Pro Tip: Even with minor rust, it’s crucial to inspect the inside of the rocker panel. A small rust spot on the outside can hide extensive corrosion within.
Welding Repair For Perforated Panels
If the rust has eaten through the metal, creating holes, welding is usually necessary. This is a more involved repair and often requires cutting out the rusted sections and welding in new metal.
- Cutting: Carefully cut out all rusted metal using a cutting wheel or jigsaw. Ensure you cut back to clean, solid metal.
- Fabrication/Patching: You can either fabricate new rocker panel sections from sheet metal or purchase patch panels specifically designed for the XJ.
- Welding: Weld the new metal or patch panel into place. This requires welding skills and equipment. Proper weld penetration is critical for structural integrity.
- Finishing: Grind down the welds smooth, apply rust inhibitor, primer, filler (if needed), paint, and clear coat.
This type of repair is often best left to experienced welders or body shops, especially if structural integrity is a concern.
Replacing Rocker Panels
For severely rusted or damaged rocker panels, complete replacement is the most effective solution. This is a significant undertaking and can be done using either OEM (Original Equipment Manufacturer) parts or aftermarket replacement panels.
Oem Vs. Aftermarket Panels
- OEM Panels: These are original parts from Jeep. They offer the best fit and are designed to match the factory specifications. However, they can be expensive and sometimes difficult to source for older vehicles like the XJ.
- Aftermarket Panels: These are manufactured by third-party companies. They are often more affordable and readily available. Quality can vary significantly between manufacturers, so it’s important to choose reputable brands known for good fitment and durability. Some aftermarket panels are also designed with off-road use in mind, offering increased strength or features for mounting accessories.
The Replacement Process
Replacing rocker panels typically involves:
- Removing Interior Trim: This includes door sills, carpet, and any plastic trim panels covering the rocker area.
- Accessing the Old Panel: The old rocker panel is usually spot-welded or riveted in place. These fasteners need to be drilled out or cut.
- Cutting Out the Old Panel: Similar to patch repairs, the entire rusted or damaged rocker panel section needs to be cut away.
- Fitting the New Panel: The new panel is positioned and secured, often with temporary clamps.
- Welding the New Panel: The new rocker panel is then welded into place. This is a critical step for ensuring structural soundness. Multiple weld points are necessary.
- Finishing: After welding, the area is ground smooth, treated for corrosion, primed, filled, painted, and clear-coated to match the rest of the vehicle.
This job is labor-intensive and requires significant welding and bodywork skills. Many owners opt to have this done professionally.
Upgrading Your Jeep Cherokee Xj Rocker Panels For Off-roading
For many Jeep Cherokee XJ owners, the goal isn’t just to restore the rocker panels but to upgrade them for enhanced off-road performance and protection. This is where rock sliders come into play.
What Are Rock Sliders?
Rock sliders are heavy-duty steel bars or plates designed to protect the rocker panels and the lower body of the Jeep from damage during off-road excursions. They are typically mounted directly to the vehicle’s frame or reinforced unibody structure, providing a robust barrier against rocks, logs, and other obstacles.
Types Of Rock Sliders
There are several common designs for XJ rock sliders:
- Tube Style: These consist of one or more steel tubes that run along the length of the rocker panel. They offer excellent protection and often provide a good stepping surface. They can be designed to protect just the rocker or extend slightly to cover the lower door area as well.
- Slick Rock Sliders: These are typically fabricated from thick steel plate and are designed to be smooth and angled. This allows the vehicle to slide over obstacles rather than getting hung up on them. They offer maximum protection and are popular for serious rock crawling.
- Bolt-On vs. Weld-On:
- Bolt-on sliders are designed to attach to existing frame points or pre-drilled holes. They are easier to install for DIYers but might not offer the same level of strength as weld-on versions.
- Weld-on sliders are welded directly to the frame or unibody structure. This provides the strongest and most secure mounting, essential for heavy-duty off-roading.
Benefits Of Upgrading To Rock Sliders
- Superior Protection: They absorb impacts that would otherwise damage or destroy factory rocker panels.
- Structural Reinforcement: Well-mounted sliders can add rigidity to the vehicle’s chassis.
- Hi-Lift Jack Points: Many sliders are designed with integrated Hi-Lift jack points, allowing for safe and secure lifting of the Jeep on the trail.
- Accessory Mounting: Some designs allow for the mounting of additional accessories.
- Aesthetics: They give the XJ a more aggressive, off-road-ready look.
Considerations When Choosing Rock Sliders
- Material: High-strength steel (like DOM tubing or thick plate steel) is preferred for durability.
- Mounting Method: Weld-on offers the strongest connection, but bolt-on can be sufficient for many applications. Ensure the mounting design is robust.
- Coverage: Decide how much protection you need. Do you want to protect only the rocker panel, or also the lower door and body seams?
- Ground Clearance: Ensure the sliders don’t significantly reduce your ground clearance.
- Weight: Steel sliders add weight, which can affect fuel economy and performance.
Many aftermarket companies offer bolt-on and weld-on rock sliders specifically designed for the Jeep Cherokee XJ. Popular brands include Smittybilt, Rock Hard 4×4, and JCR Offroad. Researching reviews and understanding your specific off-roading needs will help you choose the best option.
Installation Of Aftermarket Rocker Panels Or Rock Sliders
Installing aftermarket rocker panels or rock sliders can range from a straightforward bolt-on job to a complex welding project. Understanding the process is key to a successful installation.
Preparing For Installation
Before you begin, gather all necessary tools and materials. This might include:
- Safety Gear: Gloves, safety glasses, ear protection.
- Tools: Socket set, wrenches, drill with various bits (including step bits and possibly a hole saw), angle grinder, wire brush, measuring tape, C-clamps, welding equipment (if applicable).
- Cleaning Supplies: Degreaser, rags.
- Paint/Coating: Primer, paint, clear coat, or a bedliner-type coating for protection.
Bolt-on Rocker Panel Or Slider Installation
- Clean the Area: Thoroughly clean the mounting area on the underside of your XJ.
- Position the Panel/Slider: Place the new part against the vehicle. Use C-clamps to hold it in place.
- Mark Mounting Holes: If not pre-drilled, mark the locations for the mounting holes on the vehicle’s body or frame.
- Drill Holes: Drill the mounting holes using the appropriate drill bit size.
- Install Hardware: If the sliders require a reinforcement plate or bracket on the inside, install these first. Then, attach the slider using the provided bolts, nuts, and washers. Tighten securely.
- Check for Clearance: Ensure the installed parts do not interfere with doors, suspension components, or other parts of the vehicle.
- Paint/Protect: For any newly drilled holes or exposed metal, apply primer and paint to prevent rust.
Weld-on Rocker Panel Or Slider Installation
- Remove Old Panels (if necessary): If you are replacing the factory rocker panels entirely, follow the cutting and removal steps outlined earlier.
- Prepare Mounting Surfaces: Thoroughly clean the areas where the new panels or sliders will be welded. This might involve grinding away rust, paint, and undercoating to reach clean metal.
- Position and Clamp: Carefully position the new rocker panels or sliders. Use C-clamps or welding magnets to hold them firmly in place. Double-check alignment and ensure they are level or at the desired angle.
- Tack Weld: Once positioned correctly, apply small tack welds at several points to hold the piece in place. Check alignment again.
- Full Welding: Proceed to apply full welds along the seams. Aim for good penetration to ensure a strong bond. Work in short sections to avoid overheating the metal.
- Grind Welds: After welding and cooling, use an angle grinder to smooth down the welds for a cleaner appearance and to prepare for finishing.