Replacing Your Jeep Cherokee Side View Mirror: A Comprehensive Guide
A cracked or missing side view mirror on your Jeep Cherokee isn't just an eyesore; it's a significant safety hazard. These mirrors are crucial for visibility, helping you check blind spots, change lanes safely, and park with confidence.
Driving with a damaged mirror can lead to accidents and hefty fines.
Fortunately, replacing a Jeep Cherokee side view mirror is a manageable DIY project for many owners, saving you money on labor costs. This guide will walk you through the process, from identifying the right mirror to securely installing it.
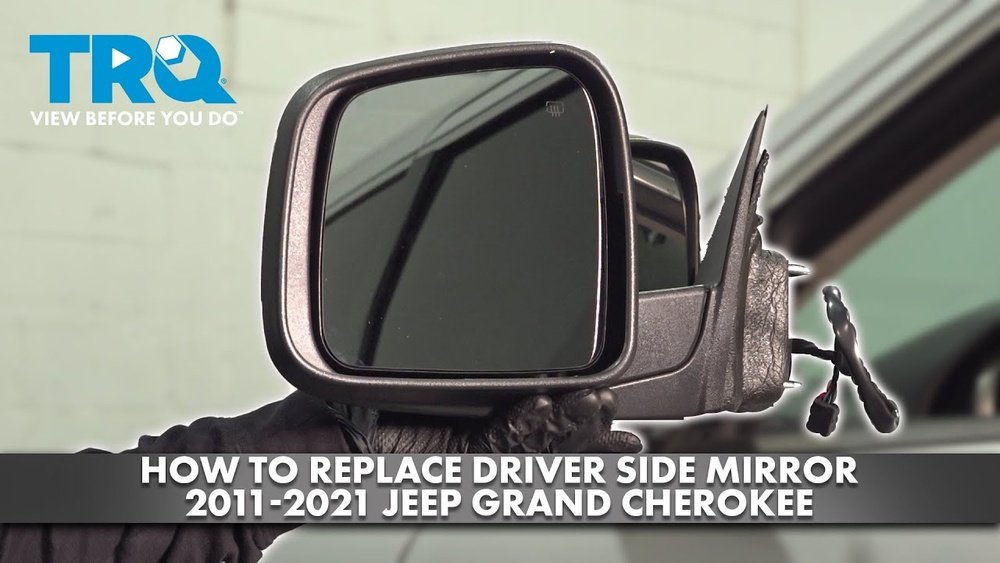
Choosing the correct replacement mirror is the first critical step. Jeep Cherokees have been produced for many years, and different model years and trim levels can have different mirror assemblies.
You need to ensure the new mirror is compatible with your specific vehicle.
Factors like power adjustments, heating elements, turn signal indicators, and even the number of pins on the electrical connector must match. Taking the time to research and purchase the correct part will prevent frustration and ensure a successful installation.
Understanding Your Jeep Cherokee Side View Mirror
Before you can replace your mirror, it’s important to understand the different types and features available for the Jeep Cherokee. These vehicles have seen many generations, and the technology and options for side view mirrors have evolved.
Types Of Side View Mirrors
Jeep Cherokees can be equipped with various types of side view mirrors, depending on the year and trim level. The most common types include:
- Manual Mirrors: These are the most basic type. You adjust them by hand from inside the vehicle. They typically have a simple ball-and-socket joint.
- Power Mirrors: These allow you to adjust the mirror’s angle using a control panel, usually located on the driver’s side door or dashboard. This is a common feature on most modern Cherokees.
- Heated Mirrors: Many Cherokees come with heated mirrors, which have a heating element embedded in the glass. This feature is invaluable in cold climates, as it quickly defrosts or defogs the mirror surface, improving visibility.
- Mirrors with Turn Signals: Higher trim levels or newer models often integrate turn signal indicators directly into the mirror housing. These help other drivers see your intentions more clearly.
- Auto-Dimming Mirrors: Some luxury trims might feature auto-dimming capabilities, which reduce glare from headlights at night.
Identifying Your Specific Mirror Needs
To ensure you buy the correct replacement, you need to know the exact specifications of your current mirror.
- Model Year and Trim: This is the most important information. A 2015 Cherokee Latitude will likely have different mirror options than a 2026 Cherokee Trailhawk.
- Power vs. Manual: Check if your current mirrors are power-adjustable. If they are, you’ll need a power mirror replacement.
- Heated Functionality: Does your mirror have a defrosting element? You can often tell by looking at the back of the mirror glass or checking if there’s a button on your dashboard related to mirror heating.
- Turn Signal: Look for a clear or amber light integrated into the side mirror housing.
- Connector Pins: If you’re replacing the entire assembly, counting the pins on the electrical connector (if applicable) is crucial for power mirrors. This ensures the wiring harness will connect properly.
Pro Tip: The easiest way to identify the correct mirror is to find the Vehicle Identification Number (VIN) of your Jeep Cherokee. You can then use online parts catalogs or consult with a dealership or auto parts store, providing your VIN to get an exact match.
Gathering Your Tools And Supplies
Before you start the replacement process, ensure you have all the necessary tools and supplies. Having everything ready will make the job smoother and faster.
Essential Tools
The tools required can vary slightly depending on whether you’re replacing just the mirror glass or the entire mirror assembly.
- Screwdrivers: You’ll likely need a Phillips head screwdriver and possibly a flathead screwdriver for prying. A set with various sizes is recommended.
- Socket Set or Wrenches: Some mirror assemblies are held on by nuts, requiring a socket set or wrenches. Common sizes are often 10mm or 13mm.
- Trim Removal Tools: Plastic trim removal tools are highly recommended. They allow you to pry away interior door panels and trim pieces without scratching or damaging them. Metal tools can easily mar the plastic.
- Wire Strippers/Cutter: If you need to splice wires for a new mirror with different features (though this is generally not recommended for a simple replacement), you’ll need these.
- Electrical Tape or Wire Connectors: For securing electrical connections if needed.
- Gloves: To keep your hands clean and provide a better grip.
- Safety Glasses: To protect your eyes from any debris.
- Towel or Soft Cloth: To protect the paintwork when leaning tools or parts against the vehicle.
Replacement Parts
- Replacement Mirror: Ensure you have the correct side view mirror for your Jeep Cherokee model year and features. This could be just the mirror glass or the entire mirror assembly (housing, glass, and internal components).
- New Fasteners (Optional): Sometimes, the old bolts or nuts can be rusted or damaged. It’s a good idea to have replacements on hand if needed.
Step-by-step Guide: Replacing The Mirror Glass
Replacing just the mirror glass is often the simplest fix if the housing and internal mechanisms are still intact. This is usually the case if the mirror was cracked or shattered but the mirror still moves and powers up correctly.
1. Accessing The Mirror Glass
- Adjust the Mirror: Use the power controls (if equipped) to move the mirror glass to an extreme position. For example, move it all the way down and inward. This often creates a small gap between the glass and the mirror housing, making it easier to get a tool underneath.
- Pry Gently: Carefully insert a trim removal tool or a thin, flathead screwdriver (wrapped in tape to prevent scratching) into the gap. Gently pry the mirror glass away from the backing plate. You should feel or hear small clips releasing. Work your way around the edges until the glass pops free.
- Disconnect Wires (if applicable): If your mirror has heating elements or auto-dimming features, there will be wires connected to the back of the glass. Carefully disconnect these by unplugging the small connectors.
2. Installing The New Mirror Glass
- Connect Wires: Attach the wires from the new mirror glass to the corresponding connectors on the vehicle. Ensure they are securely plugged in.
- Align and Press: Position the new mirror glass over the backing plate. Align the mounting points on the glass with the clips or studs on the backing plate.
- Secure the Glass: Gently but firmly press the mirror glass into place. You should hear or feel the clips snap into position, securing the glass.
- Test Functionality: Before reassembling any interior panels, turn on your Jeep and test the mirror’s movement using the power controls. Check that the heating element (if applicable) works by turning on your defroster.
Example: When I replaced the mirror glass on my own older SUV, I found that moving the mirror all the way up and outwards gave me the best access to pry from the bottom edge.
Step-by-step Guide: Replacing The Entire Mirror Assembly
Replacing the entire side view mirror assembly is a more involved process but is necessary if the housing is damaged, the internal motor fails, or if you’re upgrading to a mirror with more features (like turn signals).
1. Removing The Interior Door Panel
This is often the most time-consuming part, as it involves carefully detaching the door panel without breaking clips or damaging wiring.
- Locate Fasteners: Inspect the door panel for screws. These are often hidden behind small covers in the door handle recess, armrest, or along the edges. Use a trim tool to pop off these covers and remove the screws.
- Pry the Panel: Once screws are removed, start using your trim removal tools to gently pry the panel away from the door frame. Work your way around the entire perimeter. You’ll hear clips releasing. Be patient and avoid yanking the panel.
- Disconnect Electrical Connectors: As you pull the panel away, you’ll encounter electrical connectors for window switches, door locks, speakers, and interior lights. Carefully disconnect these by pressing the release tabs on the connectors.
- Lift the Panel: Once all clips and connectors are free, lift the door panel upwards and away from the door frame. Some panels might have a cable for the interior door handle; disconnect this as well.
2. Detaching The Old Mirror Assembly
- Locate Mounting Bolts/Nuts: Inside the door, behind the door panel, you’ll find the mounting points for the side view mirror assembly. These are typically nuts or bolts securing the assembly to the door frame.
- Disconnect Electrical Harness: Locate the electrical connector for the mirror assembly. Unplug it. This may require pressing a release tab.
- Remove Fasteners: Use your socket set or wrenches to remove the nuts or bolts holding the mirror assembly in place. Keep these fasteners safe, as you may need to reuse them.
- Remove the Mirror: Carefully pull the old mirror assembly away from the exterior of the door. You might need to gently wiggle it to free it from any adhesive or seals.
3. Installing The New Mirror Assembly
- Position the New Mirror: Place the new mirror assembly onto the door from the outside. Ensure it sits flush against the door frame and aligns with the mounting holes.
- Secure with Fasteners: From the inside of the door, re-install the nuts or bolts that hold the mirror assembly. Tighten them securely, but avoid over-tightening, which could strip the threads or crack the plastic.
- Connect Electrical Harness: Plug the electrical connector of the new mirror assembly into the vehicle’s wiring harness. Ensure it clicks into place.
- Test Functionality: Before reattaching the door panel, turn on your Jeep and test all the features of the new mirror: power adjustment, heating, turn signals, etc. This is your last chance to easily fix any issues.
4. Reassembling The Door Panel
- Reconnect Electrical Connectors: Reconnect all the electrical connectors you disconnected earlier.
- Re-hang the Panel: Align the door panel with the door frame and gently push it back into place. Ensure the top edge is seated correctly.
- Secure with Clips: Work your way around the panel, pushing firmly to re-engage the clips.
- Re-install Screws: Re-install any screws and their covers.
- Final Check: Test all door controls, including windows and locks, to ensure everything is working correctly.
Common Issues And Troubleshooting
Even with careful work, you might encounter a few snags during the replacement process. Here’s how to handle common problems.
Mirror Not Moving After Installation
If you’ve installed a power mirror and it doesn’t move, the issue could be:
- Loose Electrical Connection: Double-check that the mirror’s electrical connector is fully seated in the vehicle’s harness.
- Incorrect Connector: Ensure you plugged the correct connector into the mirror. Sometimes there are similar-looking connectors inside the door.
- Faulty New Mirror: Although rare, the new mirror assembly itself might be defective.
- Blown Fuse: Check your Jeep’s fuse box for a blown fuse related to the power mirrors. Consult your owner’s manual for the correct fuse location and rating.
Broken Clips On Door Panel
If you accidentally break a plastic clip on the door panel, don't panic. You can often purchase replacement clips from auto parts stores or online.
For minor breaks, sometimes a strong adhesive like "E6000" can help secure the panel if the clip is partially intact.
Water Leaks After Assembly
If you notice water leaking into the cabin after replacing the mirror assembly, it likely means the seal between the mirror base and the door is compromised.
- Check Gasket/Seal: Ensure the new mirror assembly came with a proper gasket or seal, and that it was installed correctly and seated evenly.
- Tighten Fasteners: The mounting nuts/bolts might not be tight enough, allowing water to seep in. Try tightening them slightly.
- Apply Sealant (Last Resort): In some cases, applying a thin bead of automotive-grade silicone sealant around the base of the mirror housing where it meets the door can create a watertight seal. Do this sparingly and carefully to avoid a messy appearance.
Heated Mirror Not Working
If the heated mirror function isn’t working:
- Check Fuse: As with power mirrors, a blown fuse is a common culprit.
- Verify Connection: Ensure the wires for the heating element are securely connected to the mirror glass or the vehicle harness.
- Test Voltage: If you have a multimeter, you can test if voltage is reaching the mirror’s heating element when the defroster is on. If voltage is present but the mirror isn’t heating, the element itself is likely faulty.
Warning: Working with electrical components can be dangerous. If you are unsure about testing voltage or handling wiring, it’s best to consult a professional mechanic.
When To Call A Professional
While replacing a Jeep Cherokee side view mirror is often a DIY-friendly task, there are situations where calling a professional mechanic is the wiser choice.
- Complex Features: If your Cherokee has advanced features like integrated cameras, blind-spot monitoring systems, or power-folding mirrors, the installation can be significantly more complex. These systems often involve intricate wiring and calibration that may require specialized tools and knowledge.
- Lack of Confidence or Tools: If you don’t have the right tools, feel uncomfortable working with car interiors, or are worried about damaging your vehicle, it’s always best to let a professional handle it. The cost of a mechanic is often less than the cost of repairing accidental damage.
- Persistent Issues: If you’ve attempted the replacement yourself and are experiencing ongoing problems (like electrical issues or leaks) that you can’t resolve, a mechanic can diagnose and fix the issue efficiently.
- Body Damage: If the damage to your mirror is a result of a larger accident and there’s associated body damage to the door or A-pillar, a professional body shop will be better equipped to handle the repair.
Cost Comparison: Diy Vs. Professional
The cost of replacing a side view mirror can vary significantly. Here’s a general idea:
| Component Replaced | Estimated DIY Cost (Parts) | Estimated Professional Cost (Parts + Labor) |
|---|
| Mirror Glass Only | $20 – $70 | $100 –