Replacing body mounts on a vehicle can make a surprising difference in ride comfort and safety. Over time, these rubber or polyurethane cushions wear out. Cracks, squished mounts, or even rusted bolts can cause unwanted vibrations, rattling, and body misalignment. While this job may sound complex, with some planning, the right tools, and safety steps, many car owners can tackle it themselves and save on labor costs.
What Are Body Mounts And Why Replace Them?
Body mounts connect the vehicle’s body to its frame. They absorb shocks and reduce vibrations coming from the road. When these mounts break down, you might notice:
- Uneven gaps between body panels
- Squeaks or rattling noises
- Harsh or bumpy ride
- Doors that don’t close smoothly
Replacing worn mounts restores stability and helps prevent further damage. Ignoring them can lead to larger issues, such as frame misalignment.
Tools And Materials Needed
Before starting, gather these essential items:
- Socket set and wrenches (metric and SAE)
- Floor jack and jack stands
- Breaker bar or impact wrench
- Penetrating oil (like PB Blaster)
- Replacement body mount kit (rubber or polyurethane)
- Wood blocks (to protect frame and body during lifting)
- Torque wrench
- Safety glasses and gloves
Some vehicles may require special tools. Check your service manual for any unique fasteners or procedures.
Step-by-step Guide To Replacing Body Mounts
1. Preparation And Safety
Always work on a flat, stable surface. Wear protective gear. Chock the wheels and disconnect the battery to avoid electrical shorts. Spray all body mount bolts with penetrating oil at least a few hours before, or even the night before, to loosen rust.
2. Lifting The Vehicle
Use a floor jack under the frame, not the body. Support the vehicle securely with jack stands. Place wood blocks between the jack and the frame to spread weight and prevent damage.
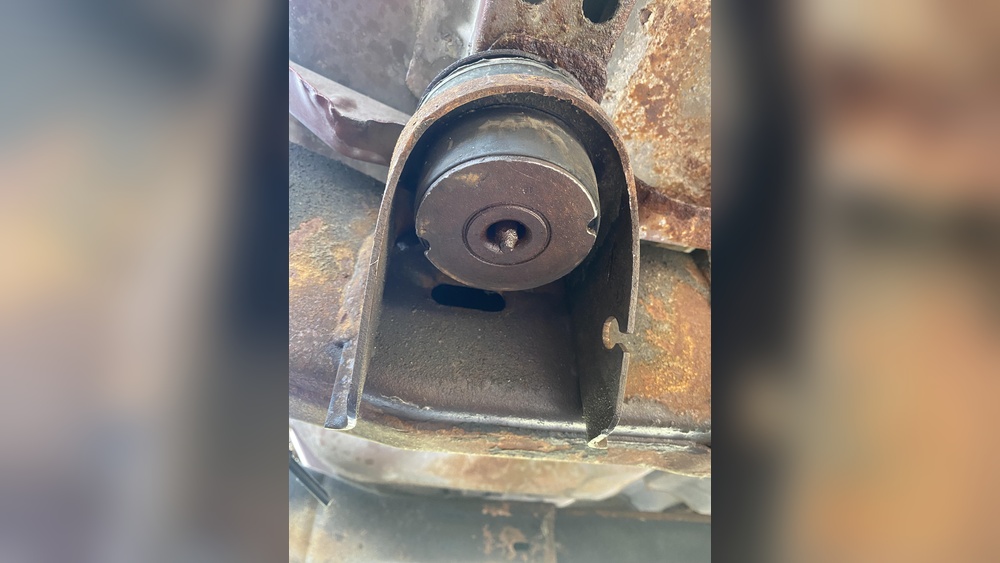
3. Removing Old Body Mounts
Most vehicles have 6 to 12 body mounts. It’s best to do them one side at a time, leaving the other side bolted in place for safety.
- Loosen each mount bolt slowly. If a bolt is stubborn, reapply penetrating oil.
- Remove the bolt, washer, and old mount. Sometimes, the mount may be stuck from years of compression; a pry bar can help.
- Clean the area with a wire brush to remove rust or debris.
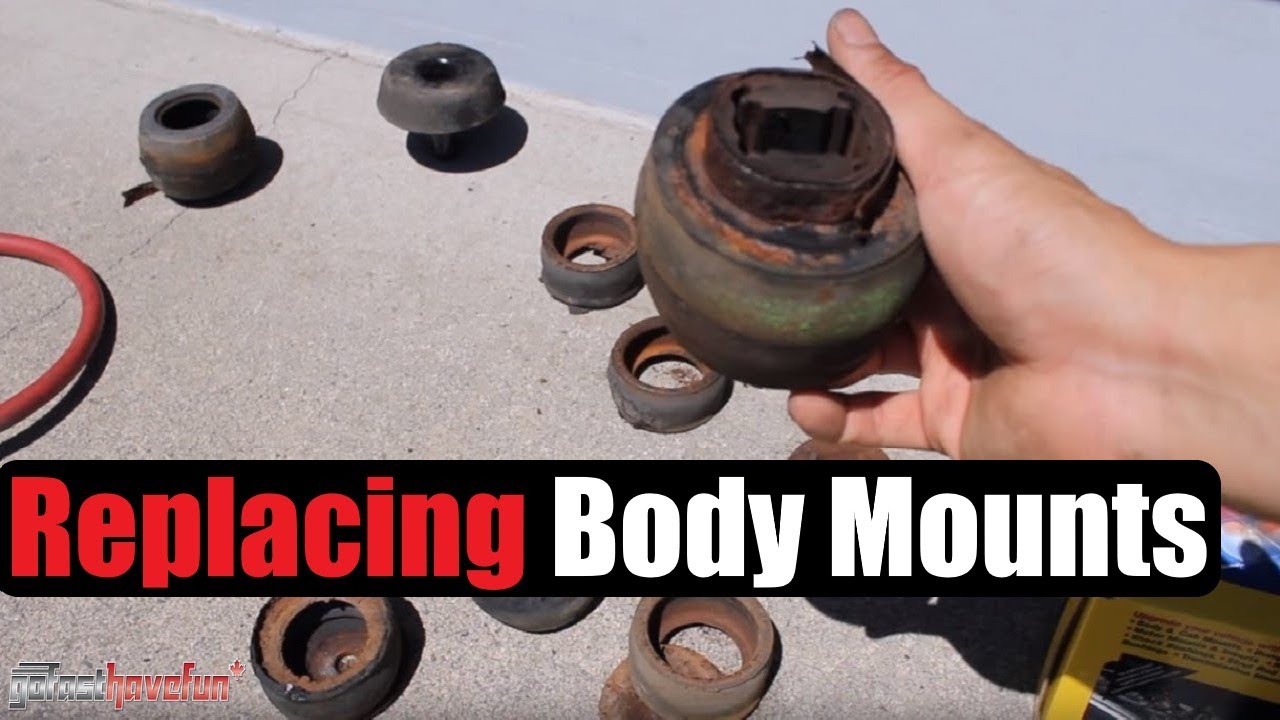
4. Installing New Body Mounts
Compare old and new mounts to ensure correct size and shape.
- Position the new mount bushing in place.
- Insert the bolt through the washer and mount, then thread it by hand.
- Tighten the bolt to the manufacturer’s torque specs using a torque wrench.
- Repeat for each mount on one side before switching to the other side.
5. Lowering And Final Checks
Carefully lower the vehicle. Recheck all bolts for correct torque. Inspect door and fender alignment. Take the car for a short, slow test drive and listen for any new noises.
Comparison: Rubber Vs. Polyurethane Body Mounts
Choosing the right replacement material can affect comfort and performance. Here’s a quick look:
| Feature | Rubber Mounts | Polyurethane Mounts |
|---|---|---|
| Ride Comfort | Softer, absorbs more vibration | Stiffer, may transmit more road feel |
| Durability | Shorter lifespan (10-15 years) | Longer lifespan (20+ years) |
| Cost | Generally cheaper | More expensive |
Cost And Time Estimates
How much will this job take in time and money? Let’s break it down:
| Item | DIY Cost | Shop Cost | Time Needed |
|---|---|---|---|
| Body Mount Kit | $80 – $200 | Included | – |
| Labor | Free | $400 – $900 | 2-6 hours |
| Tools/Supplies | $50 – $150 | Included | – |
A typical DIY replacement takes 3 to 6 hours depending on experience and rust level.
Common Mistakes To Avoid
Many first-timers make these errors:
- Lifting the body too much at once, risking body or frame damage
- Mixing up mount positions or hardware
- Not using a torque wrench, leading to loose or over-tightened bolts
- Skipping the step of cleaning rust, which can cause poor fit or future problems
A good tip: Take photos during disassembly to help during reassembly.
Signs You Need New Body Mounts
Some issues are easy to miss if you’re not looking for them. Watch for:
- The body looks lower on one side
- Doors or hood no longer line up
- Cracked or missing mount material visible under the vehicle
Early replacement can prevent expensive frame or body repairs later.
Practical Tips For Success
- Soak bolts with penetrating oil well in advance, especially on older vehicles
- Use wood blocks to protect paint and metal when lifting
- Replace all mounts at once for even support
- Mark bolt positions and hardware to avoid confusion
Many vehicle-specific forums offer detailed walkthroughs and advice. For more information, check the AutoZone DIY Guide.

Frequently Asked Questions
How Do I Know If My Body Mounts Are Bad?
Look for sagging, uneven gaps, extra noise, or difficulty closing doors. Cracks or missing pieces in the mount are clear signs.
Can I Replace Just One Body Mount?
It’s best to replace all at the same time. One new mount with old, worn ones can cause uneven support and stress.
Is Polyurethane Better Than Rubber For Body Mounts?
Polyurethane is more durable and lasts longer. However, it can make the ride stiffer compared to rubber.
Do I Need To Realign My Vehicle After Replacing Body Mounts?
Usually, no. But if body alignment was affected, doors or panels may need adjustment afterward.
Can I Do This Job Without A Lift?
Yes, but you’ll need a good floor jack and sturdy jack stands. Always lift safely and never work under a car supported only by a jack.
Replacing body mounts isn’t just about comfort—it’s about keeping your vehicle safe and solid for years. With some patience and careful work, you can restore the smooth ride your car once had.