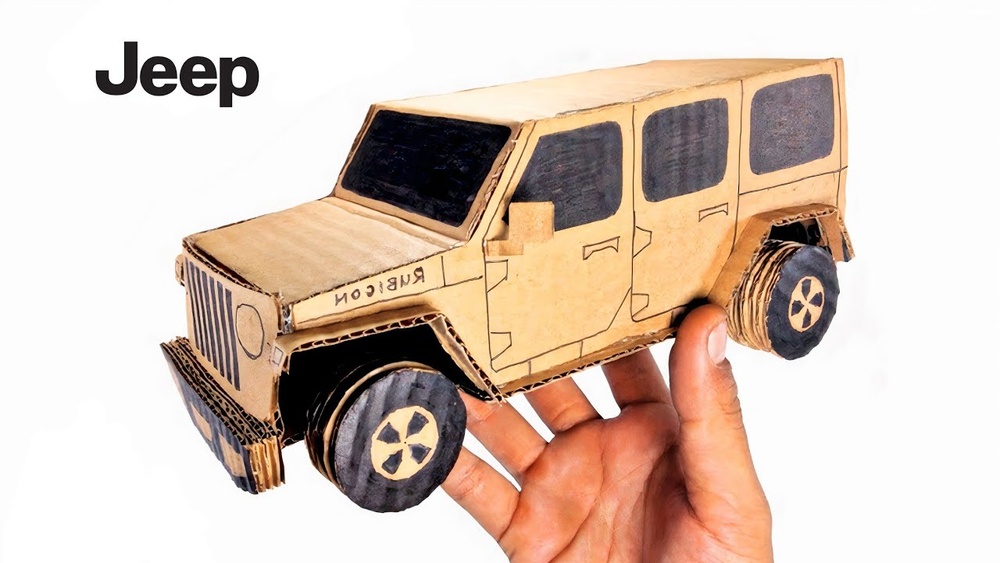
Building a toy Jeep at home can be a fun and rewarding project. Whether you want to make a simple model for your child or a detailed replica for display, the process teaches creativity, patience, and basic crafting skills. Using everyday materials, you can create a sturdy, moving toy that brings joy and a sense of accomplishment.
In this guide, you’ll learn how to make a toy Jeep step by step, with tips and examples to help you avoid common mistakes and get the best results.
Choosing Your Materials
The choice of materials is the foundation of your toy Jeep. Most homemade Jeeps use cardboard, plastic bottles, or wood. Cardboard is easy to cut and glue, making it ideal for beginners. Wood is more durable but needs basic tools. Plastic bottles are lightweight and great for recycling.
| Material | Pros | Cons |
|---|---|---|
| Cardboard | Easy to shape, widely available | Less durable, not water-resistant |
| Wood | Strong, long-lasting | Requires tools, heavier |
| Plastic Bottles | Light, recyclable | Harder to paint, less sturdy |
Most beginners start with cardboard or recycled plastic because they are safe and easy to work with. If you want a toy that lasts, choose wood and invest a bit more time.
Gathering Essential Tools And Supplies
For this project, you’ll need some basic supplies:
- Cardboard sheets (or wood/plastic bottles)
- Plastic bottle caps (for wheels)
- Scissors or craft knife
- Strong glue (hot glue or white glue)
- Wooden skewers or straws (for axles)
- Ruler and pencil
- Paints and markers
- Small nails or screws (if using wood)
- Sandpaper (for smoothing edges)
Having everything ready before you start will save time and avoid interruptions.
Step-by-step Guide: Making A Simple Cardboard Toy Jeep
1. Draw And Cut The Body Parts
Sketch the main body, roof, and hood shapes on the cardboard. Cut out each part carefully. The body should be a rectangle, about 20 cm long and 10 cm wide.
2. Build The Main Body
Fold and glue the sides to create a box shape. Attach the hood and roof pieces. Hold them in place for a few minutes until the glue sets.
3. Create The Wheels And Axles
Use four plastic bottle caps for wheels. Pierce a small hole in the center of each cap. Push a wooden skewer or straw through the base of the Jeep and attach the wheels at both ends. Secure with glue.
4. Assemble The Details
Add small pieces of cardboard for the front grille, headlights, and bumpers. You can use markers to draw windows and doors.
5. Paint And Decorate
Once the glue is dry, paint your Jeep in your favorite colors. Add details like number plates or stickers for a personal touch.
6. Test The Movement
Roll your toy Jeep on a flat surface to make sure the wheels spin freely. If the wheels wobble, check the axles and adjust as needed.
Example Measurements For A Small Jeep
| Part | Length (cm) | Width (cm) | Height (cm) |
|---|---|---|---|
| Main Body | 20 | 10 | 8 |
| Roof | 12 | 10 | 2 |
| Hood | 6 | 10 | 2 |
These sizes can be changed based on your preference or the materials you have.
Tips For A Stronger, Better-looking Toy Jeep
- Reinforce joints with extra glue or tape, especially if the toy will be played with often.
- Sand rough edges if using wood to prevent splinters.
- Double up cardboard for the base to make the Jeep sturdier.
- Choose bright colors for painting, as they make the Jeep more attractive to kids.
- To add moving parts, use toothpicks or small metal rods for the axles instead of straws.
- For a realistic look, use small plastic pieces or beads for headlights and mirrors.
Many beginners forget to check the wheel alignment. Crooked wheels can cause the Jeep to drag or not roll at all. Always test the movement before final painting.

Comparing Simple Vs. Advanced Toy Jeep Features
If you want to make your project more challenging, try adding advanced features. Here’s a comparison:
| Feature | Simple Jeep | Advanced Jeep |
|---|---|---|
| Wheels | Fixed, plastic caps | Turning, rubber tires |
| Doors | Drawn on body | Open and close |
| Lights | Painted only | Working LEDs |
| Paint | Basic colors | Realistic details |
For most people, starting simple is best. As you gain confidence, you can try adding features like working lights or moving doors. There are many videos and guides online for advanced ideas. For inspiration, check out the official Jeep history page.
Safety Reminders
- Always use scissors and glue with care, especially with children.
- Avoid small parts if the toy is for kids under 3 years.
- Paint in a well-ventilated area and wash hands after handling glue or paint.

Frequently Asked Questions
What Age Is This Toy Jeep Suitable For?
This project is best for children over 5 years old with adult help. Small parts and sharp tools are not safe for very young kids.
Can I Use Other Materials Instead Of Cardboard?
Yes, you can use wood, plastic, or even metal parts for more durability. Just be sure you have the right tools and safety gear.
How Long Does It Take To Make A Toy Jeep?
A simple cardboard Jeep usually takes 1-2 hours to complete. Adding advanced features may take several more hours.
How Can I Make The Wheels Spin Better?
Make sure the axle holes are smooth and not too tight. Using a drop of oil on the axles can help the wheels turn more easily.
What’s The Best Paint For A Cardboard Jeep?
Use acrylic paints for bright colors and fast drying. Spray paints work on plastic and wood but need adult supervision.
Creating a toy Jeep is more than just a craft—it’s a chance to learn new skills and make something unique. With a little patience and imagination, you can build a toy that brings hours of fun and pride.