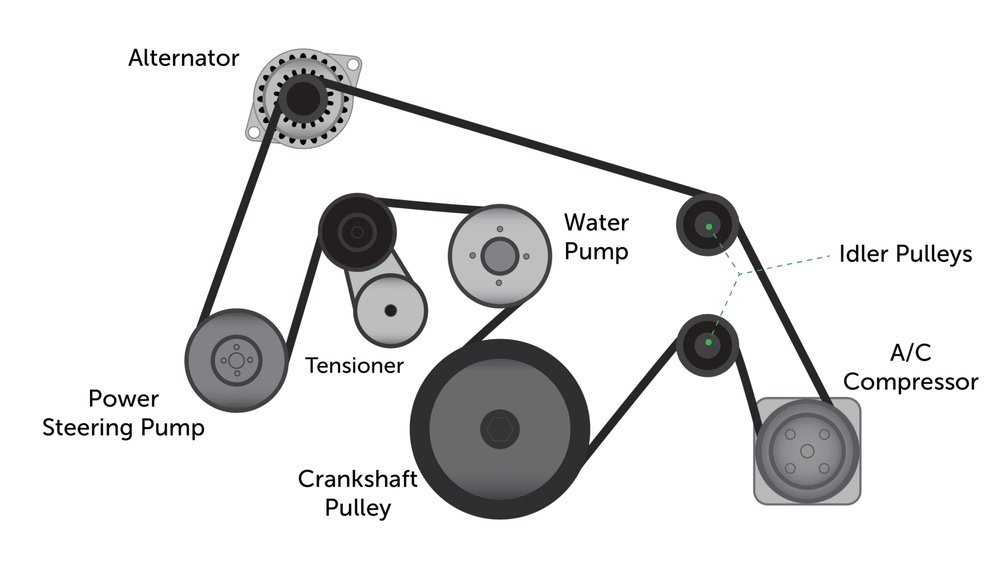
Understanding the alternator belt diagram is crucial for any car owner or mechanic. This diagram shows how the serpentine belt, or accessory drive belt, wraps around various pulleys in your engine.
These pulleys drive essential components like the alternator, power steering pump, water pump, and air conditioning compressor. Knowing the correct belt routing is vital for proper engine function and preventing breakdowns.
The serpentine belt is a single, continuous belt that replaces multiple V-belts used in older vehicles. Its complex routing means that if one component seizes or the belt breaks, several systems can fail simultaneously.
This article will guide you through understanding alternator belt diagrams, identifying the components involved, and the importance of a correctly functioning belt system.
We’ll also cover common issues and how to interpret different types of diagrams.
What Is An Alternator Belt Diagram?
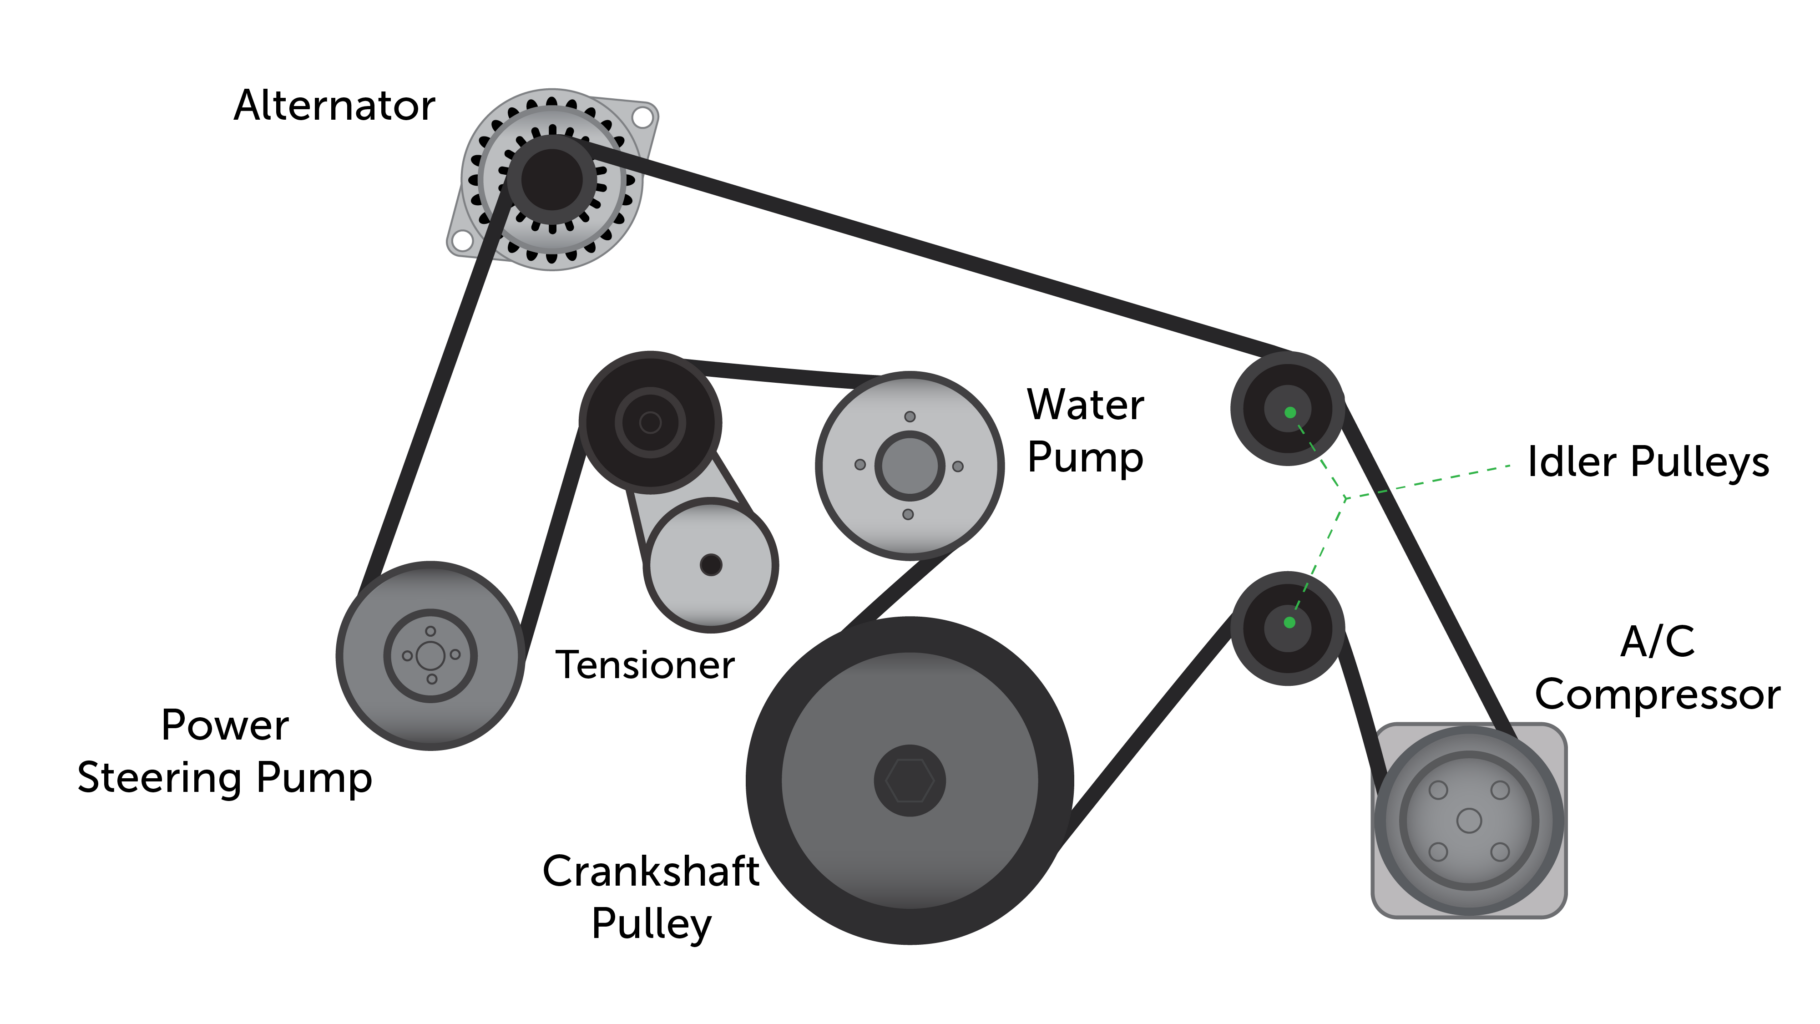
An alternator belt diagram, often referred to as a serpentine belt diagram or accessory drive belt diagram, is a visual representation of the path a single, ribbed belt takes around the various pulleys driven by the engine’s crankshaft. This belt is responsible for powering multiple accessories essential for your vehicle’s operation. Without it, components like the alternator (which charges the battery), power steering pump (making steering easier), water pump (cooling the engine), and A/C compressor (cooling the cabin) would not function.
The diagram is essentially a map. It shows the crankshaft pulley at the bottom, which is directly connected to the engine’s rotation. From there, the belt snakes around other pulleys, often including an idler pulley (used to maintain belt tension) and a tensioner pulley (which automatically adjusts belt tension). Each pulley is labeled, and arrows indicate the direction of belt travel. Mechanics and DIY enthusiasts use these diagrams to ensure the belt is installed correctly. An improperly routed belt will not function, and could even cause damage to other engine components.
Why Is The Diagram Important?
The importance of an alternator belt diagram cannot be overstated, especially in modern vehicles.
- Correct Installation: The primary function of the diagram is to guide the installation of a new serpentine belt. The routing is specific; even a slight misplacement can prevent the belt from engaging properly with the pulleys, leading to slippage, noise, or complete failure.
- Troubleshooting: When a belt fails or starts making noise, a mechanic will consult the diagram to inspect each pulley and the belt’s condition. It helps them identify which component might be causing the issue, such as a worn pulley bearing or a misaligned pulley.
- Preventing Damage: A broken or slipping serpentine belt can cause a cascade of problems. The battery won’t charge, the engine can overheat, steering can become difficult, and the air conditioning will stop working. In some cases, a failing belt can wrap around other components and cause significant damage. The diagram helps ensure everything is in its proper place to avoid these issues.
- Component Identification: For those unfamiliar with engine bays, the diagram serves as a helpful tool to identify the various accessories being driven by the belt.
Key Components In An Alternator Belt Diagram
Understanding the parts shown in a serpentine belt diagram is essential for interpreting it correctly. Each component plays a distinct role in the overall accessory drive system.
The Pulleys
Pulleys are the rotating wheels that the serpentine belt wraps around. They are typically made of metal or reinforced plastic and have grooves or ribs that match the belt’s design.
- Crankshaft Pulley: This is usually the largest pulley and is directly connected to the engine’s crankshaft. It provides the rotational force to drive the belt.
- Alternator Pulley: Connected to the alternator, this pulley spins the alternator to generate electricity and charge the battery.
- Power Steering Pump Pulley: Drives the power steering pump, reducing the effort needed to turn the steering wheel. Not all cars have power steering pumps driven by the serpentine belt; some use electric pumps.
- Water Pump Pulley: Drives the water pump, which circulates coolant through the engine to prevent overheating.
- Air Conditioning (A/C) Compressor Pulley: Engages the A/C compressor to cool the vehicle’s cabin. This pulley often has a clutch, meaning it can spin freely when the A/C is turned off, preventing unnecessary load on the engine.
- Idler Pulley(s): These are non-driven pulleys used to guide the belt along its path, maintain proper tension, or take up slack. They help ensure the belt has sufficient contact with the driven pulleys.
- Tensioner Pulley: This pulley is part of a tensioner mechanism (either spring-loaded or hydraulic) that automatically maintains the correct tension on the serpentine belt. Proper tension is crucial to prevent slippage and extend belt life.
The Belt
The serpentine belt itself is a long, flat, ribbed belt made of durable rubber compounds. Its V-shaped ribs grip the corresponding grooves in the pulleys, ensuring efficient power transfer. These belts are designed to last for many years and miles but can degrade over time due to heat, friction, and exposure to engine fluids.
The Diagram’s Arrows
The arrows on the diagram are critical. They indicate the direction of rotation for each pulley and, more importantly, the direction the belt must travel around them. Following these arrows precisely is paramount during installation.

Types Of Alternator Belt Diagrams
While the basic concept remains the same, alternator belt diagrams can vary slightly depending on the vehicle manufacturer and model. They are typically found in a few key locations.
Location Of Diagrams
- Under the Hood Sticker: Many vehicles have a sticker located in the engine bay, often on the radiator support, hood, or firewall. This sticker usually contains the serpentine belt diagram for that specific vehicle. This is the most convenient place for quick reference.
- Owner’s Manual: The vehicle’s owner’s manual is another common place to find the serpentine belt diagram. It’s usually located in the maintenance or specifications section.
- Service Manuals: Professional automotive service manuals (like Haynes or Chilton) provide detailed diagrams for virtually every vehicle make and model. These are invaluable for complex repairs.
- Online Resources: Numerous automotive websites and forums offer serpentine belt diagrams searchable by year, make, and model.
Visual Representation Styles
- Line Drawings: The most common type, these are simple line drawings showing the pulleys and the belt path. They are clear and easy to follow.
- Schematic Diagrams: More technical diagrams that might show the belt’s path with less emphasis on the exact physical layout of the engine bay.
- 3D Renderings: Some modern manuals or online resources might use 3D models to illustrate the belt routing, offering a more comprehensive view.
How To Read And Use An Alternator Belt Diagram
Interpreting a serpentine belt diagram is straightforward once you understand the symbols and components.
Step-by-step Interpretation
- Locate the Diagram: Find the diagram for your specific vehicle year, make, and model. Check under the hood, in your owner’s manual, or online.
- Identify the Pulleys: Each circle in the diagram represents a pulley. Look for labels identifying which component each pulley belongs to (e.g., CRANK, ALT, PS, WP, AC, IDLER, TENSIONER).
- Trace the Belt Path: Start at any pulley (often the crankshaft pulley is a good starting point) and follow the solid line representing the belt. Pay close attention to the direction indicated by the arrows.
- Note the Tensioner: Identify the tensioner pulley. This is the pulley that applies pressure to the belt. You’ll often need to use a wrench or a special tool to rotate the tensioner to release tension, allowing you to remove or install the belt.
- Observe Belt Wrap: Notice how much of each pulley the belt contacts. This is important for ensuring proper grip and power transfer. Some pulleys might only have partial contact, while others are nearly fully wrapped.
Pro Tip: Taking A Photo Before Removal
Before you remove an old serpentine belt, take a clear photo of the belt routing with your smartphone. This provides an immediate visual reference if you get stuck or if the diagram is unclear. This simple step can save a lot of frustration and potential errors during installation.
Common Serpentine Belt Problems And Symptoms
Serpentine belts are durable, but they aren’t indestructible. Understanding common issues can help you diagnose problems before they lead to a breakdown.
Belt Wear And Tear
Over time, the rubber material of the belt degrades.
- Cracking: Small cracks can appear on the ribbed surface or the back of the belt due to age, heat, and UV exposure.
- Glazing: The ribbed surface can become smooth and shiny, indicating a loss of grip. This often leads to squealing noises.
- Fraying: The edges of the belt can start to fray or unravel.
- Contamination: Oil or coolant leaks can degrade the rubber, causing swelling or premature failure.
Symptoms Of Belt Problems
- Squealing Noise: A high-pitched squeal, especially on startup or when accelerating, is the most common symptom. This usually indicates a loose belt or a glazed belt slipping on a pulley.
- Chirping Noise: A rhythmic chirping sound can sometimes indicate a pulley bearing that is starting to fail.
- Vibrations or Wobbling: If the belt is damaged or a pulley is misaligned, you might notice vibrations.
- Loss of Power Steering: If the power steering pump isn’t being driven, steering will become significantly harder.
- Overheating: If the water pump isn’t circulating coolant, the engine temperature gauge will rise rapidly.
- Battery Warning Light: If the alternator isn’t charging the battery, the battery warning light on the dashboard will illuminate.
- Visible Damage: A visual inspection might reveal cracks, fraying, or missing chunks of rubber from the belt.
Replacing A Serpentine Belt: A General Guide
Replacing a serpentine belt is a common maintenance task, but it requires care and attention to detail. Always refer to your vehicle’s specific service manual for detailed instructions.
Tools And Materials Needed
- New Serpentine Belt: Ensure you have the correct belt for your vehicle’s make, model, and engine.
- Wrench or Socket Set: To turn the tensioner pulley.
- Serpentine Belt Tool (Optional but Recommended): A specialized tool that can make it easier to reach and manipulate the tensioner, especially in tight engine bays.
- Gloves: To protect your hands.
- Safety Glasses: To protect your eyes.
- Flashlight: For better visibility.
- Serpentine Belt Diagram: Essential for correct routing.
The Replacement Process
- Safety First: Ensure the engine is off and cool. Engage the parking brake.
- Locate the Belt and Tensioner: Find the serpentine belt and the automatic tensioner pulley.
- Release Belt Tension: Using the appropriate wrench or serpentine belt tool, rotate the tensioner pulley to release tension on the belt. This might involve pulling the tensioner arm away from the belt.
- Remove the Old Belt: While holding the tensioner released, carefully slip the old belt off one of the pulleys (usually an idler or accessory pulley). Slowly release the tensioner.
- Route the New Belt: Refer to the alternator belt diagram (or your pre-removal photo). Carefully route the new belt around the pulleys according to the diagram. Ensure the ribbed side of the belt engages with the ribbed pulleys and the smooth side runs on smooth pulleys.
- Apply Tension: Once the belt is correctly routed, use the wrench or tool to rotate the tensioner pulley again. Slip the belt onto the final pulley (often the crankshaft pulley).
- Release Tensioner: Slowly release the tensioner. The tensioner should automatically apply the correct tension to the new belt.
- Double-Check: Visually inspect the belt routing one last time. Ensure it’s seated correctly on all pulleys and that no part of the belt is touching anything it shouldn’t.
- Start the Engine: Start the engine briefly and listen for any unusual noises. Check that the battery warning light goes off and that accessories like the power steering and A/C are functioning. Let the engine run for a few minutes to ensure everything is stable.

Understanding Belt Tension
Belt tension is a critical factor in the performance and longevity of the serpentine belt system. Too little tension leads to slippage, while too much tension can damage the bearings of the pulleys and the belt itself.
Automatic Tensioners
Most modern vehicles use automatic serpentine belt tensioners. These mechanisms use a spring or a hydraulic damper to constantly apply the correct amount of tension to the belt, compensating for belt stretch and wear over time. The tensioner pulley is usually mounted on an arm that pivots.
Manual Tensioners
Older vehicles might have a manual tensioner. This requires a mechanic to adjust the belt tension manually using a specific tool and a designated adjustment bolt or screw. Setting the correct tension manually is more difficult and requires experience.
How To Check Tension (general)
While automatic tensioners do the work for you, it’s good to know how to check.
- Visual Inspection: A properly tensioned belt should feel snug. You shouldn’t be able to easily twist it more than 90 degrees midway between two pulleys.
- Listen for Noise: Slipping belts (due to low tension) often squeal. Overly tight belts can cause a whining noise from bearing strain.
- Check the Tensioner: Many automatic tensioners have a marker. If the marker is at the extreme end of its travel, it might indicate the belt is stretched beyond its usable limit or the tensioner is weak.
When To Replace The Serpentine Belt
Serpentine belts are wear items, meaning they need replacement periodically.
Recommended Replacement Intervals
Manufacturers typically recommend replacing the serpentine belt based on mileage or time.
- Mileage: Common recommendations range from 60,000 to 100,000 miles.
- Time: Even if the mileage isn’t reached, belts can degrade over 5 to 7 years.
Factors Influencing Belt Life
- Driving Conditions: Frequent short trips, stop-and-go traffic, and extreme temperatures can shorten belt life.
- Engine Bay Environment: Leaks of oil, coolant, or power steering fluid can contaminate and degrade the belt.
- Pulley Condition: Worn or misaligned pulleys can cause uneven wear on the belt.
- Quality of Belt: Using a high-quality replacement belt can contribute to longer service life.
Warning Signs That Demand Immediate Attention
- Sudden breakage: If the belt snaps, you’ll lose all accessory functions immediately.
- Loud, persistent sque