Removing the back seat from a Jeep Wrangler is a useful skill for any owner. Whether you need extra cargo space for camping gear or want to clean under the seat, knowing how to do it yourself saves time and money. Many Jeep owners are surprised at how simple the process is, but there are a few key steps and tips that can make it even easier. In this guide, you’ll learn the exact steps, tools required, and practical advice to remove your Wrangler’s back seat safely.
Why Remove The Back Seat?
Most Jeep Wranglers are built for both adventure and utility. By taking out the back seat, you can:
- Create more cargo space for bulky items
- Make cleaning the interior much easier
- Reduce the vehicle’s weight, which may slightly improve fuel efficiency
- Prepare for custom modifications or installing a pet barrier
Many owners remove the rear seat for quick weekend trips or to fit in large boxes, bikes, or camping gear.
Tools And Preparation
Before you begin, gather the right tools. The process is simple, but using the wrong tool can damage your Jeep or make the job harder.
You’ll need:
- A socket wrench (usually 13mm or 18mm socket)
- Flathead screwdriver (for clips, if needed)
- Gloves (optional, for protection)
- A box or bag for bolts
Pro tip: Check your Jeep’s manual or under the seat for the exact bolt size, as it may vary by year and model.

Step-by-step Guide To Removing The Back Seat
The removal process is straightforward but can be slightly different depending on your Wrangler’s year or whether you have a 2-door or 4-door model.
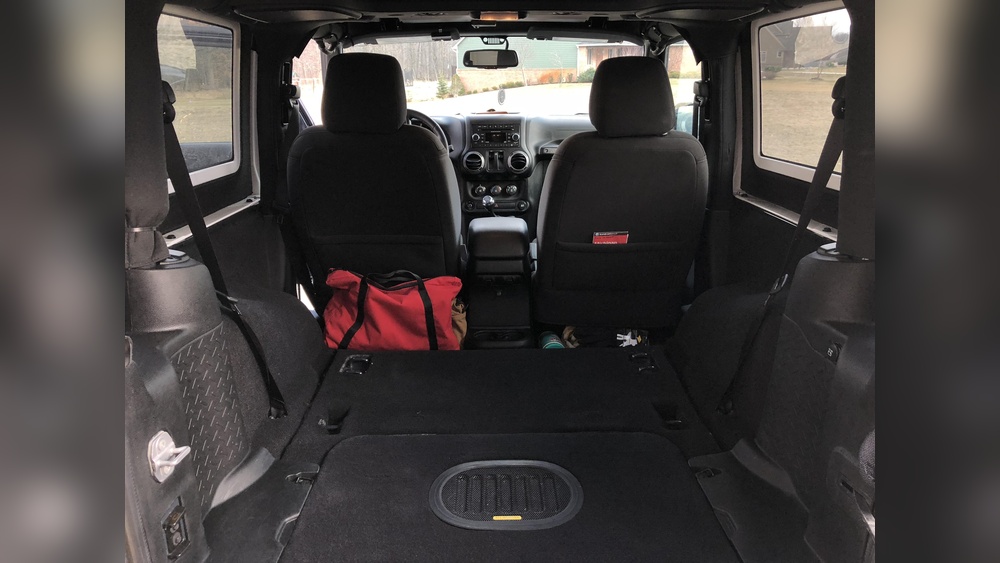
1. Clear Out The Area
Move any items or floor mats from the back seat. Slide the front seats forward for more room.
2. Locate Seat Bolts
The back seat is secured with bolts at the base and sometimes at the backrest. Most Wranglers have four main bolts (two at the front of the seat and two at the back).
3. Remove Bolts
Use your socket wrench to loosen and remove the bolts. Turn counterclockwise. Keep the bolts safe; you’ll need them to reinstall the seat.
4. Disconnect Latch (if Present)
Some models have a latch or clip under the seat. Press or lift the latch as needed. If unsure, gently lift the seat—never force it.
5. Lift The Seat Out
With bolts and latches released, tilt the seat forward and carefully lift it out. The seat may be heavier than expected, so get help if needed.
6. Store Or Reinstall
If you plan to reinstall the seat, keep all hardware together. Store the seat in a dry place to avoid mildew or damage.
Here’s a comparison of the removal process for different Jeep Wrangler models:
| Model | Number of Bolts | Special Steps |
|---|---|---|
| 2-Door Wrangler (TJ/JK/JL) | 4 | Fold seat forward first |
| 4-Door Wrangler (JKU/JLU) | 4-6 | May need to remove headrests |
| Older Models (YJ/CJ) | 2-4 | Check for extra side clips |
Safety And Common Mistakes
While the process is simple, a few mistakes can lead to frustration or damage:
- Losing bolts: Always use a small box or bag to keep bolts and clips together.
- Forcing the seat: If the seat doesn’t lift easily, double-check for hidden bolts or clips.
- Scratching interior: The metal seat brackets can scratch door panels or trim. Move slowly and use a blanket if needed.
Remember, Jeep seats are heavier than they look, especially in 4-door models. If you feel any strain, ask for help to avoid injury.
Cleaning And Maintenance Tips
With the back seat out, it’s a perfect time to deep clean. Vacuum the carpet and check for dirt or rust.
For tough stains, use a mild upholstery cleaner. If you spot any rust on the seat brackets, a quick spray of rust remover can prevent future issues. Before reinstalling, make sure the area is completely dry.
Here’s a quick overview of cleaning options:
| Cleaning Task | Recommended Tool | Time Needed |
|---|---|---|
| Vacuuming | Handheld vacuum | 5-10 minutes |
| Stain Removal | Upholstery spray & brush | 10-20 minutes |
| Rust Treatment | Rust remover spray | 5 minutes |
Reinstallation Tips
Putting the back seat in is mostly the reverse of removal, but a few things can trip up new owners:
- Align bolts carefully. Don’t force them, or you may strip the threads.
- Test the latch. Make sure the seat clicks securely before driving.
- Double-check for extra parts. If you find an extra bolt, something was missed.
If you’re unsure about bolt torque, hand-tighten and then give an extra quarter turn. Over-tightening can damage the bracket.

When Not To Remove The Back Seat
Some states have laws about seat removal if you carry passengers. Also, if your Jeep is under warranty, check with your dealer first. Removing the seat rarely voids warranties, but it’s better to be safe.
For more details on seat removal and modifications, the official Jeep Accessories page has useful information.
Frequently Asked Questions
Does Removing The Back Seat Affect My Jeep’s Safety?
Removing the seat reduces passenger capacity and removes seat belts for rear passengers. Always reinstall the seat before carrying people in the back.
How Long Does It Take To Remove The Back Seat?
For most owners, the process takes 10 to 20 minutes. It’s faster if you’ve done it before.
Can I Drive My Jeep Wrangler Without The Back Seat?
Yes, it’s legal in most places to drive without the back seat, but always check local laws if you plan to carry passengers or make permanent changes.
Will I Need Special Tools?
Most jobs require only a socket wrench and sometimes a flathead screwdriver. Specialty tools are not usually needed.
Is It Easy To Put The Seat Back In?
Yes, as long as you keep the bolts and remember the steps. Alignment is key—take your time, and you’ll have no trouble.
Removing the back seat from your Jeep Wrangler is a simple project that opens up space and makes cleaning easier. By following these steps and tips, you’ll save time, avoid common mistakes, and get the most out of your Jeep’s flexible design.