Removing the headlights from your Jeep might seem tricky, but with the right steps, it’s a manageable task for most drivers. Whether you want to replace a burnt-out bulb, upgrade to LEDs, or check for wiring issues, knowing how to do this yourself saves time and money. Many Jeep models share similar headlight setups, so the process can be applied to popular models like the Wrangler JK, JL, and Cherokee. Let’s walk through everything you need to know for a smooth, damage-free headlight removal.
Why Remove Jeep Headlights?
Replacing or upgrading your Jeep headlights isn’t just about looks. Headlights are a key safety feature. Dull, broken, or poorly aimed headlights can reduce visibility and increase accident risks. Swapping in new bulbs or cleaning the housing can improve nighttime driving and help you pass state inspections. Some Jeep owners also upgrade for off-road performance or to get a modern look.
Tools And Preparation
Before starting, gather these common tools:

- Phillips and flathead screwdrivers
- Torx drivers (usually T15 or T20, depending on model)
- Ratchet and socket set (often 7mm, 8mm, or 10mm)
- Gloves to keep hands clean and protect bulbs
- Clean towel or mat for removed parts
Pro tip: Always disconnect your vehicle’s battery before working with electrical components to avoid shorts or shocks.

Headlight Removal: Step-by-step
Each Jeep model has some differences, but these steps cover most modern Wranglers and Cherokees.
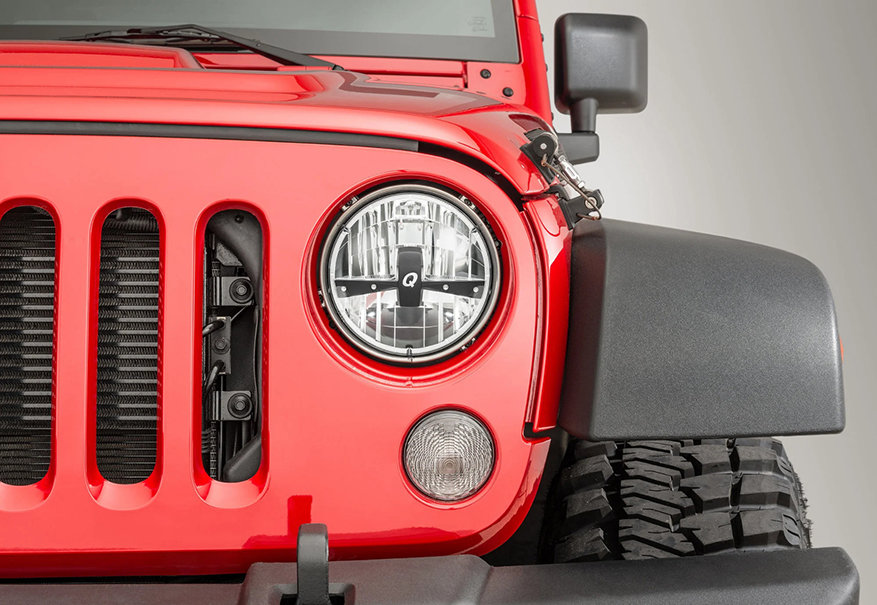
1. Access The Headlight Area
- Open the hood and locate the headlight assembly.
- On many Jeeps, you’ll need to remove the front grille. This is usually held by plastic clips and a few screws along the top.
2. Remove The Grille
- Use a flathead screwdriver to gently pry up the plastic fasteners.
- Unscrew any bolts at the top of the grille.
- Pull the grille forward gently. Some force may be needed, but don’t yank—it could break clips.
3. Unbolt The Headlight Retaining Ring
- Around each headlight, you’ll see a metal or plastic retaining ring. This holds the headlight in place.
- Use the correct screwdriver or Torx bit to remove the screws (usually 3 or 4).
- Carefully set the screws aside so you don’t lose them.
4. Disconnect The Headlight Wiring
- Pull the headlight assembly out gently.
- Unplug the wiring harness from the back of the headlight. Press the clip to release it.
- If your Jeep has a dust cover, twist or pull it off before disconnecting the wiring.
5. Remove The Headlight
- With the wiring harness disconnected, the headlight should come out easily.
- Set the assembly on a clean towel to avoid scratches or dirt.
Here’s a quick comparison of common Jeep models and their headlight removal difficulty:
| Model | Years | Difficulty | Tools Needed |
|---|---|---|---|
| Wrangler JK | 2007-2018 | Easy | Phillips, Torx |
| Wrangler JL | 2018-present | Medium | Torx, Socket |
| Cherokee | 2014-present | Medium | Socket, Flathead |
Common Issues And Tips
Many Jeep owners face a few challenges during headlight removal:
- Stuck clips: Use a trim removal tool, not just a screwdriver, to avoid breaking plastic.
- Lost screws: Place screws and clips in a small container as you work.
- Headlight condensation: If you notice fog inside the headlight, check seals before reinstalling.
- Upgrading bulbs: Always check bulb compatibility and avoid touching new bulbs with bare fingers. Oil from skin can shorten bulb life.
Unexpected Insight: For some aftermarket headlights, the connector may not match the factory harness. You might need an adapter. Check this before starting—many Jeep owners only discover this mid-job.

Reinstalling The Headlight
After bulb replacement or repairs, reverse the steps:
- Plug the wiring harness into the new or cleaned headlight.
- Fit the assembly back into the housing.
- Reattach the retaining ring and tighten screws evenly.
- Snap the grille back on, making sure all clips and screws are in place.
- Reconnect the battery and test the lights before closing the hood.
Here’s a quick reference for bulb types by Jeep model:
| Model | Low Beam | High Beam | Notes |
|---|---|---|---|
| Wrangler JK | H13 | H13 | Single bulb for both |
| Wrangler JL | LED or 9005 | LED or 9005 | Varies by trim |
| Cherokee | H11 | 9005 | Separate bulbs |
Safety And Legal Considerations
Properly installed headlights are essential for safety and to meet local traffic laws. After removing and reinstalling, always check:
- Headlight aim: Misaligned lights can blind other drivers.
- Secure connections: Loose wiring can cause flickering or outages.
- State inspection: Some states check headlight type and aim during annual inspections.
Non-obvious tip: If you installed aftermarket LED or HID lights, you may need to adjust the headlight aim. Most Jeep models have easy-to-access adjustment screws.
For more details on headlight regulations, the National Highway Traffic Safety Administration offers guidance: NHTSA Headlight Information.
Frequently Asked Questions
How Long Does It Take To Remove Jeep Headlights?
Most Jeep models take 20 to 45 minutes per side for headlight removal if you have the tools ready. First-timers may take longer, especially if the grille is stubborn.
Do I Need To Remove The Front Bumper To Change Headlights?
No, on most Wranglers and Cherokees, removing the grille is enough. The bumper does not block access to the headlight assembly.
Can I Upgrade To Led Headlights Myself?
Yes, many Jeep owners upgrade to LED headlights as a DIY project. Make sure the new lights are DOT-approved and compatible with your Jeep’s wiring.
What If My New Headlights Flicker?
Flickering is often caused by a mismatch in the wiring or lack of a CANbus adapter. Double-check connections and consider a decoder or adapter for aftermarket LEDs.
Will Removing The Battery Reset Anything In My Jeep?
Disconnecting the battery may reset the radio and clock settings, but it will not affect the main vehicle computer or security system.
Removing Jeep headlights is a straightforward project that builds confidence and keeps your vehicle in top shape. With care and the right steps, you’ll have your lights swapped or serviced in less than an hour—no mechanic needed.