Wiring auxiliary lights on a Jeep is a popular upgrade for off-road enthusiasts and daily drivers alike. These lights improve visibility in low-light conditions, enhance safety, and add style to your vehicle. Many Jeep owners are surprised to learn that wiring auxiliary lights is not as complicated as it seems.
With the right tools, a basic understanding of electrical systems, and careful planning, you can install your own lights and avoid expensive shop fees. This guide explains each step, highlights common mistakes, and shares expert tips so you can wire auxiliary lights confidently.
Planning Your Auxiliary Light Installation
Before buying and installing lights, it’s important to understand your needs and make smart choices. Auxiliary lights come in various types—spot lights, flood lights, and LED light bars. Each serves a different purpose:
- Spot lights focus light in a narrow beam, perfect for distance.
- Flood lights spread light wide, ideal for close-range visibility.
- LED light bars combine both styles and offer high brightness.
Jeep owners often mount lights on the bumper, windshield, or roof. Decide where you want your lights, considering both appearance and functionality.
| Light Type | Beam Pattern | Common Placement |
|---|---|---|
| Spot Light | Narrow/Long | Bumper |
| Flood Light | Wide/Short | Windshield, Bumper |
| LED Light Bar | Mixed | Roof, Bumper |
Electrical requirements are another key factor. Most Jeep auxiliary lights operate on 12 volts, but you must check the wattage and amperage to avoid overloading the circuit. For example, four 30-watt lights require 10 amps (120 watts/12 volts). Always use wiring and fuses rated for the total current.
Tools And Materials Needed
To wire auxiliary lights, gather these essential items:
- Auxiliary lights (with mounting brackets)
- Wiring harness (preferably with relay and fuse)
- Switch (toggle or rocker)
- Wire connectors (crimp or solder)
- Electrical tape or heat-shrink tubing
- Drill and mounting hardware
- Wire stripper and crimper
- Multimeter (for testing voltage)
Buying a pre-made wiring harness saves time and reduces mistakes, especially for beginners.
Step-by-step Wiring Instructions
1. Mount The Lights
Secure the lights in your chosen locations. Use sturdy brackets and ensure the lights are aligned correctly. For roof or windshield mounts, check local regulations, as some states restrict certain placements.
2. Route The Wiring
Run the wires from the lights to the engine bay, avoiding hot or moving parts. Use zip ties to keep wires neat and prevent chafing. Always follow the Jeep’s frame or existing wire channels when possible.
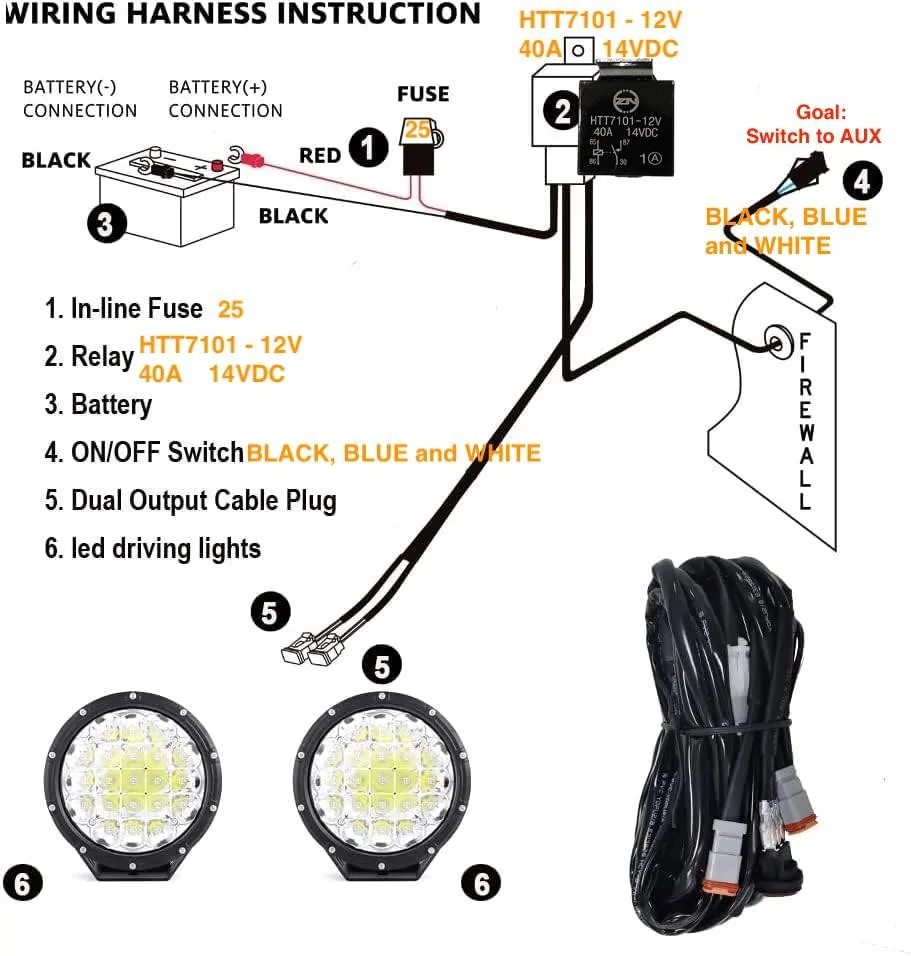
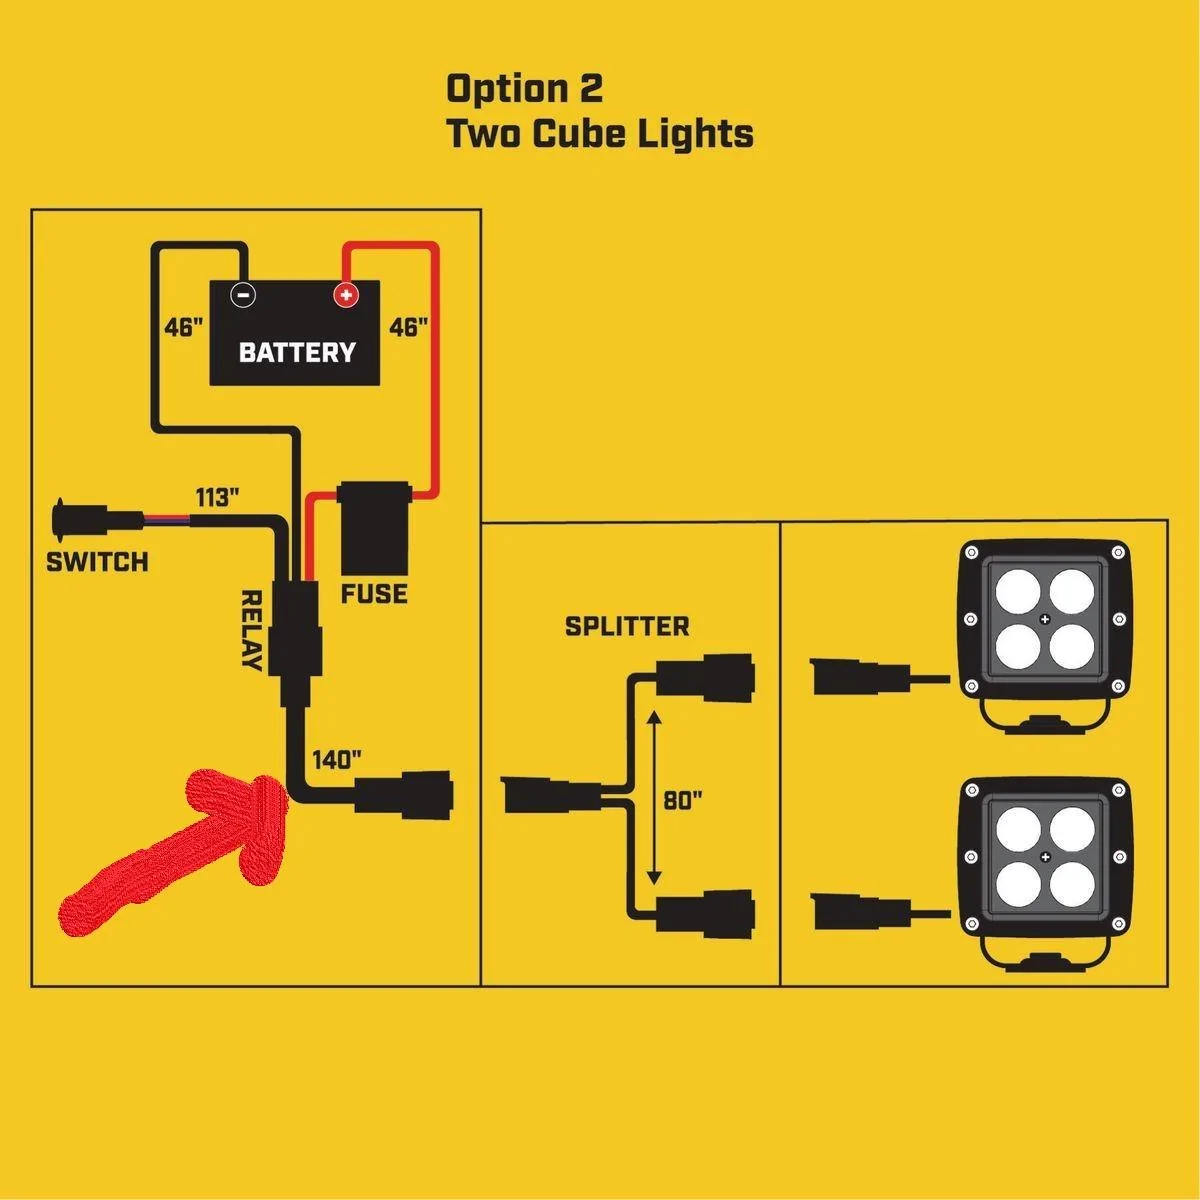
3. Connect The Relay
Relays are critical for safety and performance. They prevent high current from passing through the switch and allow you to use smaller wires for control. Typical relay wiring:
- Pin 30: Connect to battery positive (with fuse)
- Pin 87: Connect to lights
- Pin 85: Connect to ground
- Pin 86: Connect to switch
| Relay Pin | Function | Wire Gauge (Min.) |
|---|---|---|
| 30 | Battery Positive | 12 AWG |
| 87 | Lights Output | 12 AWG |
| 85 | Ground | 16 AWG |
| 86 | Switch Input | 16 AWG |
4. Install The Switch
Mount the switch inside the cabin where it’s easy to reach. Drill a hole if needed and secure the switch. Connect one wire to the relay (Pin 86) and another to a 12V ignition source or battery, depending on your preference.
5. Fuse And Connect To Battery
Install an inline fuse on the main power wire (Pin 30). The fuse should match the total amperage of your lights. For example, a 15-amp fuse is suitable for up to 180 watts. Connect the wire to the battery positive terminal.
6. Ground Connections
Ground the lights and relay (Pin 85) to a clean metal surface on the Jeep’s frame. A poor ground is a common cause of malfunction.
7. Test The System
Before finishing, use a multimeter to check voltage and continuity. Turn on the switch and confirm all lights work. If something fails, check all connections and fuses.
Common Mistakes To Avoid
Many beginners make these errors:
- Skipping the relay: Direct wiring to the switch can cause overheating and failure.
- Incorrect fuse size: Too large leaves your system unprotected; too small causes nuisance blowing.
- Bad ground: Leads to flickering or non-working lights.
- Using thin wires: Causes voltage drop and possible fire risk.
Always double-check the wiring diagram and match wire gauge to amperage. For reference, 12 AWG handles up to 20 amps safely.
| Wire Gauge | Maximum Amps | Recommended Use |
|---|---|---|
| 16 AWG | 10 | Switch/Relay |
| 14 AWG | 15 | Short runs |
| 12 AWG | 20 | Main power |

Practical Tips For A Reliable Installation
- Use heat-shrink tubing for waterproofing connections.
- Label wires if you plan future upgrades.
- Position the fuse within 6 inches of the battery for best protection.
- Upgrade to LED lights for lower power draw and longer life.
- Test lights at night before final tightening to adjust aim.
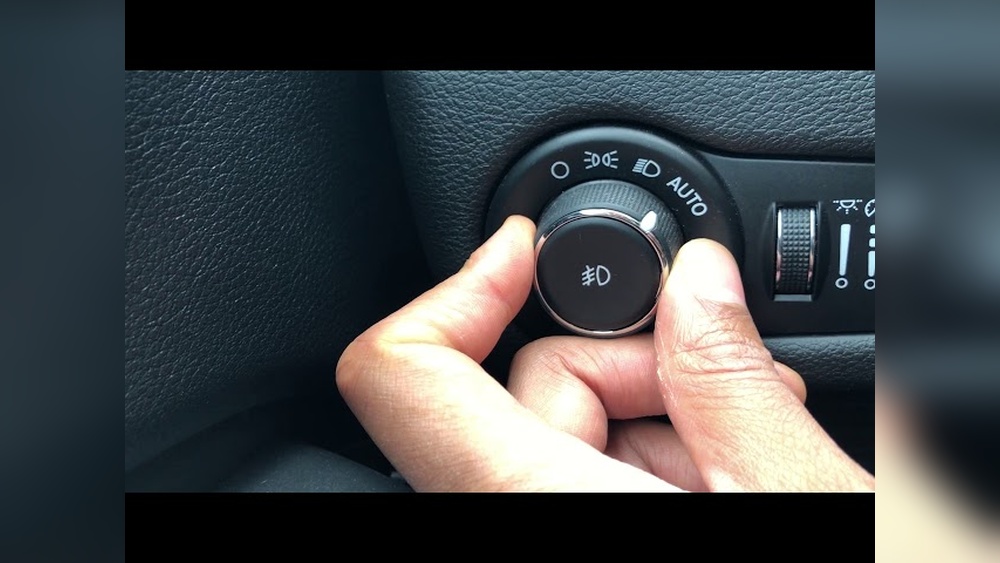
An often-missed insight: Some Jeep models have factory auxiliary switches. If your Jeep has them, you can wire directly to these instead of adding a new switch and relay—saving time and keeping the dash clean. Also, always disconnect the battery before starting to avoid accidental shorts.
Frequently Asked Questions
Can I Wire Multiple Auxiliary Lights To One Switch?
Yes, but make sure the total amperage does not exceed the relay, fuse, and wire capacity. If you plan to run more than three lights, consider separate circuits for safety.
Do I Need A Relay For Led Lights?
Even though LED lights use less power, a relay is still recommended. It protects the switch and wiring, and ensures stable operation.
What Is The Best Place To Mount Auxiliary Lights On A Jeep?
Bumpers, windshield pillars, and roof racks are popular spots. Choose based on your lighting needs and local laws. Always aim lights to avoid blinding other drivers.
How Can I Prevent Water Damage To My Wiring?
Seal all connections using heat-shrink tubing or waterproof connectors. Route wires away from areas prone to water splash.
Are There Legal Restrictions On Auxiliary Lights?
Some states limit the number, placement, or brightness of auxiliary lights. Check your local laws before installation. For more information, visit NHTSA.
Adding auxiliary lights to your Jeep is rewarding and practical. With careful planning and attention to detail, you can achieve professional-quality results. Remember to follow safety guidelines, use the right materials, and avoid common mistakes. Your Jeep will be ready for the trails—and the road ahead.