The 2012 Jeep Patriot serpentine belt is a crucial component that drives many of the vehicle's essential accessories. Understanding its routing and function is vital for proper maintenance and troubleshooting.
This article provides a detailed look at the serpentine belt system for the 2012 Jeep Patriot, including diagrams, explanations of accessory functions, and common issues.
Understanding The Serpentine Belt System
The serpentine belt is a single, continuous belt that snakes around various pulleys, powering multiple accessories. In a 2012 Jeep Patriot, this belt is responsible for operating the power steering pump, alternator, air conditioning compressor, and water pump.
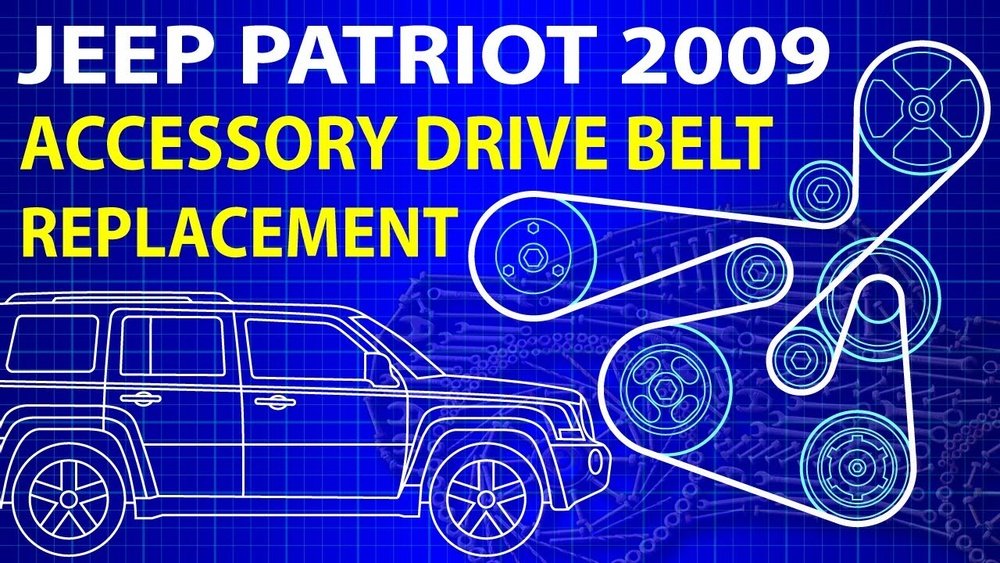
Its continuous movement ensures these systems receive the necessary power to function correctly.
A failure in the serpentine belt can lead to a rapid loss of power for multiple critical systems, potentially leaving you stranded.
Components Driven By The Serpentine Belt
Each accessory connected to the serpentine belt plays a significant role in the overall operation and comfort of your Jeep Patriot.
- Alternator: This is perhaps the most critical component driven by the belt. The alternator’s job is to generate electrical power to run the vehicle’s electrical systems (lights, radio, ignition, etc.) And to recharge the battery while the engine is running. Without a functioning alternator, the battery will quickly drain, and the engine will eventually stall.
- Power Steering Pump: This pump provides hydraulic pressure to assist the driver in turning the steering wheel, making it easier to maneuver the vehicle, especially at low speeds. If the belt driving the power steering pump breaks, steering will become extremely heavy and difficult.
- Air Conditioning (A/C) Compressor: The A/C compressor is responsible for circulating refrigerant within the air conditioning system, allowing you to cool the cabin. While not essential for driving, a broken belt will disable the A/C.
- Water Pump: The water pump circulates coolant through the engine and radiator, preventing the engine from overheating. A serpentine belt failure that stops the water pump will lead to rapid and severe engine overheating, which can cause significant damage.
Why A Serpentine Belt Diagram Is Important
A serpentine belt diagram, often called a belt routing diagram or diagram, shows the path the belt takes around all the pulleys. This diagram is essential for several reasons:
- Installation: When a belt needs to be replaced, the diagram ensures it is routed correctly. Installing it incorrectly will prevent it from driving the accessories and could damage the belt or pulleys.
- Troubleshooting: If you hear unusual noises (like squealing) or notice an accessory isn’t working, the diagram helps identify which pulley the belt might be slipping on or if a pulley is seized.
- Inspection: It helps you visually inspect the belt’s condition along its entire path, looking for cracks, fraying, or glazing.
Serpentine Belt Routing For The 2012 Jeep Patriot
The exact routing of the serpentine belt can vary slightly depending on the engine configuration (e. g.
, 2. 0L or 2.
4L engine). However, the general principle of how it wraps around the pulleys remains consistent.
The diagram below illustrates a common routing for a 2012 Jeep Patriot.
(Please note: As a text-based AI, I cannot directly display an image or diagram. However, I will describe the routing in detail, and you can easily find visual diagrams online by searching for “2012 Jeep Patriot serpentine belt diagram”.)
Common Pulley Locations And Routing Description
Imagine the engine at the front of the vehicle. The serpentine belt is a long loop.
- Crankshaft Pulley: This is typically the largest pulley, located at the bottom front of the engine. The belt usually starts by wrapping around a significant portion of this pulley.
- Power Steering Pump Pulley: This pulley is often located towards the top or side of the engine. The belt will loop from the crankshaft pulley to this one.
- Alternator Pulley: Usually found higher up on the engine, the belt will wrap around the alternator pulley.
- A/C Compressor Pulley: This pulley is typically located lower down, often on the passenger side of the engine. The belt will engage with this pulley.
- Water Pump Pulley: The water pump pulley is often integrated with the water pump housing and can be located in various positions, sometimes towards the front or side of the engine.
- Tensioner Pulley: This is a crucial component. It’s a spring-loaded or hydraulic pulley that keeps the serpentine belt taut. The belt will wrap around this pulley. The tensioner allows the belt to maintain proper tension as it heats up and expands or cools and contracts.
Routing Example (General Description):
Starting from the crankshaft pulley (bottom front), the belt might go up to the alternator pulley, then down to the A/C compressor pulley, then across to the power steering pump pulley, then down to the water pump pulley, and finally around the tensioner pulley before returning to the crankshaft pulley.
This is a simplified example, and the actual path involves precise angles and contact points with each pulley.
The Role Of The Tensioner
The automatic belt tensioner is a vital part of the serpentine belt system. It automatically adjusts the belt’s tension to compensate for wear, temperature changes, and load variations. A failing tensioner can lead to a loose belt, causing squealing noises and eventual slippage or breakage. Conversely, an over-tightened belt (due to a faulty tensioner) can cause premature wear on the belt and bearings of the accessories it drives.
Identifying Your Engine Type
The 2012 Jeep Patriot came with two primary engine options:
- 2.0L DOHC 16V I4 Engine: This is the base engine.
- 2.4L DOHC 16V I4 Engine: This is the optional, larger engine.
While the core function of the serpentine belt is the same for both, the specific layout of the pulleys and therefore the belt routing diagram can differ. Always ensure you are referencing the correct diagram for your specific engine size.
Replacing The Serpentine Belt
Replacing a serpentine belt is a common maintenance task that many DIY enthusiasts can tackle. However, it requires careful attention to detail, especially regarding the correct routing.
Tools And Materials Needed
Before starting, gather the necessary tools and materials:
- New Serpentine Belt: Ensure it’s the correct part number for your 2012 Jeep Patriot’s engine.
- Serpentine Belt Tool Kit: This is highly recommended. It includes a long, flexible wrench or a breaker bar with various socket attachments to engage with the tensioner pulley.
- Socket Set and Ratchet: For removing any covers or components that might obstruct access.
- Gloves: To protect your hands.
- Safety Glasses: To protect your eyes.
- Flashlight or Work Light: For better visibility.
- Serpentine Belt Diagram: Printed or accessible on your phone.
Step-by-step Replacement Guide
- Locate the Belt and Tensioner: Open the hood and identify the serpentine belt and the automatic tensioner pulley. The tensioner usually has a bolt head or a square drive hole on its body or arm.
- Consult the Diagram: Before touching anything, study the serpentine belt diagram for your engine. Take a picture of the existing belt routing if you’re unsure.
- Release Belt Tension: Attach the appropriate socket or tool to the tensioner pulley bolt or drive hole. Apply steady pressure to rotate the tensioner arm, which will loosen the belt. This is the most critical step. You need to move the tensioner in the correct direction (usually counter-clockwise, but check your specific model) to create slack.
- Remove the Old Belt: While holding the tensioner released, carefully slip the old belt off one of the pulleys. Start with a smaller or more accessible pulley if possible. Once it’s off one pulley, you can usually unthread it from the other pulleys.
- Inspect Pulleys: With the belt off, take this opportunity to inspect all the pulleys. Spin each one by hand. They should rotate smoothly and quietly. If you feel any roughness, hear grinding noises, or find a pulley that’s seized, that component likely needs replacement. A seized pulley will quickly destroy a new belt.
- Install the New Belt: Refer to your diagram again. Begin by routing the new belt around most of the pulleys, leaving one easily accessible pulley (often the crankshaft pulley or an idler pulley) for last. Ensure the belt is seated correctly in the grooves of all ribbed pulleys.
- Apply Tension and Seat the Belt: Once the belt is routed around all pulleys except the last one, use your tool to rotate the tensioner again, creating slack. Slip the belt onto the final pulley.
- Release Tensioner Slowly: Carefully release the tensioner. The belt should become taut. Double-check that the belt is properly seated on all pulleys.
- Final Inspection: Visually inspect the belt routing one last time. Ensure it’s centered on all pulleys and not rubbing against any components it shouldn’t be. Start the engine briefly and listen for any unusual noises. If everything sounds normal, you’ve successfully replaced the belt.
Common Mistakes To Avoid
- Incorrect Routing: This is the most common mistake. Always follow the diagram precisely.
- Using the Wrong Belt: Belts have specific lengths and rib configurations. Using the wrong one will cause problems.
- Not Releasing Enough Tension: If you don’t release enough tension, you won’t be able to get the belt onto the last pulley.
- Forcing the Belt: A new belt should generally slide on with proper tension release. Forcing it can damage the belt or pulleys.
- Ignoring Pulley Issues: If a pulley is noisy or seized, replacing the belt alone won’t fix the underlying problem and can lead to further damage.
Signs Of A Failing Serpentine Belt
Regular inspection and awareness of potential symptoms can help you avoid being stranded by a broken serpentine belt.
Audible Clues
- Squealing Noise: This is the most common symptom. A high-pitched squeal, especially noticeable on startup or when accelerating, often indicates a loose belt or a belt slipping on a pulley. This can be due to a worn belt, a weak tensioner, or a pulley that is starting to seize.
- Grinding or Chirping: While less common than squealing, these noises can sometimes indicate a worn belt or issues with a pulley bearing.
Visual Clues
- Cracks and Fraying: Inspect the belt’s surface for any visible cracks, especially across the ribs. Fraying on the edges is another sign of wear.
- Glazing: The belt’s surface may appear shiny or glossy. This “glazing” indicates it has been overheating due to slipping and has lost its grip.
- Missing Ribs: In severe cases, sections of the belt’s ribs can break off.
- Misalignment: If the belt is not running straight on the pulleys, it can be a sign of a misaligned pulley or a damaged tensioner.
Performance Issues
- Loss of Power Steering: If the belt breaks or slips significantly, you’ll notice the steering becoming very heavy.
- Overheating: If the water pump is no longer being driven, the engine temperature gauge will quickly climb into the red.
- Battery Warning Light: If the alternator stops charging the battery due to belt failure, the battery warning light on the dashboard will illuminate.
- A/C Not Working: If the A/C stops blowing cold air, it could be due to the belt slipping or breaking.
Understanding The Tensioner And Idler Pulleys
Beyond the accessories, the serpentine belt system often includes a tensioner pulley and possibly one or more idler pulleys.
The Automatic Belt Tensioner
As mentioned, the automatic belt tensioner is crucial for maintaining the correct belt tension. It typically consists of a spring-loaded or hydraulic mechanism attached to an arm that holds a pulley.
- Spring-Loaded Tensioners: These use the tension of a heavy-duty spring to keep the belt tight. They are common and generally reliable.
- Hydraulic Tensioners: These use hydraulic fluid and a piston to provide a more consistent and controlled tension, especially in demanding applications.
When the tensioner shows signs of wear (leaking fluid, excessive play, or not providing enough tension), it should be replaced along with the belt. A worn tensioner can cause belt slippage, noise, and premature belt failure.
Idler Pulleys
Idler pulleys are essentially smooth or grooved pulleys used to redirect the belt’s path or to increase the belt’s contact surface area on other pulleys. They do not drive any accessories.
- Purpose: They help ensure proper belt wrap around critical pulleys like the crankshaft and water pump, improving efficiency and preventing slippage. They can also be used to take up slack if an automatic tensioner isn’t present or to route the belt in a more complex path.
- Inspection: Like accessory pulleys, idler pulleys should be inspected for smooth rotation and any signs of bearing wear (noise, roughness). A failing idler pulley bearing can seize, leading to belt breakage.
Serpentine Belt Maintenance Schedule
Regular maintenance is key to preventing unexpected failures. While specific recommendations can vary, here’s a general guideline for your 2012 Jeep Patriot.
Recommended Intervals
- Visual Inspection: Check the belt for visible signs of wear (cracks, fraying, glazing) every oil change or at least every 6 months.
- Replacement: Most manufacturers recommend replacing the serpentine belt between 60,000 and 100,000 miles. However, this can vary based on driving conditions (e.g., extreme heat or cold, stop-and-go traffic) and the quality of the belt. It’s always best to consult your owner’s manual for the most accurate recommendation.
- Tensioner and Idler Pulleys: It’s often recommended to replace the tensioner and any idler pulleys when you replace the serpentine belt, especially if they are original components. This proactive approach can save you from a separate breakdown shortly after belt replacement.
Factors Affecting Belt Life
- Heat: Engine bay heat is a major enemy of rubber components. Frequent short trips that involve prolonged idling in traffic can lead to higher operating temperatures.
- Contamination: Leaks of oil, coolant, or power steering fluid onto the belt can degrade the rubber and cause it to slip.
- Misalignment: If any pulley is not perfectly aligned, it will cause uneven wear on the belt.
- Tension: Incorrect belt tension (too loose or too tight) will accelerate wear.